Author Alexander Trost · Read Time 61 minutes · Created Tue Mar 26 21:20:06 2019 · Updated Sat Mar 26 17:28:53 2022
Table of Contents
Welcome!
Quick short introduction to myself, my name is Alexander Trost. I’m a sysadmin who loves automation, containers, coding in Go, playing games but also with new technologies.
I’m currently working at Cloudical as a DevOps Engineer, helping companies move to the cloud and / or to container technologies (e.g., Docker, Kubernetes, etc).
Goal of the Training
The training is going to show how simple it is to get started with containers. In this case Docker is used, as it is the most popular container toolchain and runtime right now.
After getting to know containers and Docker, we will hopefully realize that there is a need for some kind of magical orchestration layer to run applications and more in containers (in an orchestrated way). The important if you haven’t noticed here is the orchestration of containers in an automated and orchestrated manner.
README
If you have any questions or something is unclear during the workshop, please do not hesistate to ask.
RTFM before asking, thanks!
Please before asking though make sure you have read the whole question, task and / or comment, thanks!
Now get ready for day #1 of the training!
Heads up - “Blogger” Words
Grey Boxes: Mostly contain an useful tip, expected command output or something funny.
TASK: Is a refer to a task in the workshop repository.
WDWD: Stands for “What does what do” aka “Me explaining what the things listed below do” (short forms FTW!). I only explain new things in these sections.
The VMs you are given for the training are running Fedora 29 (with Cockpit enabled).
Cockpit is a simple web management, which allows me to “monitor” the VMs and help, if a problem occurs.
Also to note firewalld has been stopped, disabled and removed, iptables and ip6tables have been cleared and rule persistence disabled.
Why are the VMs running Fedora?
That’s simple. Fedora is more up to date, not e.g., like Debian :P
More “up to date” may not mean more stable (for “classical” / legacy applications) but having the latest kernel and other important applications, programs and libraries in their latest versions just makes it easier to run containers.
(Most applications, programs and libraries are available in their latest version from Fedora repositories, meaning that we do not need to begin building and / or downloading binares for applications, programs and libraries which is nice)
Goal of the Day
We are going to learn what containers are, why they have gained so much popularity and what use cases for container there are. After everyone is on the same page of what a container is, we are going to look at Docker, as it is the most common container runtime.
We will look at running and managing containers, and building container images with Docker. docker-compose will also be shown, to demonstrate the simplicity of containers for multi container applications.
This will allow everyone to manage Docker containers and build their own application container images. With that we are ready to dive into enterprise container orchestration with Kubernetes on the next day.
Container and Microservices
Why do people like the “Docker way”?
The “Docker way” is basically just a way to package applications but also simplicity to run the containerized applications. Making it as simple as possible to for example starting a WordPress with database server with only two commands (or one command using docker-compose).
Simpleness that almost everybody, with even very little knowledge about using a shell or cmd, could do it. That’s what makes Docker great but also opens a “dark” side.
The “dark” side being that those people and for example open issues, because they are unable to do basic debugging of an issue on their own and / or ReadTheFuckingManual.
Still overall Docker is a good tool, which started the whole “container” hype.
Thanks to that, all the awesome open source applications using containers, like Open Container Initiative, Kubernetes and many many more.
Micro-what? Microservices!
Microservices are small gears of a big application.
As an example if you have an application which can show the weather, time and stores the per user timezone, one can imagine the following microservices:
Weather Service
Time Service
User Timezone Profile Service
Database
If for example you have many people access the weather service, you could go ahead and scale up / down that single service as needed to accomplish the load.
A MariaDB database, NoSQL database, Redis, etc, can also be seenfor a big application like, e.g., GitLab, WordPress, Magento, PrestaShop, etc.
Due to containers being smaller than VMs developers can test locally with ease and containers are and should be ephemeral. You should never have a problem with a container being deleted and / or recreated because for example you would lose data.
But obviously there is also a plus point for production, if Microservices are done right. When done right, it will allow to scale an application with ease at the pain points.
Meaning, e.g., that if the database is overloaded you would be able to scale it .
Container? Container!
Currently Docker containers can (and will) only allow you to run any distribution that runs on Linux. NO WINDOWS or other bullshit!
Every container runs in it’s own namespace. For this we need to understand how namespaces work.
A namespace is a separated “branch”, where processes, mounts, etc. can exist without disturbing other processes, mounts, etc. in other namespaces.
An advantage of namespaces is, that you can limit the cpu, memory, network, etc. for them. For example, a process that goes rogue, can be limited to specific resource limits.
This diagram should make it clear, how namespaces can create “unlimited” separated and isolated container environments.
Linux cgroups namespaces hierachy - by Shmuel Csaba Otto Traian
Docker and most other containers utilities use namespaces to separate containers from each other. There are several other techniques for kernel namespace separation to further improve security.
A container uses the running Linux kernel of the host, that is why there are less resources used, because a container is just using the existing kernel processes and doesn’t need to spawn processes like that like when using a virtual machine.
Why is it a good idea to use separate namespaces for networked applications? Because if someone breaches for example your webserver, he is just in the container and not on the host server. If you’ll then detect the breach, you just stop the container and would restart it with an updated image version that contains the latest webserver software.
TL;DR
A container is NOT a VM. A container is a “separate” namespace in the container of the host and not like a VM where everything is virtualized for the system, which can then be controlled.
Prepare for the Docker Madness
NOTE
These steps only need to be exeucted the VM which has master in its name, not the other machines.
Side Notes
You can also install Docker on your system or in a VirtualBox. If you use a VirtualBox, please consider using Fedora 29 or anyother linux distro with at least kernel 4.x.
If you are a Windows or Mac OSX user, switch to linux m8, thanks! Just kidding, there are ways like Boot2Docker to run Docker “there” (I don’t help or give any support if you use it though!).
The download and login details to the VMs will be given to you.
Docker System Requirements
The System Requirements are too damn high - Meme
Nope, they’re not! :-D
A Linux-based distribution
Linux Kernel 4.x+
If you are on a RHEL based distribution, the 3.x should also work though a more up to date kernel is preferred.
You can run Docker under any kernel 3.16+, but I recommend you to use a more up to date kernel for the implemented improvements in some of the file system and network systems Docker uses.
Docker Installation
To install Docker run the command:
curl -sSL https://get.docker.com/ -o install-docker.sh
# Look at the install-docker.sh script to make sure there is nothing evil going on
sh install-docker.sh
For more details on the installation of Docker, please refer to the Docker documentation Linux installation docs and select the distribution in the navigation sidebar, or the Windows installation docs.
Docker consistst of the client program docker and the Docker Daemon (dockerd). To keep it simple “that is it”, but there is more behind Docker.
After you have installed it hopefully without any errors popping up, you have to enable and start the Docker Engine:
After making sure Docker is working correctly, continue with either Non-Root User section when you accessing the server as a non-root user or directly to the next section, docker-compose Installation.
Non-Root User
If you are connected as a non-root user, you need to add your user to the docker group. The group name may vary depending on the distribution used.
To add your user to the docker group, you can run the following command:
gpasswd -a $USER docker
Please logout from the server, after you have added yourself to the group.
NOTE
If you are persistent control connections for SSH, you need to terminate those connections as well when you are logged in as the user you just added to the Docker group.
docker-compose Installation
docker-compose Logo
With curl we download the docker-compose binary, then we move docker-compose to your /usr/local/bin that is in your PATH and set the execute permission.
$ sudo curl -L "https://github.com/docker/compose/releases/download/1.24.0/docker-compose-$(uname -s)-$(uname -m)" -o /usr/local/bin/docker-compose
% Total    % Received % Xferd  Average Speed   Time    Time     Time  Current
                               Dload  Upload   Total   Spent    Left  Speed
100   617    0   617    0     0   1226      0 --:--:-- --:--:-- --:--:--  1226
100 15.4M  100 15.4M    0     0  5751k      0  0:00:02  0:00:02 --:--:-- 7099k
$ sudo chmod +x /usr/local/bin/docker-compose
After you have followed the commands above, you can check if the “install” was successfully by running docker-compose version:
$ docker-compose version
docker-compose version 1.23.2, build unknown
docker-py version: 3.7.0
CPython version: 3.7.2
OpenSSL version: OpenSSL 1.1.1b  26 Feb 2019
Clone the workshop repo
Clone the repository, which contains the example and task files, from GitHub https://github.com/galexrt/workshop-container-docker-kubernetes.git. It’ll provide all files and tasks used in the Workshop.
This section will guide you through starting your first container and the process of starting a WordPress container with a MariaDB database container.
Hello World!
Now to start your first container and test your Docker installation, we will start like when learning a new programming language, with a simple example: a “Hello World” container.
To run the “Hello World” container, you just run the following command:
$ docker run hello-world
Unable to find image 'hello-world:latest' locally
latest: Pulling from library/hello-world
1b930d010525: Pull complete
Digest: sha256:2557e3c07ed1e38f26e389462d03ed943586f744621577a99efb77324b0fe535
Status: Downloaded newer image for hello-world:latest

Hello from Docker!
This message shows that your installation appears to be working correctly.

To generate this message, Docker took the following steps:
 1. The Docker client contacted the Docker daemon.
 2. The Docker daemon pulled the "hello-world" image from the Docker Hub.
    (amd64)
 3. The Docker daemon created a new container from that image which runs the
    executable that produces the output you are currently reading.
 4. The Docker daemon streamed that output to the Docker client, which sent it
    to your terminal.

To try something more ambitious, you can run an Ubuntu container with:
 $ docker run -it ubuntu bash

Share images, automate workflows, and more with a free Docker ID:
 https://hub.docker.com/

For more examples and ideas, visit:
 https://docs.docker.com/get-started/
When everything went correct, you should have a similar output and I can now welcome you to the big world of the containers!
Welcome to the Danger Zone! - Taken from MemeGenerator.net
Basic commands you need to know
These are a few basic Docker commands which are useful and important for working with Docker:
docker ps
Displays all currently running containers. To display all containers even containers which are not running anymore, add the -a flag.
Start or stop a container by sending a SIGTERM (15) first and after a timeout of default 10 seconds, a SIGKILL (9) is sent.
Both commands just print out the targeted container(s) name.
Remove a stopped or exited container. Where CONTAINER_NAME_OR_ID is a container ID or name.
$ docker rm my-cool-container
my-cool-container
docker logs CONTAINER_NAME_OR_ID
Show the logs of a container. Where CONTAINER_NAME_OR_ID is a container ID or name.
$ docker logs my-cool-container
[... Many log lines from the my-cool-container application ...]
docker images
List the images with the tags and size which are currently on the Docker host.
$ docker images
REPOSITORY                         TAG                                          IMAGE ID            CREATED             SIZE
fedora-emacs                       latest                                       f8f91b022f8c        About an hour ago   965MB
wordpress                          5.1-php7.1-apache                            bfb3e0bc8467        3 days ago          412MB
golang                             1.12.2-stretch                               c7942203692b        3 days ago          774MB
busybox                            1.30.1-glibc                                 d5d8c9fc06a4        7 days ago          4.46MB
centos                             7                                            9f38484d220f        3 weeks ago         202MB
mariadb                            10.4.3-bionic                                9057231b8afe        4 weeks ago         379MB
fedora                             29                                           d7372e6c93c6        7 weeks ago         275MB
docker run
Create and start a container. This comnmand will be shown extensively in the next section.
docker run --help

Usage:	docker run [OPTIONS] IMAGE [COMMAND] [ARG...]

Run a command in a new container

Options:
      --add-host list                  Add a custom host-to-IP mapping (host:ip)
  -a, --attach list                    Attach to STDIN, STDOUT or STDERR
      --blkio-weight uint16            Block IO (relative weight), between 10 and 1000, or 0 to disable (default 0)
      --blkio-weight-device list       Block IO weight (relative device weight) (default [])
      --cap-add list                   Add Linux capabilities
      --cap-drop list                  Drop Linux capabilities
      --cgroup-parent string           Optional parent cgroup for the container
      --cidfile string                 Write the container ID to the file
      --cpu-period int                 Limit CPU CFS (Completely Fair Scheduler) period
      --cpu-quota int                  Limit CPU CFS (Completely Fair Scheduler) quota
      --cpu-rt-period int              Limit CPU real-time period in microseconds
      --cpu-rt-runtime int             Limit CPU real-time runtime in microseconds
  -c, --cpu-shares int                 CPU shares (relative weight)
      --cpus decimal                   Number of CPUs
      --cpuset-cpus string             CPUs in which to allow execution (0-3, 0,1)
      --cpuset-mems string             MEMs in which to allow execution (0-3, 0,1)
  -d, --detach                         Run container in background and print container ID
      --detach-keys string             Override the key sequence for detaching a container
      --device list                    Add a host device to the container
      --device-cgroup-rule list        Add a rule to the cgroup allowed devices list
      --device-read-bps list           Limit read rate (bytes per second) from a device (default [])
      --device-read-iops list          Limit read rate (IO per second) from a device (default [])
      --device-write-bps list          Limit write rate (bytes per second) to a device (default [])
      --device-write-iops list         Limit write rate (IO per second) to a device (default [])
      --disable-content-trust          Skip image verification (default true)
      --dns list                       Set custom DNS servers
      --dns-option list                Set DNS options
      --dns-search list                Set custom DNS search domains
      --entrypoint string              Overwrite the default ENTRYPOINT of the image
  -e, --env list                       Set environment variables
      --env-file list                  Read in a file of environment variables
      --expose list                    Expose a port or a range of ports
      --group-add list                 Add additional groups to join
      --health-cmd string              Command to run to check health
      --health-interval duration       Time between running the check (ms|s|m|h) (default 0s)
      --health-retries int             Consecutive failures needed to report unhealthy
      --health-start-period duration   Start period for the container to initialize before starting health-retries countdown (ms|s|m|h) (default 0s)
      --health-timeout duration        Maximum time to allow one check to run (ms|s|m|h) (default 0s)
      --help                           Print usage
  -h, --hostname string                Container host name
      --init                           Run an init inside the container that forwards signals and reaps processes
  -i, --interactive                    Keep STDIN open even if not attached
      --ip string                      IPv4 address (e.g., 172.30.100.104)
      --ip6 string                     IPv6 address (e.g., 2001:db8::33)
      --ipc string                     IPC mode to use
      --isolation string               Container isolation technology
      --kernel-memory bytes            Kernel memory limit
  -l, --label list                     Set meta data on a container
      --label-file list                Read in a line delimited file of labels
      --link list                      Add link to another container
      --link-local-ip list             Container IPv4/IPv6 link-local addresses
      --log-driver string              Logging driver for the container
      --log-opt list                   Log driver options
      --mac-address string             Container MAC address (e.g., 92:d0:c6:0a:29:33)
  -m, --memory bytes                   Memory limit
      --memory-reservation bytes       Memory soft limit
      --memory-swap bytes              Swap limit equal to memory plus swap: '-1' to enable unlimited swap
      --memory-swappiness int          Tune container memory swappiness (0 to 100) (default -1)
      --mount mount                    Attach a filesystem mount to the container
      --name string                    Assign a name to the container
      --network string                 Connect a container to a network (default "default")
      --network-alias list             Add network-scoped alias for the container
      --no-healthcheck                 Disable any container-specified HEALTHCHECK
      --oom-kill-disable               Disable OOM Killer
      --oom-score-adj int              Tune host's OOM preferences (-1000 to 1000)
      --pid string                     PID namespace to use
      --pids-limit int                 Tune container pids limit (set -1 for unlimited)
      --privileged                     Give extended privileges to this container
  -p, --publish list                   Publish a container's port(s) to the host
  -P, --publish-all                    Publish all exposed ports to random ports
      --read-only                      Mount the container's root filesystem as read only
      --restart string                 Restart policy to apply when a container exits (default "no")
      --rm                             Automatically remove the container when it exits
      --runtime string                 Runtime to use for this container
      --security-opt list              Security Options
      --shm-size bytes                 Size of /dev/shm
      --sig-proxy                      Proxy received signals to the process (default true)
      --stop-signal string             Signal to stop a container (default "SIGTERM")
      --stop-timeout int               Timeout (in seconds) to stop a container
      --storage-opt list               Storage driver options for the container
      --sysctl map                     Sysctl options (default map[])
      --tmpfs list                     Mount a tmpfs directory
  -t, --tty                            Allocate a pseudo-TTY
      --ulimit ulimit                  Ulimit options (default [])
  -u, --user string                    Username or UID (format: <name|uid>[:<group|gid>])
      --userns string                  User namespace to use
      --uts string                     UTS namespace to use
  -v, --volume list                    Bind mount a volume
      --volume-driver string           Optional volume driver for the container
      --volumes-from list              Mount volumes from the specified container(s)
  -w, --workdir string                 Working directory inside the container
As we can see docker run has a lot of flags, to choose from. These flags allow to “configure” how the container should created.
NOTE
Most of these flags are also available for docker create, which can be used to create containers but not start them.
In this workshop we are only covering the basic flags, you should know to begin with.
So we are going to focus on the usage part first:
$ docker run –help
Usage: docker run [OPTIONS] IMAGE [COMMAND] [ARG…]
Run a command in a new container
>**WDWD**>*`[OPTIONS]`- Run flags for the container to be run.
*`IMAGE`- The name of the Container image tousefor the container.
*`[COMMAND] [ARG ...]`- Depending on the images, `COMMAND`and`ARG`s will be used either as arguments oras the command + arguments by the so called "entrypoint" of the container.
I'm going in depth about image names, command args and entrypoint later on in ["Understanding Dockerfiles"](#Understanding-Dockerfiles).
### Starting the MariaDB database server
We are going to use the "official" MariaDB Container image from the Docker Hub.
So we will now specify that image as the `IMAGE` argument in our `docker run` command now:
```console
docker run \
mariadb:10.4.3-bionic
When running this command the first time, Docker will pull the image from the Docker Hub and then create the container from it.
But as we have not given any configuration details for it, the “entrypoint” script exits with an error telling us that we need to specify certain environment variables.
The “entrypoint” script is the “first” thing to be executed when the container is started, which happens automatically when using docker run.
The output should look something like this:
$ docker run \
   mariadb:10.4.3-bionic
Unable to find image 'mariadb:10.4.3-bionic' locally
10.4.3-bionic: Pulling from library/mariadb
898c46f3b1a1: Pull complete
63366dfa0a50: Pull complete
041d4cd74a92: Pull complete
6e1bee0f8701: Pull complete
0fa9bfc0c84b: Pull complete
8e9b088fe106: Pull complete
af96bccda5c4: Pull complete
0655ee57b408: Pull complete
58e50a9049b1: Pull complete
57cd7839e491: Pull complete
23d8b0c94134: Pull complete
4aaa8cd60ac7: Pull complete
052f0d0b139f: Pull complete
78d717e43484: Pull complete
Digest: sha256:fb69aaa343a69826d4fb00809b8eb340a660cec3651a946dfd87f2113e0af627
Status: Downloaded newer image for mariadb:10.4.3-bionic
error: database is uninitialized and password option is not specified
  You need to specify one of MYSQL_ROOT_PASSWORD, MYSQL_ALLOW_EMPTY_PASSWORD and MYSQL_RANDOM_ROOT_PASSWORD
What is the container named? Can the Docker daemon read our mind and has already named database? A random name is given to the container, and thankfully no.
When a container is started and no name is given, it will receive a randomly generated name. It is an actual name and not just some bits and bytes mashed in a mixer, that would be the container id.
In the Basic commands you need to know section we have learned about the docker ps command. Now we are going to use it to learn more about it and get the name and id of the first try at a mariadb container.
$ docker ps
CONTAINER ID        IMAGE               COMMAND             CREATED             STATUS              PORTS               NAMES
What’s that? No container in the list of running containers. Due to the missing configuration as seen in the above logs the container is not running anymore and has terminated itself.
The docker ps command has a flag called -a which will show us all container, even those not running anymore:
$ docker ps -a
CONTAINER ID        IMAGE                   COMMAND                  CREATED              STATUS                          PORTS               NAMES
7864ef7db36a        mariadb:10.4.3-bionic   "docker-entrypoint.s…"   About a minute ago   Exited (1) About a minute ago                       recursing_bell
In this case the container (short) ID is 7864ef7db36a and the generated name is recursing_bell, to change that so that we can target the container more easily we are going to give the container a name in the next section.
Our MariaDB database server container should have a name, right? When not specifying a name for the container it will get a randomized name.
Every container gets an unique ID and randomized name. We can set / override the name with the --name=NAME flag.
Let’s name it “database”.
Before running the command again, let’s first add a name to the container and add some configuration to it. The configuration part will be done in the next section though.
Adding a name to a container is as simple as adding another flag to the docker run command, example:
docker run \
    --name=database \
    mariadb:10.4.3-bionic
This gives the container the name database, which makes it easier to target the container and simplifies later processes, like connecting from the upcoming WordPress container to the MariaDB database server container.
How would one configure the MariaDB database server container?
One big questions will be for you, “How can I configure the MariaDB database server?” in the container.
You can..
A) use config files
or
B) use environment variables (portable and the best way).
The most portable way is to use environment variables.
Most containers that are configured through environment variables, have a script, the entrypoint, that sets config variables and a lot more, before the main application / program is started.
In the case of the mariadb container image the following environment variables are available for configuration:
MYSQL_USER - Database User to create. User will be given access to the database(s) from MYSQL_DATABASE.
MYSQL_PASSWORD - Password for the given database user.
MYSQL_DATABASE - Database to create and gain access to the username given in MYSQL_USER.
MYSQL_ROOT_PASSWORD - Root user password for database server.
MYSQL_ROOT_HOST - Root user allowed host (range) for database server.
And more to configure the database more granular..
To specify an environment variable, the --env (or -e short form) flag can be used:
*sarcasm on* 100% secure passwords used here *sarcasm off*
Use secure passwords when running in production!
openssl rand -base64 64, can be used to generate a “secure” passwords.
Does the container keep on running or do I need something like screen or what?!
If you run the command to start the container, upon start you see some log output coming, but should notice that when closing the terminal, the database container will be immediately stopped (run docker ps -a to see all containers).
When you docker run a container, by default your current stdin and stdout will be attached to the container, making it “interactive” (If you want an interactive container, you should still add --interactive flag, so it is clear from that).
If you want as for most applications, like database, web, cache and so on server application, you can disable the attachment of stdin and stdout by adding the --detach (or short -d) flag to the command. To view logs of the detached container you can normally use docker logs CONTAINER_NAME_OR_ID.
Have you already run into errors where Docker is telling you that a container with the same exists? You need to delete exited / stopped containers with the docker rm CONTAINER_NAME_OR_ID command (where CONTAINER_NAME_OR_ID would be, is the name or ID of the container, e.g., database), this “clears” their name and removes the container.
The command to delete the container named database is like this:
$ docker rm database
database
NOTE
On success it will print out the name of the container(s) stopped.
How do I save the database data outside the container?
You want to save your data outside of the container, for a simple reason: If you stop and delete the container, your data is gone. For this Docker has volumes.
A Volume is like a mount from the host system inside the container.
The volume flag is --volume (or -v). The syntax of the volume flag is for example:
docker run \
[...]
    -v HOST_PATH:CONTAINER_PATH:MODE \
[...]
WDWD
HOST_PATH - Path to mount from the host system inside the container.
CONTAINER_PATH - “Mount” destination path in the container.
:MODE - Optional. Can be rw (read-write), ro (read-only), z / Z cause files to be SELinux relabeled on the path. Default is rw.
NOTE
If the host path doesn’t exist it’ll get created.
The host path can be a file too.
Docker doesn’t distinguish between file or folder. If the path doesn’t exist, a directory always get’s created.
Running the MariaDB database server container
Now we have all components, we need for running the MariaDB container.
When we have put everything we learned now together, we should get something that looks like this:
-v /opt/docker/wordpress/mysql:/var/lib/mysql - Mount /opt/docker/wordpress/mysql directory of the host to inside the container at /var/lib/mysql.
mariadb:10.4.3-bionic - Specifies what image to use.
If you run the run command with the --detach (or -d), it’ll just return the unique (long) ID of the container.
With docker logs CONTAINER (where CONTAINER is a container ID or name), you’ll get the logs of the first process in the container.
How do you execute a command / get a shell inside a container?
Let’s check the MariaDB server if the wanted wordpress database has been created. For that we need to execute a command inside the database container.
To execute a command inside a container, for example in the MariaDB database container for, e.g., maintenance access.
The following mysql command will execute the SHOW DATAbASE query which lists the existing databases:
mysql -u root -p -e "SHOW DATABASES;"
The command docker exec can be used to execute a separate command inside a container.
Running docker exec --help will shows the help menu:
EXAMPLE
$ docker exec --help

Usage:	docker exec [OPTIONS] CONTAINER COMMAND [ARG...]

Run a command in a running container

Options:
  -d, --detach               Detached mode: run command in the background
      --detach-keys string   Override the key sequence for detaching a container
  -e, --env list             Set environment variables
  -i, --interactive          Keep STDIN open even if not attached
      --privileged           Give extended privileges to the command
  -t, --tty                  Allocate a pseudo-TTY
  -u, --user string          Username or UID (format: <name|uid>[:<group|gid>])
  -w, --workdir string       Working directory inside the container
To run a command interactively for example opening an interactive MariaDB shell session, the command would be:
-t - Optional. Allocate a pseudo-TTY (pseudo TeleTYpewriter) to the shell / command run.
CONTAINER - Container ID or name of the container the command should be executed in.
mysql -u root -p - The command and arguments for the command to execute inside the container.
You can also use the --detach (or -d) option to exec the command non-interactively inside the container with no logs or exit code).
When running the above docker exec command, be sure to enter the MySQL root user password when prompted for it.
NOTE
To be able to run a command in the container, the command / binary / file has to exist in the container! Also to note that when the command / binary is not in the containers PATH, you must give the full absolute path to it.
Summary of what we did so far
We now have a MariaDB 10.4.3 container running which is configured to create a database named wordpress with a user named wordpress and password wordpress.
Now we are going to move on to create the WordPress container which will use the database container.
Starting the WordPress container
So you now already know some “basics”, about starting containers. I’m not going in depth with every little thing anymore.
How can the WordPress container and the MariaDB container communicate with each other?
Got network communication for your containers?
(Original photo taken from pexels.com Free stock photo site)
In Docker in general by default all containers can talk to each other, if they know the IP address.
NOTE There is an option for the Docker daemon that is called Inter Container Communication (ICC) --icc=[true/false], default true, but disabling this may have other implications than just stopping ICC communication too.
So now to make sure the WordPress container can talk to the MariaDB container, we could use the IP address of the MariaDB container. To get the IP address of the container we can use docker inspect CONTAINER_OR_IMAGE (where CONTAINER_OR_IMAGE is the unique ID or name of the container). docker inspect command will return a JSON output with “all” informations about the given container(s), but is also working for Docker containers image(s) (docker images).
But it would be too much work to keep the IP address up to date, when the container gets a new IP address! That is where the “Docker Networking” feature comes into play.
So to be able to use this Docker Networking feature, we need to create a network for the application containers.
This can be done using docker network create command:
OPTIONS - Options for the docker network create command.
NETWORK_NAME - The name of the network to be created.
Running the following command, will create a new network in Docker which means there is a new network device on the server created too:
docker network \
    create \
    wordpress
This new network device can be seen in the output below:
EXAMPLE
$ docker network create wordpress
4cc4efd905ff369efdf691dfe9d20c7c55775e628ccb57cc3fdac499785ea05b
$ ip addr show
1: lo: <LOOPBACK,UP,LOWER_UP> mtu 65536 qdisc noqueue state UNKNOWN group default qlen 1000
    link/loopback 00:00:00:00:00:00 brd 00:00:00:00:00:00
    inet 127.0.0.1/8 scope host lo
       valid_lft forever preferred_lft forever
    inet6 ::1/128 scope host
       valid_lft forever preferred_lft forever
2: enp4s0: <BROADCAST,MULTICAST,UP,LOWER_UP> mtu 1500 qdisc fq_codel state UP group default qlen 1000
[...]
3: docker0: <NO-CARRIER,BROADCAST,MULTICAST,UP> mtu 1500 qdisc noqueue state DOWN group default
    link/ether 02:42:d1:cc:07:47 brd ff:ff:ff:ff:ff:ff
    inet 172.17.0.1/16 brd 172.17.255.255 scope global docker0
       valid_lft forever preferred_lft forever
    inet6 fe80::42:d1ff:fecc:747/64 scope link
       valid_lft forever preferred_lft forever
4: br-4cc4efd905ff: <NO-CARRIER,BROADCAST,MULTICAST,UP> mtu 1500 qdisc noqueue state DOWN group default
    link/ether 02:42:90:e4:8d:a1 brd ff:ff:ff:ff:ff:ff
    inet 172.18.0.1/16 brd 172.18.255.255 scope global br-4cc4efd905ff
       valid_lft forever preferred_lft forever
Network - resolv.conf and hostnames
As we are talking about network, let’s take a quick look at the resolv.conf and hostnames.
Running the following commands will show you the resolv.conf and hostname of the container (output below the WDWD explanation):
$ docker run \
-it \
--rm \
--entrypoint=/bin/bash \
wordpress:5.1-php7.1-apache
$ hostname
$ cat /etc/hosts
$ exit# The `--rm` flag takes care of removing the container then, so no need to manually delete the container
WDWD
--rm - Causes the container to be deleted when stopped / exited.
--entrypoint=/bin/bash - This overwrites the command executed (as proccess number #1 in the container), when the container is started.
Every container is getting a random hostname, you can override the hostname of a container using the --hostname=HOSTNAME flag for docker run / docker create. As a general note your application should try to not rely on the hostname too much, that can also be important for later on with Kubernetes.
root@7c329dddc849:/var/www/html# cat /etc/resolv.conf
# Generated by NetworkManager
search lan
nameserver 172.16.1.1
The resolv.conf is partially passed through from the host system. Meaning that in this example 172.16.1.1 is the address of the local nameserver I’m using (172.16.1.1/24 is the network range the host is in).
The /etc/hosts file is generated per container and has the hostname of the container as an entry in it. As we can see the hostname does not resolve to 127.0.0.1, where everyone feels at home, but to the IP of the container (depending on who you ask this is good or bad, to be left uncommented).
Let’s connect the database container to the wordpress network
There are two choices to connect the database container to the wordpress network:
Stop, delete and create the database container again but now with the --net=wordpress flag added to the docker run command:
The command connects the database container to the wordpress network, that we previously created.
Now that the database container is in the wordpress network, we can go ahead and begin to start the WordPress instance.
Running the WordPress container
To configure our WordPress container, the Container image comes with extra environment variables.
The WordPress container image name is wordpress (Docker Hub - WordPress Image) and the tag for now is 5.1-php7.1-apache.
The possible environment variables for the configuration are the following ones:
WORDPRESS_DB_HOST=... - Set to database so it will connect to the database container.
WORDPRESS_DB_USER=... - Set to wordpress as we have configured the database container to create a user with name wordpress.
WORDPRESS_DB_PASSWORD=... - Set to wordpress as we have configured the database container to create the wordpress user with password wordpress.
WORDPRESS_MYSQL_DATABASE=... - Set to wordpress as we have configured the database container to create a database wordpress for the wordpress user.
WORDPRESS_AUTH_KEY=..., WORDPRESS_SECURE_AUTH_KEY=..., WORDPRESS_LOGGED_IN_KEY=..., WORDPRESS_NONCE_KEY=..., WORDPRESS_AUTH_SALT=..., WORDPRESS_SECURE_AUTH_SALT=..., WORDPRESS_LOGGED_IN_SALT - These need to be set to a secure random value; in production use different random values per variable.
And other ones which are “optional” in regards to getting the WordPress container up’n’running.
The command to run the WordPress container should look like this now:
--net=wordpress - Put the container inside the wordpress network, we created earlier.
--name=wordpress - Gives the container the name wordpress.
-e ...=... - Specifies environment variables, that are used for configuration.
wordpress:5.1-php7.1-apache - Specifies what image to use.
Now execute the command and you should be able to see the WordPress installation screen at http://IP_ADDRESS_OF_THE_SERVER:80.
NOTE
All data inside the container, will be lost on removal of the container! In our case, we already use volumes, so don’t worry.
For cleanup you now stop and delete the containers.
To stop the wordpress , run docker stop CONTAINER (where CONTAINER in this case is wordpress). After stopping the container, you can remove it with docker rm CONTAINER.
The container has to be stopped, before it can be removed.
How can the WordPress container be reached from the outside world now?
Right now it can’t but we can change this by making the webserver port (80) available to the “public”, by publishing / exposing the port(s).
That is what the --publish (or -p) flag is used for, in this format:
HOST_ADDRESS: - Optional. By default 0.0.0.0. Address to expose the port on the host system.
HOST_PORT - Host port to expose the container port on.
CONTAINER_PORT - Container port to expose.
/PROTOCOL - Optional. By default tcp. The port protocol, currently can be tcp or udp.
And that’s how you forward / publish ports from the container to the outside.
Summary of what we did so far
You should now be able to list containers, start up container, create a network for your containers and be able to access them from the “outside”.
Please make sure to stop and / or remove stopped / terminated containers.
Now that we looked into some of most important beginner topics of Docker, we are going to take a look deeper into these topics.
Data, Data everywhere!
Data Data everywhere! Meme - Made with Imgur Memegen
Volumes aka Mounts
Volumes add persistence to your data. When a container is stopped and removed, the data in the container is lost.
With a volume you would mount the part of the data out of the container. For example with our MariaDB container, we would mount the container path /var/lib/mysql/ (contains the MariaDB databases) somewhere safe.
So if the MariaDB server inside the container should ever crash and the container then be terminated, you can just fire up with the docker start command or delete the container and execute the docker run command again. The MariaDB container then starts using the data where it exited.
I already showed the option, but here is it again (Long form --volume=):
docker run \
[OPTIONS]
    -v HOST_PATH:CONTAINER_PATH:MODE
[IMAGE] [ARGUMENTS]
WDWD
HOST_PATH - Path to mount from the host system inside the container.
CONTAINER_PATH - “Mount” destination path in the container.
:MODE - Is optional. Can be rw (read-write) or ro (read-only). Defaults to rw.
TL;DR
-v HOST_PATH:CONTAINER_PATH allows you to store data from containers on the host.
NOTE
When the host path doesn’t exist, it will be created. BUT the permissions will be a bit “freaky”, when the path get’s created on the host, the directory will be (by default) owned by root:root, directory permissions drwxr-xr-x.
docker volume command
Docker nowadays also allows to create volumes for containers locally but also through available storage drivers.
Through plugins for the Docker Engine you can access multiple different storage systems / softwares.
A list of volume plugins can be found here: Docker Engine Documentation - Volume Plugins.
This in general is pretty useful as the Docker engine takes care to provide a volume for your container(s), but in regards to the second day when we start to run Kubernetes we will see that Docker doesn’t matter too much anymore with such features.
To mention it already there is a new interface for requesting / “managing” storage, which is named Container Storage Interface (CSI). The goal of CSI is to have an unified interface through which anyone can request storage. Mounting of the requested storage is done by the storage dependent CSI driver then.
Data containers aka --volumes-from (DEPRECATED)
NOTE
I do NOT recommend this method as I often enough “accidentally” clear all exited / dead containers, so my disk space doesn’t run out.
I also have cron jobs running on my servers, that clean exited containers. Meaning data containers would just get cleared out everytime.
You can store data inside another container, that’s called data volume containers.
When creating an image, you can specify those volumes. You create a container that has a volume “built-into” (Specified while the image was built), meaning that assuming it is our MariaDB server image the in-built volume would be located at /var/lib/mysql
The data volume container runs “nothing”, it is just there for purpose of getting used by another container. For this you change the entrypoint with the following run option --entrypoint=COMMAND (where command could be just /bin/true) so the container stops and doesn’t run the program it should.
Now that we would have a data container, we can use the volumes from this container using the --volumes-from=CONTAINER (where CONTAINER is a container name or ID) option.
Let’s assume we have a data container, created from the example here, with the volume /data and we have a second container, running the same image, that would save the data to /data.
In this case using the --volumes-from option would write the data inside the first container, the data container.
I personally don’t recommend data container for data sharing, as I find it a bad practice to store data inside a ephemeral container.
Networking
Brace Yourself Network Stuff Incoming - Made using Imgur Memegen
NATing your way into my container
I’m not going to explain NAT in-depth here.
Network Address Translation (NAT) allows multiple devices to sit behind the same IP address.
Docker creates iptables rules to allow traffic to the container.
Over seven bridges you must go (docker0 bridge and veth interfaces)
By default Docker creates a bridge called docker0, that is used as a bridge to your “normal” network interface(s) (e.g., eth0, en0, etc).
The docker0 bridge tries to find an unoccupied network range, mostly from the 172.17.0.1/16 IP range as a network. This IP address range will be used, to assign every container a separate IP.
Sometimes the bridge address range needs to be adjusted, even though Docker tries it’s “best” to find a free IP range. In most cases when you are running Docker in a corporate network, get in touch with your network team to ask for a “free range”.
NOTE
To manually override the Docker bridge address, you can add the --bip=192.168.1.0/24 (where 192.168.1.0/24 is an unused IP range) to your Docker Daemon flags in the Systemd Unit file or through the “config” files, e.g., on Debian based systems /etc/default/docker or on RHEL based systems /etc/sysconfig/docker or /etc/sysconfig/docker-network.
EXAMPLEdocker0 interface
$ ip addr show docker0
4: docker0: <NO-CARRIER,BROADCAST,MULTICAST,UP> mtu 1500 qdisc noqueue state DOWN group default
link/ether 02:42:d1:cc:07:47 brd ff:ff:ff:ff:ff:ff
inet 172.17.0.1/16 brd 172.17.255.255 scope global docker0
valid_lft forever preferred_lft forever
inet6 fe80::42:d1ff:fecc:747/64 scope link
valid_lft forever preferred_lft forever
When a container is created, a `veth` interface will be created (depending on the network mode, [next section](#network-modes-default-host-or-other)). The `veth` interface will have an unique name.
`veth` stands for virtual ethernet device and it will be connected to the `docker0` bridge, to acquire network connectivity.
The veth interface will notshow the IP address whenusing tools like`ip addr show`or`ifconfig`on the host, but you are able to see the IP inside the container.
>**EXAMPLE**`veth` interface of container from host
>```auto
$ ip addr show veth9af2aa6
138: veth9af2aa6@if137: <BROADCAST,MULTICAST,UP,LOWER_UP> mtu 1500 qdisc noqueue master br-4cc4efd905ff state UP groupdefault link/ether be:e2:72:ce:72:1b brd ff:ff:ff:ff:ff:ff link-netnsid 0 inet6 fe80::bce2:72ff:fece:721b/64 scope link
valid_lft forever preferred_lft forever
Previously we also had it about other networks / bridges in regards to docker network commands. When running docker network create a new bridge will be created which has its “own” IP range as can been seen in the example output.
EXAMPLEdocker network create “normal” bridge on host
$ ip addr show br-4cc4efd905ff
104: br-4cc4efd905ff: <BROADCAST,MULTICAST,UP,LOWER_UP> mtu 1500 qdisc noqueue state UP group default
    link/ether 02:42:90:e4:8d:a1 brd ff:ff:ff:ff:ff:ff
    inet 172.18.0.1/16 brd 172.18.255.255 scope global br-4cc4efd905ff
       valid_lft forever preferred_lft forever
    inet6 fe80::42:90ff:fee4:8da1/64 scope link
       valid_lft forever preferred_lft forever
You can view the IP address and much more information of containers, using docker inspect CONTAINER_NAME:
#### Multi Machine Network
Docker Swarm, which is the "clustered" mode /"version" of Docker, can allow you tocreate an overlay network, between multiple machines. But I'm not going deeper into this here.
For people interested in this feature, see the [Docker Docs `network create`](https://docs.docker.com/engine/reference/commandline/network_create/).
#### IPv6
'State of IPv6 and containers' - Image taken from Cheezburger.com
> _Let's not talk about that, okay ..?_
With Docker itself it isnot too much of a problem touse IPv6, but sadly not too optimal.
You can have IPv4 and IPv6, but let's concern ourselves with that when we are looking at Kubernetes. Reason for looking at this topic first in Kubernetes is that, in Kubernetes you won't really use the networking of Docker anymore.
### Network modes ("default", host or other)
I've wrote, that I'm not going deeper into Docker's own (overlay) network feature, but with this topic, I'll have to go into it just a bit.
When running a container in the default network mode (named `default`, `--net=default`). The `default` network mode causes every container to get a separate network interface / stack.
There is also the network mode `host` available bydefault. The `host` network mode gives the host network stack aka "full access to the network of the host system" inside the container.
The `--net` flag can also take a name of a network which has been created using the `docker network` command, e.g, as used in the example `wordpress`as the network name `--net=wordpress`.
>**NOTE**>>For the upcoming example outputs, the `docker0` bridge uses the `172.17.0.1/16`!The below snippet shows how the contaienr inside network looks for"default" (/ unspecified) network mode:
>**EXAMPLE**>```console
HOST $ docker run -it debian:jessie ip addr show1: lo: <LOOPBACK,UP,LOWER_UP> mtu 65536 qdisc noqueue state UNKNOWN groupdefault qlen 1000 link/loopback 00:00:00:00:00:00 brd 00:00:00:00:00:00 inet 127.0.0.1/8 scope host lo
valid_lft forever preferred_lft forever
141: eth0@if142: <BROADCAST,MULTICAST,UP,LOWER_UP> mtu 1500 qdisc noqueue state UP groupdefault link/ether 02:42:ac:11:00:02 brd ff:ff:ff:ff:ff:ff
inet 172.17.0.2/16 brd 172.17.255.255 scope global eth0
valid_lft forever preferred_lft forever
As you can see the container is getting an IP from the docker0 bridge.
What about using the host’s network with --net=host?
EXAMPLE
$ docker run -it –net=host debian:jessie ip addr show
1: lo: <LOOPBACK,UP,LOWER_UP> mtu 65536 qdisc noqueue state UNKNOWN group default qlen 1000
link/loopback 00:00:00:00:00:00 brd 00:00:00:00:00:00
inet 127.0.0.1/8 scope host lo
valid_lft forever preferred_lft forever
inet6 ::1/128 scope host
valid_lft forever preferred_lft forever
2: enp4s0: <BROADCAST,MULTICAST,UP,LOWER_UP> mtu 1500 qdisc fq_codel state UP group default qlen 1000
link/ether REDACTED brd ff:ff:ff:ff:ff:ff
inet 172.16.1.99/24 brd 172.16.1.255 scope global noprefixroute dynamic enp4s0
valid_lft 5204sec preferred_lft 5204sec
inet6 REDACTED/64 scope global noprefixroute dynamic
valid_lft 86396sec preferred_lft 14396sec
inet6 fe80::800b:52b6:865b:5444/64 scope link noprefixroute
valid_lft forever preferred_lft forever
4: docker0: <NO-CARRIER,BROADCAST,MULTICAST,UP> mtu 1500 qdisc noqueue state DOWN group default
link/ether 02:42:d1:cc:07:47 brd ff:ff:ff:ff:ff:ff
inet 172.17.0.1/16 brd 172.17.255.255 scope global docker0
valid_lft forever preferred_lft forever
inet6 fe80::42:d1ff:fecc:747/64 scope link
valid_lft forever preferred_lft forever
104: br-4cc4efd905ff: <BROADCAST,MULTICAST,UP,LOWER_UP> mtu 1500 qdisc noqueue state UP group default
link/ether 02:42:90:e4:8d:a1 brd ff:ff:ff:ff:ff:ff
inet 172.18.0.1/16 brd 172.18.255.255 scope global br-4cc4efd905ff
valid_lft forever preferred_lft forever
inet6 fe80::42:90ff:fee4:8da1/64 scope link
valid_lft forever preferred_lft forever
138: veth9af2aa6@if137: <BROADCAST,MULTICAST,UP,LOWER_UP> mtu 1500 qdisc noqueue master br-4cc4efd905ff state UP group default
link/ether be:e2:72:ce:72:1b brd ff:ff:ff:ff:ff:ff
inet6 fe80::bce2:72ff:fece:721b/64 scope link
valid_lft forever preferred_lft forever
The container is getting full access to the host's network stack when using `--net=host`.
The `br-4cc4efd905ff` interface is the `wordpress` network previously created.
> **WARNING**
>
> This means that there are no namespaces between the host's network stack and the container!>> A container running with`--net=host` can potentially shutdown your server.
> Only use`--net=host`when you know what you are doing and what the implications are.
Just for comparsion here the `ip addr show` output directly from the host to compare it with the above output from the container.
>**EXAMPLE**>```console
HOST $ ip addr show1: lo: <LOOPBACK,UP,LOWER_UP> mtu 65536 qdisc noqueue state UNKNOWN groupdefault qlen 1000 link/loopback 00:00:00:00:00:00 brd 00:00:00:00:00:00 inet 127.0.0.1/8 scope host lo
valid_lft forever preferred_lft forever
inet6 ::1/128 scope host
valid_lft forever preferred_lft forever
2: enp4s0: <BROADCAST,MULTICAST,UP,LOWER_UP> mtu 1500 qdisc fq_codel state UP groupdefault qlen 1000 link/ether REDACTED brd ff:ff:ff:ff:ff:ff
inet 172.16.1.99/24 brd 172.16.1.255 scope global dynamic noprefixroute enp4s0
valid_lft 5188sec preferred_lft 5188sec
inet6 REDACTED/64 scope global dynamic noprefixroute
valid_lft 86395sec preferred_lft 14395sec
inet6 fe80::800b:52b6:865b:5444/64 scope link noprefixroute
valid_lft forever preferred_lft forever
4: docker0: <NO-CARRIER,BROADCAST,MULTICAST,UP> mtu 1500 qdisc noqueue state DOWN groupdefault link/ether 02:42:d1:cc:07:47 brd ff:ff:ff:ff:ff:ff
inet 172.17.0.1/16 brd 172.17.255.255 scope global docker0
valid_lft forever preferred_lft forever
inet6 fe80::42:d1ff:fecc:747/64 scope link
valid_lft forever preferred_lft forever
104: br-4cc4efd905ff: <BROADCAST,MULTICAST,UP,LOWER_UP> mtu 1500 qdisc noqueue state UP groupdefault link/ether 02:42:90:e4:8d:a1 brd ff:ff:ff:ff:ff:ff
inet 172.18.0.1/16 brd 172.18.255.255 scope global br-4cc4efd905ff
valid_lft forever preferred_lft forever
inet6 fe80::42:90ff:fee4:8da1/64 scope link
valid_lft forever preferred_lft forever
138: veth9af2aa6@if137: <BROADCAST,MULTICAST,UP,LOWER_UP> mtu 1500 qdisc noqueue master br-4cc4efd905ff state UP groupdefault link/ether be:e2:72:ce:72:1b brd ff:ff:ff:ff:ff:ff link-netnsid 0 inet6 fe80::bce2:72ff:fece:721b/64 scope link
valid_lft forever preferred_lft forever
Publishing ports
Docker creates iptables rules so published (/ exposing) ports are reachable from the host itself but also from the outside.
In the below example output below, all iptables rules are shown that are created when one container is publishing / exposing port 3000/TCP:
As we can see Docker uses a separate DOCKER chain in the FORWARD chain, to map incoming traffic on port 80 to the container IP.
After the destination IP has been changed, Docker uses DNAT (Destination Network Address Translation), to “map” the traffic to the container’s end address.
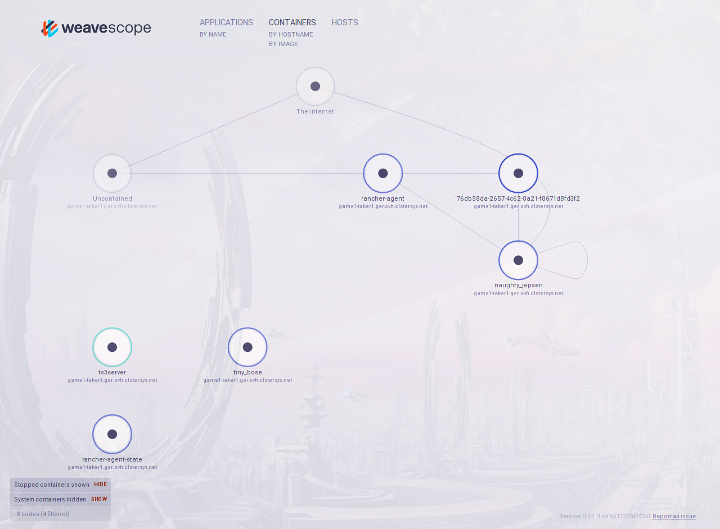
Do you want to visualize your container network situation? Yes? Then the perfect tool for this is Weave Scope.
In the network101 task is a file called start_weave_scope.sh. The script downloads the Weave Scope wrapper script, that starts the containers needed for Weave Scope to function.
The commands that are used to download the Weave Scope wrapper script are:
After the image of the container has been pulled and started, you can then navigate to http://IP_ADDRESS_OF_THE_SERVER:4040 to see the Weave Scope UI.
Weave Scope UI
Through the Weave Scope UI you gain an immersive insight into your network of the containers.
Limiting container resources
It's OK I know my limit - said the rogue process
As I already mentioned in the Container!? part, namespaces are able to limit the resources available to processes, etc.
CPU Limit
Limiting the precious computing resource of a container.
$ docker run --help
[...]
  --cpu-period                    Limit CPU CFS (Completely Fair Scheduler) period
  --cpu-quota                     Limit CPU CFS (Completely Fair Scheduler) quota
  --cpuset-cpus                   CPUs in which to allow execution (0-3, 0,1)
[...]
You can limit the time period and the quota of the CFS (Completely Fair Scheduler).
Limiting a container to specific cores is also possible (--cpuset-cpus).
Memory and Swap Limit
$ docker run --help
[...]
  --cpuset-mems                   MEMs in which to allow execution (0-3, 0,1)
[...]
  --kernel-memory                 Kernel memory limit
[...]
  --memory-reservation            Memory soft limit
  --memory-swap                   Swap limit equal to memory plus swap: '-1' to enable unlimited swap
  --memory-swappiness=-1          Tune container memory swappiness (0 to 100)
[...]
  --oom-kill-disable              Disable OOM Killer
  --oom-score-adj                 Tune host's OOM preferences (-1000 to 1000)
[...]
As you can see, there is a good amount of option to play around with the memory a container can use and how it can use the memory.
A good feature if you have limited memory available is to play with the memory swappiness.
The OOM (Linux Out of Memory Management) options are good, if you have memory intensive applications, but only limited memory available. So important application container don’t get killed, when the system should run out of memory.
Selfies? I mean Images
An image is the core of a container. Without an image, there would be no container.
Creating images is simple to do, depending on what you try to “containerize”.
In this part we set a simple goal. Our goal is to create a container that runs nginx in it.
Image Names explained
Images that “come” from the Docker Image Hub, don’t need a repository specified.
The image we used for the MariaDB container is:
mariadb:10.4.3-bionic
WDWD
sameersbn - The username of the creator.
mysql - The image name.
latest - The “version” tag. The tag can be anything, but emojis.
An example for an image that is pulled from a different image server, than the official Docker Hub, is my Prometheus DellHW Exporter image that is hosted on quay.io:
quay.io, SERVER - Defaults to docker.io. The image repository server to pull the image from.
galexrt, USERNAME - Username of the image author / uploader.
dellhw_exporter, IMAGE_NAME - Name of the image.
v1.3.5, TAG - Like git tags. When not specified, the default is latest.
In the case of official created images, like the WordPress image we used no server and username is required (by default).
Official images are “marked” by not having a username in the image “address”. When browsing such iamges on Docker Hub, the URL does have an underscore instead of a username, e.g., https://hub.docker.com/_/wordpress/.
What have Layer Cakes to do with Container Images?
In the Docker universe, a Container image is built from the bottom to the top like a cake, the bottom is a baseimage (or any other image as a base).
Every “new” layer on top of it, is an action that had been run when building the image.
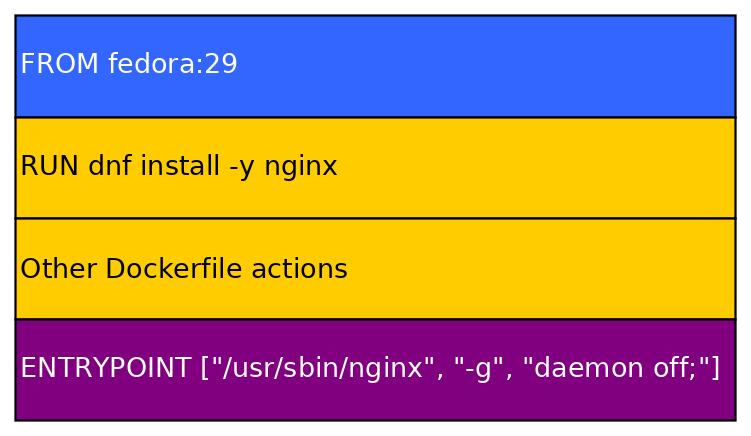
Meaning if we create an image from the baseimage fedora:29 like the example Dockerfile, a cross-section / profile would look like this:
Dockerfile Steps / Container Image Layers
That is one of the reasons, why Container images are so small. If you download 10 images that are based on debian:jessie, you would only have to download the created / modified layers, because the baseimage is the same for these 10 images.
To build / create an image, you create a Dockerfile and that’s what we are going to talk about next.
Dockerfile examples
As you may have already seen in the current task directory dockerfile101, there is a file called Dockerfile.
A Dockerfile contains container image build instructions. Dockerfiles have their own syntax, but the syntax is pretty simple.
I’m going to show you two more or less advanced Dockerfile examples in the next section, one for a Golang and one for a Python application.
Golang application with Dependency Dockerfile Example
If you have trouble writing a Dockerfile, checkout the Dockerfile Docs for the full “syntax”.
You will create an image with nginx installed (You can later expand it, with more functionality, like with PHP-FPM).
To guide you in creating a nginx image, I show you an example of a http webserver application written in golang, before you are going to create your own nginx image.
Golang Dockerfile Example:
# golang image where workspace (GOPATH) configured at /go.
FROM golang:1.12.2-stretch

# Add a label to the image so everyone knows who is maintaing it.
LABEL maintainer="John Doe <john.doe@example.com>"

# Copy the local package files to the container’s workspace.
ADD . /go/src/github.com/galexrt/workshop-container-docker-kubernetes

# Build the project inside the container.
RUN go install github.com/galexrt/workshop-container-docker-kubernetes

# Run the  command when the container starts.
ENTRYPOINT ["/go/bin/workshop-container-docker-kubernetes"]

# http server listens on port 8080.
EXPOSE 8080
WDWD
FROM ... - Sets the baseimage.
LABEL ...=... - Labels to add to the image, in key value pairs (KEY=VALUE).
COPY ... ... - Copy files from the build root.
ADD ... ... - Same as COPY, but target can be “online” and if it is an archive, it will be extracted.
RUN ... - Run commands (Shell used /bin/sh).
ENTRYPOINT ["..."] - The command to execute when the container is started.
CMD ["..."] - Arguments for the ENTRYPOINT.
EXPOSE 8080/TCP NUMBER/PROTOCOL... - Expose a port (This is important when linking containers together, as otherwise the port would not reachable from the other containers). Protocol can be TCP or UDP.
There’s even the possibility, to execute specific commands when the image is used as a base image, the base instruction is called ONBUILD ..., but explaining this is beyond the scope of this training. Thanks for understanding!
The ONBUILD instruction adds to the image a trigger instruction to be executed at a later time, when the image is used as the base for another build. The trigger will be executed in the context of the downstream build, as if it had been inserted immediately after the FROM instruction in the downstream Dockerfile.
To build an image we use the docker build command. Building this golang example image, we run the following command:
docker build -f Dockerfile -t workshop-gowebapp .
WDWD
build - Used to build Container images.
-t IMAGE_NAME - Specify the name (with an optional tag) of the image, you are creating. IMAGE_NAME is a string name for the image with an optional tag specified. The tag is added by adding double dots like this :TAG_NAME. This flag in itself is optional.
NOTE This options is useful when manually building and pushing a Container image to a repository, so you can specify the name of the image as you want.
-f DOCKERFILE - Set the location of the Dockerfile (Optional).
. - The image build root of the image build (Important when ADD or COPY is used in the Dockerfile). All files will be at least added to the build environment for easy access, but not added to the image itself.
As you can see, it isn’t hard to build your first Container images.
If you want to see more advanced examples, you can find more examples in my GitHub repositories here.
Commands you need to know when working with Container images
Listing the Container images
To list the Container images, use the docker images command:
docker images
The command can also take a name of an image, but then it will only show quick overview of the given image.
Deleting a Container image
To delete a Container image, you use the docker rmi command. The syntax is basically the same as for the docker rm command:
docker rmi IMAGE [IMAGE...]
WDWD
rmi - The subcommand for deleting one or more image(s).
IMAGE [IMAGE...] - One or more image names or IDs to delete.
-t IMAGE_NAME - More details to IMAGE_NAME are going to be explained in a later section, here or see above WDWD part.
DOCKERFILE - Path to a Dockerfile. Defaults to the current work directory with Dockerfile attached as a file name.
BUILD_PATH - The build root path. Files in the directory will be added to the Docker build environment, but not to the image itself. The files are only added when the specified Dockerfile has instructions to do so. You can’t go deeper than the BUILD_PATH!
Let’s build your first Container image
Now that we know some Dockerfile basics, we can start building our own nginx image from the baseimage debian:jessie.
Let’s make this like a test in the school, replace all __BLANK__ with the correct answer (Solutions are here):
FROM __BLANK__

RUN __BLANK__

ENTRYPOINT ["__BLANK__"]
Got all blanks filled out? Good. Let’s build the image:
docker build -t workshop-nginx .
Expected Output of docker build -t workshop-nginx .
The build should go successfully, when you filled in the blanks correctly. Let's run the image to see if it is working, the container name will be `workshop-nginx`:

```console
docker run \
    --name=workshop-nginx \
    -d \
    -p 80:80 \
    workshop-nginx
If you did something wrong, remove the container using (where CONTAINER_NAME is a container ID or name):
docker rm CONTAINER_NAME
To check if the container is running with your image, run docker ps -a.
WDWD
ps - Like the ps command, but for the containers.
-a - Show all containers, whether their current state, without it showing only running containers.
You should see that the container you started, has exited.
There’s a simple reason, why the container exited / stopped. When running a command as the entrypoint, it has to stay running, not fork to background. When the process forks to background, Docker will think the process has stopped and the container status will be set to exited with the last return code.
That’s why we need to tell nginx, not to run as a daemon, not fork to background, with the following additional arguments "-g", "daemon off;" (these arguments must be added to the ENTRYPOINT line of the Dockerfile).
So we could make a change to the nginx.conf, overwrite nginx.conf with a custom one or just change the ENTRYPOINT line to make it look like this:
ENTRYPOINT ["nginx", "-g", "daemon off;"]
Let’s rebuild the image (same docker build command) and run it again. Open http://IP_ADDRESS_OF_THE_SERVER:8080 in your browser and voilà it should show the nginx default page.
To go further with your created image, let’s “mount” a volume inside the container with our own index.html.
Use the index.html from task dockerfile202 or create one yourself.
Now we add a volume to the container. Add -v "$(pwd)":"/usr/share/nginx/html" to the docker run command, but don’t forget add the argument before the image name.
Your command should look like this:
This starts a container named workshop-nginx running the image workshop-nginx with a volume mounted at /usr/share/nginx/html.
Run the command and if everything went well after a few seconds, you can now open http://IP_ADDRESS_OF_THE_SERVER:8080 in the browser. You should see the contents of the previously created index.html. Well done!
How can this help in the development workflow?
If you are for example creating a new CMS written in PHP, you could create a Dockerfile for it so that a Container image can be created for it.
On every push to the git repository of the project, the image could be built and automatic checks could be run, to ensure every feature is working fine.
For example Travis CI has switched big parts of their build infrastructure to Docker containers.
Quoting Travis CIsome headings from their blog post:
Builds start in seconds
Faster builds
More available resources in a build container
Better network capacity, availability and throughput
Easier to scale
As we can see, containers can be better than VMs depending on the use case.
Due to the lower resource usage, containers are good for the development workflow, making it faster and cheaper in the end.
“Composing” containers together with docker-compose
Making multi container applications easier to start
To remove the process of typing all docker run and so on, commands to start the containers, docker-compose has been created.
docker-compose makes it easy peasy lemon squeezy to run one to many containers using one command.
The syntax of a docker-compose.yml is YAML. As it is just YAML, you can basically just use a YAML syntax checker, e.g., Online YAML Parser.
In our example with WordPress we will create a docker-compose.yml for our MariaDB database server, WordPress and as an extra we’ll add phpMyAdmin to it too.
Create the docker-compose.yml file. I made this part like a test again, so you can see where you have knowledge holes, replace all __BLANK__ with the correct answer (the solution is available in the docker-compose-solution.yml file of task compose101):
image: - Defines the used image for the container.
links: [] - A list of container links.
ports: [] - A list of published ports.
environment: [] - Key / Value list of environment variables (Format: NAME: VALUE).
I have also added the environment variables DB_REMOTE_ROOT_NAME and DB_REMOTE_ROOT_PASS, so that Admin can access the MariaDB server.
Networking Changes
As you might have spotted the above docker-compose file does not have anything related to which network to use in it.
That is because docker-compose creates a network based on the “project name” by default, meaning that there is no need in our case to create another network.
Starting our multi container applications with one command
To run / start the content of the filled out docker-compose.yml (if you are too lazy to fill out the file, use the docker-compose-solutions.yml) run:
docker-compose -f docker-compose.yml up
WDWD
docker-compose - The docker-compose command.
-f DOCKER_COMPOSE_YML - Optional. Defaults to docker-compose.yml. DOCKER_COMPOSE_YML is a path to a valid docker-compose file.
up - Starts the containers defined in the given docker-compose file.
EXAMPLE
$ docker-compose up # no need for -f DOCKER_COMPOSE_YML flag as the default file is used docker-compose.yml
Creating compose101_database_1 … done
Creating compose101_phpmyadmin_1 … done
Creating compose101_wordpress_1 … done
Attaching to compose101_database_1, compose101_phpmyadmin_1, compose101_wordpress_1
phpmyadmin_1 | phpMyAdmin not found in /var/www/html - copying now…
wordpress_1 | WordPress not found in /var/www/html - copying now…
phpmyadmin_1 | Complete! phpMyAdmin has been successfully copied to /var/www/html
wordpress_1 | Complete! WordPress has been successfully copied to /var/www/html
phpmyadmin_1 | /usr/lib/python2.7/site-packages/supervisor/options.py:461: UserWarning: Supervisord is running as root and it is searching for its configuration file in default locations (including its current working directory); you probably want to specify a “-c” argument specifying an absolute path to a configuration file for improved security.
phpmyadmin_1 | ‘Supervisord is running as root and it is searching '
phpmyadmin_1 | 2019-04-07 22:17:35,638 CRIT Supervisor is running as root. Privileges were not dropped because no user is specified in the config file. If you intend to run as root, you can set user=root in the config file to avoid this message.
phpmyadmin_1 | 2019-04-07 22:17:35,638 INFO Included extra file “/etc/supervisor.d/nginx.ini” during parsing
phpmyadmin_1 | 2019-04-07 22:17:35,638 INFO Included extra file “/etc/supervisor.d/php.ini” during parsing
phpmyadmin_1 | 2019-04-07 22:17:35,646 INFO RPC interface ‘supervisor’ initialized
phpmyadmin_1 | 2019-04-07 22:17:35,646 CRIT Server ‘unix_http_server’ running without any HTTP authentication checking
phpmyadmin_1 | 2019-04-07 22:17:35,646 INFO supervisord started with pid 1
wordpress_1 | [07-Apr-2019 22:17:35 UTC] PHP Warning: mysqli::__construct(): (HY000/2002): Connection refused in - on line 22
wordpress_1 |
wordpress_1 | MySQL Connection Error: (2002) Connection refused
database_1 | 2019-04-07 22:17:35 0 [Note] mysqld (mysqld 10.4.3-MariaDB-1:10.4.3+maria~bionic) starting as process 1 …
database_1 | 2019-04-07 22:17:35 0 [Note] InnoDB: Using Linux native AIO
database_1 | 2019-04-07 22:17:35 0 [Note] InnoDB: Mutexes and rw_locks use GCC atomic builtins
database_1 | 2019-04-07 22:17:35 0 [Note] InnoDB: Uses event mutexes
database_1 | 2019-04-07 22:17:35 0 [Note] InnoDB: Compressed tables use zlib 1.2.11
database_1 | 2019-04-07 22:17:35 0 [Note] InnoDB: Number of pools: 1
database_1 | 2019-04-07 22:17:35 0 [Note] InnoDB: Using SSE2 crc32 instructions
database_1 | 2019-04-07 22:17:35 0 [Note] mysqld: O_TMPFILE is not supported on /tmp (disabling future attempts)
database_1 | 2019-04-07 22:17:35 0 [Note] InnoDB: Initializing buffer pool, total size = 256M, instances = 1, chunk size = 128M
database_1 | 2019-04-07 22:17:35 0 [Note] InnoDB: Completed initialization of buffer pool
database_1 | 2019-04-07 22:17:35 0 [Note] InnoDB: If the mysqld execution user is authorized, page cleaner thread priority can be changed. See the man page of setpriority().
database_1 | 2019-04-07 22:17:35 0 [Note] InnoDB: 128 out of 128 rollback segments are active.
database_1 | 2019-04-07 22:17:35 0 [Note] InnoDB: Creating shared tablespace for temporary tables
database_1 | 2019-04-07 22:17:35 0 [Note] InnoDB: Setting file ‘./ibtmp1’ size to 12 MB. Physically writing the file full; Please wait …
database_1 | 2019-04-07 22:17:35 0 [Note] InnoDB: File ‘./ibtmp1’ size is now 12 MB.
database_1 | 2019-04-07 22:17:35 0 [Note] InnoDB: 10.4.3 started; log sequence number 139845; transaction id 21
database_1 | 2019-04-07 22:17:35 0 [Note] InnoDB: Loading buffer pool(s) from /var/lib/mysql/ib_buffer_pool
database_1 | 2019-04-07 22:17:35 0 [Note] Plugin ‘FEEDBACK’ is disabled.
database_1 | 2019-04-07 22:17:35 0 [Note] Server socket created on IP: ‘::’.
database_1 | 2019-04-07 22:17:35 0 [Warning] ‘proxies_priv’ entry ‘@% root@81494c3919ba’ ignored in –skip-name-resolve mode.
database_1 | 2019-04-07 22:17:35 0 [Note] InnoDB: Buffer pool(s) load completed at 190407 22:17:35
database_1 | 2019-04-07 22:17:36 0 [Note] Reading of all Master_info entries succeded
database_1 | 2019-04-07 22:17:36 0 [Note] Added new Master_info ’’ to hash table
database_1 | 2019-04-07 22:17:36 0 [Note] mysqld: ready for connections.
database_1 | Version: ‘10.4.3-MariaDB-1:10.4.3+maria~bionic’ socket: ‘/var/run/mysqld/mysqld.sock’ port: 3306 mariadb.org binary distribution
phpmyadmin_1 | 2019-04-07 22:17:36,648 INFO spawned: ‘php-fpm’ with pid 21
phpmyadmin_1 | 2019-04-07 22:17:36,649 INFO spawned: ’nginx’ with pid 22
phpmyadmin_1 | [07-Apr-2019 22:17:36] NOTICE: fpm is running, pid 21
phpmyadmin_1 | [07-Apr-2019 22:17:36] NOTICE: ready to handle connections
phpmyadmin_1 | 2019-04-07 22:17:37,671 INFO success: php-fpm entered RUNNING state, process has stayed up for > than 1 seconds (startsecs)
phpmyadmin_1 | 2019-04-07 22:17:37,671 INFO success: nginx entered RUNNING state, process has stayed up for > than 1 seconds (startsecs)
wordpress_1 | AH00558: apache2: Could not reliably determine the server’s fully qualified domain name, using 172.19.0.4. Set the ‘ServerName’ directive globally to suppress this message
wordpress_1 | AH00558: apache2: Could not reliably determine the server’s fully qualified domain name, using 172.19.0.4. Set the ‘ServerName’ directive globally to suppress this message
wordpress_1 | [Sun Apr 07 22:17:38.927887 2019] [mpm_prefork:notice] [pid 1] AH00163: Apache/2.4.25 (Debian) PHP/7.1.28 configured – resuming normal operations
wordpress_1 | [Sun Apr 07 22:17:38.927939 2019] [core:notice] [pid 1] AH00094: Command line: ‘apache2 -D FOREGROUND’
[…]
Insert Apache access logs of the WordPress and / or phpMyAdmin stance being access
[…]
^CGracefully stopping… (press Ctrl+C again to force)
Stopping compose101_wordpress_1 … done
Stopping compose101_phpmyadmin_1 … done
Stopping compose101_database_1 … done
After running the command, you should see log output startingto fill your terminal. To stop the started containers press `CTRL+C`.
Again aswith a single container, to detach the container into background when running `docker-compuse up`, add the the `--detach` (or`-d`) flag.
## Basic `docker-compose` commands
There are some `docker-compose` commands you should know when working with the `docker-compose` command.
### Stopping all containers run by the current `docker-compose` file
Instead of the `up`, you just put `stop` there. Stops the containers from the current `docker-compose` file:
```console
docker-compose stop -t TIMEOUT
WDWD
stop - Stop subcommand.
-t TIMEOUT - Optional. Timeout to wait for the containers to exit, before the containers get killed.
Deleting all containers from the current docker-compose file
Replacing the up with rm, deletes all containers that are started by the current docker-compose file, but now are stopped or exited:
docker-compose -f DOCKER_COMPOSE_YML rm --force
WDWD
rm - Subcommand to remove / delete all container started by the selected docker-compose file.
--force - Optional. Forces the removal of the containers.
Restarting all container started by the current docker-compose file
Restarts all containers that are started or have exited by the current docker-compose file.
This just stops and starts the containers again. It does not delete and create the containers again.
docker-compose -f DOCKER_COMPOSE_YML restart
WDWD
restart - Subcommand to stop and then start all containers of the selected docker-compose file.
The task directory contains some other docker-compose.yml files for you to play around with. Look at the docker-compose.ymls, realize what they do and run ’em.
TIP
Keep the -f DOCKERFILE option in mind, when dealing with multiple docker-compose.yml as in this case in specific.
Let me know if you run into any issues, during “play time” with docker-compose.
Summary of the Day
If you are reading this, you have made it to the end of day #1. Well done, sir or madam, have a cookie!
Here is a Cookie (from Memegen)
I hope everyone had a good time during the training’s first day and has taken new knowledge with them already.
If you have any feedback about the training itself or the materials, please let me know in person or email me at me AT galexrt DOT moe.

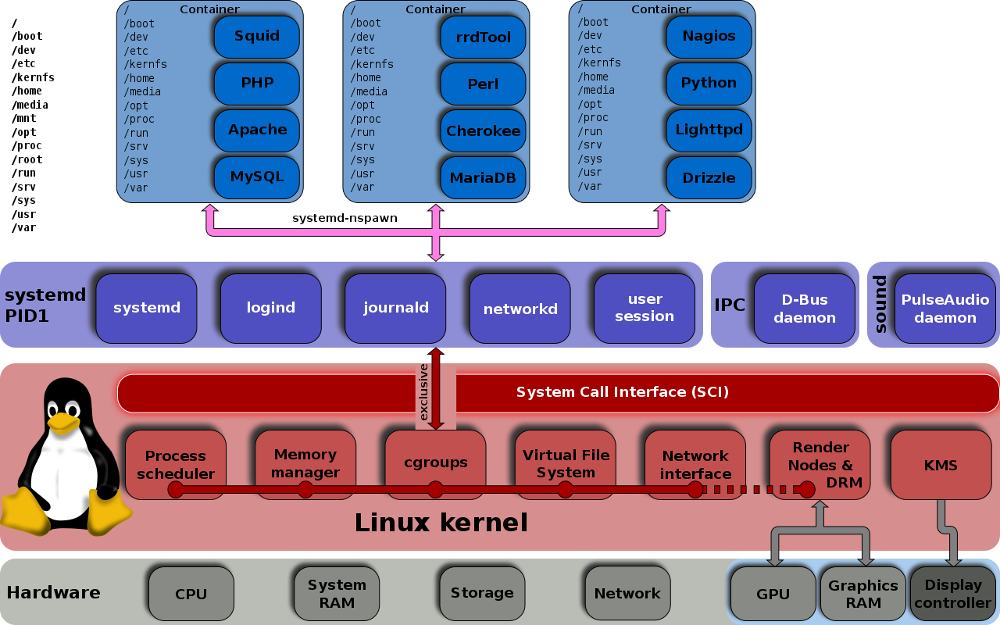

