Table of Contents
Intro
This post shows how you can use Keycloak with SAML 2.0 as an OmniAuth Provider for GitLab (CE and EE).
Please note that these settings are tested only with GitLab CE 10.x.x and above.
GitLab EE edition should probably work too, additionally offers more control features like Admin groups, “User must be in group/role to be able to login”, etc.
If you haven’t heard of Keycloak yet, checkout their website at: Keycloak.org. In short Keycloak is an Open Source Identity and Access Management that allows SSO, uses standard protocols like OpenID Connect, OAuth 2.0 and SAML 2.0, it also has other very interesting features available.
Requirements
- Running and working Keycloak instance(s)
- Keycloak knowledge on an intermediate level
- Keycloak admin access (you need permissions to create a client in a realm of choice)
- Running GitLab instance
- Access to the GitLab’s instance configuration files
Step 1 - Create SAML Client in Keycloak
NOTE
Replace
gitlab.edenmal.moewith your actual GitLab hostname, examplemy-gitlab.edenmal.moe.
Go to the Clients page and click the Create button in the right upper corner.
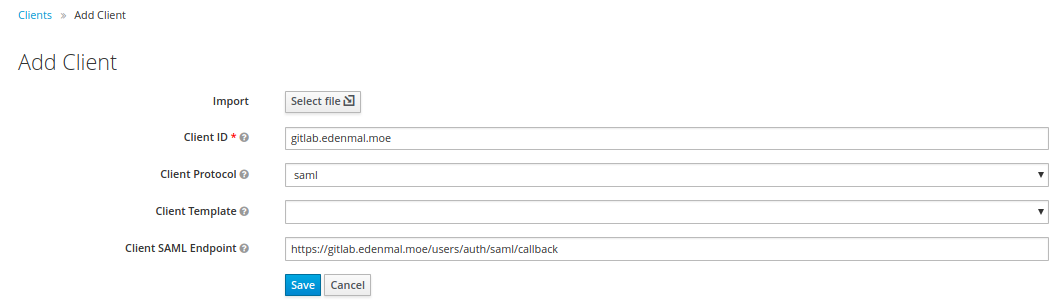
Keycloak - Add Client form
The configuration of the SAML client will be done in Step 2 - Configure SAML Client in Keycloak.
Step 2 - Configure SAML Client in Keycloak
In this step the configuration of the created Keycloak SAML client will be done. If you aren’t on the client configuration page of your created SAML client yet, navigate to it now.
Settings Tab
NOTE
Replace
gitlab.edenmal.moewith your actual GitLab hostname, examplemy-gitlab.edenmal.moe.
The next screenshots contains the settings you need to set on your client.
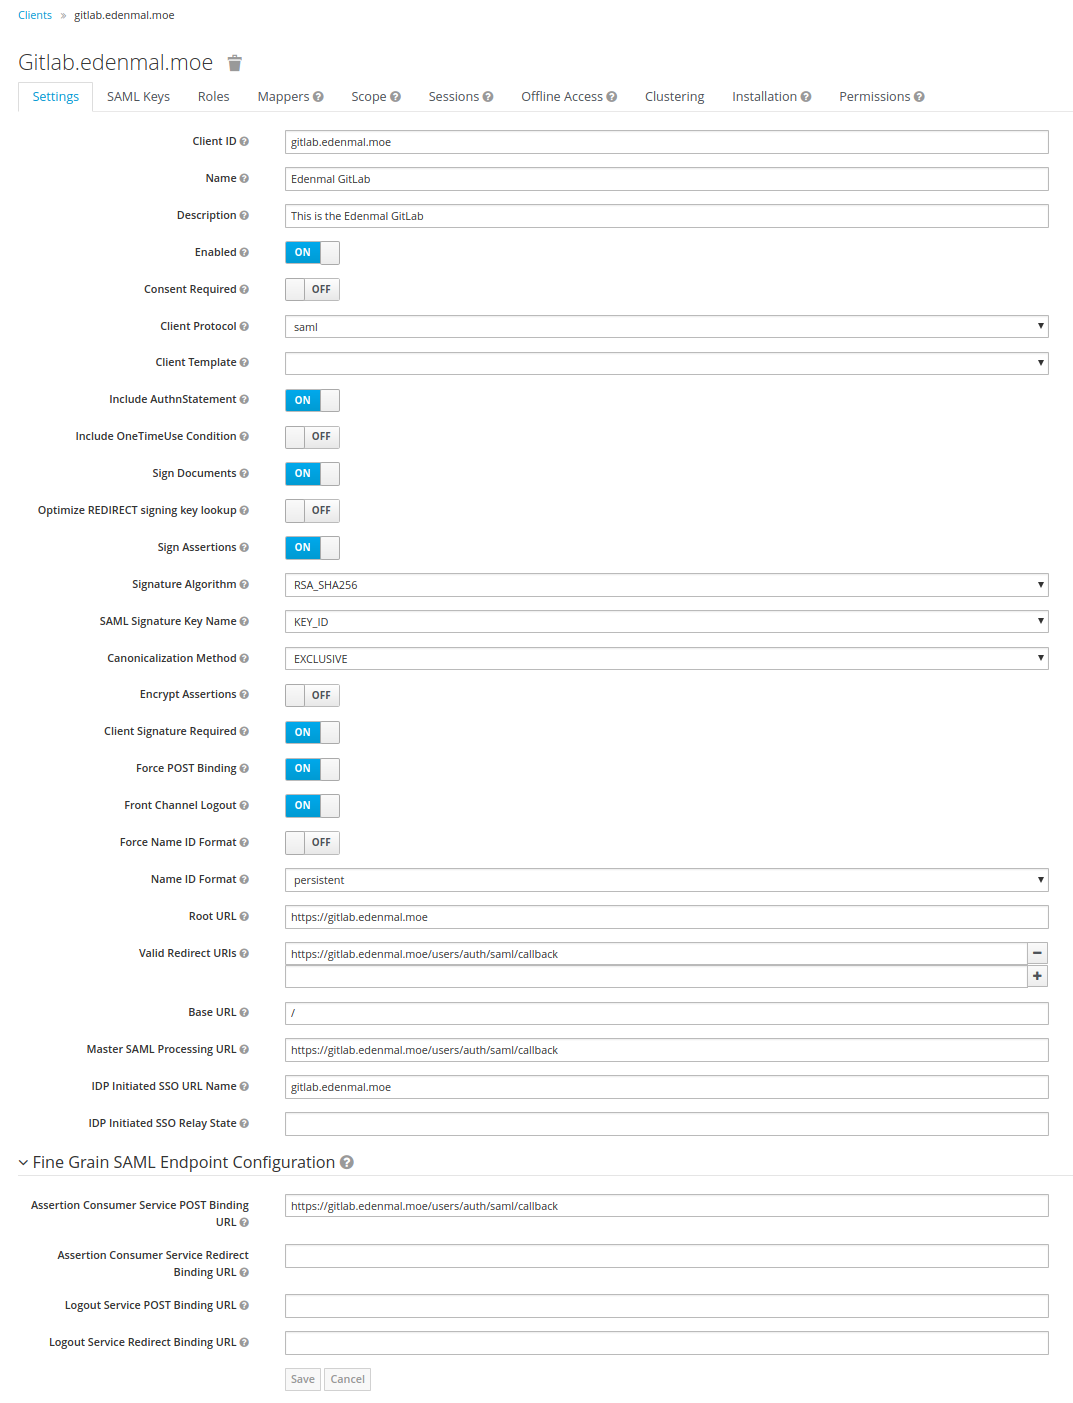
Keycloak - Created Client Settings overview
Roles Tab
GitLab CE users are “only” able to specifically mark users as “external” in GitLab, that is what, below in the screenshot, the gitlab.edenmal.moe:external group is for.
GitLab EE users have more possibilites to restrict access, which can be found here: GitLab EE Documentation - SAML OmniAuth Provider.
Please note that the roles other than the *:external in the screenshot, only “work” for GitLab EE edition.

Keycloak - Created Client Settings Roles Tab
Now that you have setup roles to control the acccess to your GitLab, continue on to the Mappers tab.
Mappers Tab
Mappers, as the name may suggest, allow you to map user information to parameters in the SAML 2.0 request for GitLab. An example would be to map the Username into the request for GitLab.

Keycloak - Created Client Settings Mappers Tab
The created mappers configuration is:
- Name:
name- Mapper Type:
User Property - Property:
Username - Friendly Name:
Username - SAML Attribute Name:
name - SAML Attribute NameFormat:
Basic
- Mapper Type:
- Name:
email- Mapper Type:
User Property - Property:
Email - Friendly Name:
Email - SAML Attribute Name:
email - SAML Attribute NameFormat:
Basic
- Mapper Type:
- Name:
first_name- Mapper Type:
User Property - Property:
FirstName - Friendly Name:
First Name - SAML Attribute Name:
first_name - SAML Attribute NameFormat:
Basic
- Mapper Type:
- Name:
last_name- Mapper Type:
User Property - Property:
LastName - Friendly Name:
Last Name - SAML Attribute Name:
last_name - SAML Attribute NameFormat:
Basic
- Mapper Type:
- Name:
roles- Mapper Type:
Role list - Role attribute name:
roles - Friendly Name:
Roles - SAML Attribute NameFormat:
Basic - Single Role Attribute:
On
- Mapper Type:
All of the mappers have “Consent Required” set to Off.
Scope Tab
Sadly this option needs to be set to On for GitLab, as there seem to issues with it getting the roles because of “missing” scopes requested.
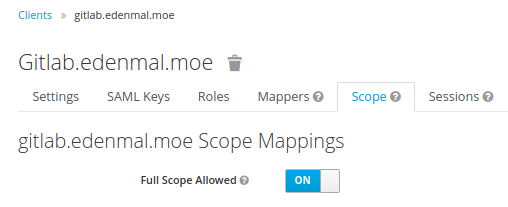
Keycloak - Created Client Settings Scope Tab
Step 3 - Get Certificate Fingerprint
The Keycloak IDP realm’s public certificate fingerprint is needed for the configuration of SAML2.0.
For that go to the Realm Settings sidebar menu point and client the SAML 2.0 Identity Provder Metadata.

Now download / save page by, e.g., using CTRL + S, right click on the page and “Save as…”.
The file contains the Keycloak IDP public certificate of which the public fingerprint is needed for the configuration on GitLab’s side. To get that certificate in the “correct” format and get the fingerprint, I have a small script snippet below to extract the cert and print the fingerprint.
REQUIREMENTS
- bash (located at
/bin/bash)grepsedopenssl
Set the IDP_DESCRIPTOR_FILE variable to the path where you saved the SAML 2.0 Identity Provder Metadata “page” to.
IDP_DESCRIPTOR_FILE="~/Downloads/descriptor"
(
    echo "-----BEGIN CERTIFICATE-----"
    grep -oP '<ds:X509Certificate>(.*)</ds:X509Certificate>' "$IDP_DESCRIPTOR_FILE" | sed -r -e 's~<[/]?ds:X509Certificate>~~g' | fold -w 64
    echo "-----END CERTIFICATE-----"
) | openssl x509 -noout -fingerprint -sha1
Write down the fingerprint that is printed out by the script we need it for GitLab configuration later on.
Now that you have the Keycloak IDP certificate fingerprint and the SAML 2.0 client created + configured, we can move on to configuring GitLab to use the client for authentication in the next step Step 4 - Configure GitLab.
Step 4 - Configure GitLab
This needs to be done in the gitlab.yml config file of your GitLab instance.
Adding the SAML OmniAuth Provider configuration
The GitLab config YAML snippet below contains the settings that control the SAML OmniAuth Provider.
NOTE The snippet below is from GitLab CE.
GitLab EE has more options for SAML authentication, see GitLab EE Documentation - SAML OmniAuth Provider.
As before, don’t forget to replace gitlab.edenmal.moe with your actual GitLab hostname, example my-gitlab.edenmal.moe.
Additionally replace YOUR_KEYCLOAK_CERT_FINGERPRINT with the Keycloak certificate fingerprint from the previous step’s section (Get Certificate Fingerprint) and keycloak.edenmal.moe with the actual address to your Keycloak instance.
production:
[...]
    omniauth:
        # Allow login via Twitter, Google, etc. using OmniAuth providers
        enabled: true

        # Uncomment this to automatically sign in with a specific omniauth provider's without
        # showing GitLab's sign-in page (default: show the GitLab sign-in page)
        auto_sign_in_with_provider:

        # Sync user's email address from the specified Omniauth provider every time the user logs
        # in (default: nil). And consequently make this field read-only.
        # sync_email_from_provider: cas3

        # CAUTION!
        # This allows users to login without having a user account first. Define the allowed providers
        # using an array, e.g. ["saml", "twitter"], or as true/false to allow all providers or none.
        # User accounts will be created automatically when authentication was successful.
        allow_single_sign_on: [saml]

        # Locks down those users until they have been cleared by the admin (default: true).
        block_auto_created_users: true
        # Look up new users in LDAP servers. If a match is found (same uid), automatically
        # link the omniauth identity with the LDAP account. (default: false)
        auto_link_ldap_user: false

        # Allow users with existing accounts to login and auto link their account via SAML
        # login, without having to do a manual login first and manually add SAML
        # (default: false)
        auto_link_saml_user: true

        # Set different Omniauth providers as external so that all users creating accounts
        # via these providers will not be able to have access to internal projects. You
        # will need to use the full name of the provider, like `google_oauth2` for Google.
        # Refer to the examples below for the full names of the supported providers.
        # (default: [])
        external_providers: []

        ## Auth providers
        # Uncomment the following lines and fill in the data of the auth provider you want to use
        # If your favorite auth provider is not listed you can use others:
        # see https://github.com/gitlabhq/gitlab-public-wiki/wiki/Custom-omniauth-provider-configurations
        # The 'app_id' and 'app_secret' parameters are always passed as the first two
        # arguments, followed by optional 'args' which can be either a hash or an array.
        # Documentation for this is available at http://doc.gitlab.com/ce/integration/omniauth.html
        providers:
          # See omniauth-cas3 for more configuration details
          - { name: 'saml',
              label: 'gitlab.edenmal.moe Keycloak',
              groups_attribute: 'roles',
              external_groups: ['gitlab.edenmal.moe:external'],
              args: {
                      assertion_consumer_service_url: 'https://gitlab.edenmal.moe/users/auth/saml/callback',
                      idp_cert_fingerprint: 'YOUR_KEYCLOAK_CERT_FINGERPRINT',
                      idp_sso_target_url: 'https://keycloak.edenmal.moe/auth/realms/master/protocol/saml/clients/gitlab.edenmal.moe',
                      issuer: 'gitlab.edenmal.moe',
                      attribute_statements: {
                        first_name: ['first_name'],
                        last_name: ['last_name'],
                        name: ['name'],
                        username: ['name'],
                        email: ['email'] },
                      name_identifier_format: 'urn:oasis:names:tc:SAML:2.0:nameid-format:persistent' } }
Full examples of the gitlab.yml with all available options can be found here for GitLab:
- CE edition: config/gitlab.yml.example · master · gitlab-org/gitlab-ce
- EE Edition: config/gitlab.yml.example · master · gitlab-org/gitlab-ee
Make sure the address to your Keycloak instance is correct.
You can adjust most options that are outside the providers section to your likings, for example the block_auto_created_users option.
NOTE
The
block_auto_created_usersoption defaults totrue, meaning that when you first time login in to GitLab through a authentication provider your account will be blocked. So be ready to unblock the new account with an admin account or set the option tofalse.
Step 5 - Try to login to your GitLab
Logout of GitLab and you should land on the normal GitLab login page.
Just try to login to GitLab using the button named after the label value in the providers section of the gitlab.yml.
If it is not working, I suggest you investigate the Keycloak logs and GitLabs application logs for any errors thrown there.
When that works, you can switch the toggle that automatically redirects you to your login provider.
The option in GitLab to automatically redirect to the SSO provider (Keycloak in this case) is auto_sign_in_with_provider.
To allow the automatic redirection set auto_sign_in_with_provider to the (string) value saml (auto_sign_in_with_provider: saml) and restart your GitLab instance.
Now when going to your GitLab instance, you should automatically get redirected to your Keycloak instance and be prompted for login.
Side notes
High availability for Sessions
It is recommended that if you have more than one GitLab instance, that you use a shared Redis so users session are not invalidated when getting sent to the other GitLab instance.
SSO Logout
SSO Logout is currently not supported by GitLab. There is an issue open to implement this behavior, see Explore SAML Single Sign Out (#17344) · Issues · gitlab-org/gitlab-ce.
Summary
I hope this helps you to get started with using Keycloak as a GitLab SAML 2.0 OmniAuth Provider for simple SSO login. For questions about the post or issues while trying the configuration from this post, please leave a comment below, thanks!
Have Fun!