Table of Contents
Deprecation Warning
GitLab has deprecated the Kubernetes integration with release 10.3.
Kubernetes service integration has been deprecated in GitLab 10.3. If the service is active the cluster information still be editable, however we advised to disable and reconfigure the clusters using the new Clusters page. If the service is inactive the fields will be uneditable. Read GitLab 10.3 release post for more information. See https://docs.gitlab.com/ce/user/project/integrations/kubernetes.html.
Instead of the integration, the new GitLab CI Kubernetes Cluster feature should be used, the documentation for that can be found here: https://docs.gitlab.com/ce/user/project/clusters/index.html.
The new GitLab CI Cluster feature in GitLab exposes the same environment variables as the “old” Kubernetes integration.
NOTE An updated post on using the new GitLab CI Cluster feature, can be found here: Edenmal - GitLab + Kubernetes: Using GitLab CI’s Kubernetes Cluster feature.
Updated version of this Post is available
An updated post using the new GitLab CI Cluster feature, can be found here: Edenmal - GitLab + Kubernetes: Using GitLab CI’s Kubernetes Cluster feature.
Intro
In this post, I’ll be going over using GitLab CI to create your application’s container Continuous Delivery to Kubernetes. This is the first of a three post series about Kubernetes and GitLab.
NOTE
Please check the requirements before beginning.
Requirements
- Kubernetes Cluster
- GitLab instance
- GitLab Container Registry enabled.
- GitLab CI runner configured and enabled.
- The CI runners must be able to access the Kubernetes apiserver.
kubectlconfigured with Kubernetes cluster access.- Kubernetes
ServiceAccount- That has specific permissions, for more information see Step 2 - Get ServiceAccount Token from Kubernetes.
NOTE
In this post the Kubernetes namespace
presentation-gitlab-k8swill be used for “everything”.
GitLab Integration: Kubernetes
GitLab has multiple integrations for different applications, from Jira to Kubernetes and much more.
The GitLab Kubernetes integration mainly simplifies the usage of Kubernetes config in your GitLab CI pipelines. It adds environment variables to the GitLab CI build environment that are “always” the same.
Instead of having to manually add secret variables this is done in the integration settings and as written the names of the variables are “always” the same.
The second point about the integration which was greatly expanded in the version 10.x.x release is the AutoDevOps functionality. I haven’t worked yet with the AutoDevOps feature, but at least from the docs it seems to allow you to deploy to testing automatically, generate an URL (Ingress) for your changes and other pretty stuff to make it faster and easier to develop application on top of Kubernetes.
Step 1 - Download and “import” example Repository
The repository with the files used in this blog post are available on GitHub: galexrt/presentation-gitlab-k8s.
You can use the GitLab repository import functionality to import the repository. If you imported the repository into your GitLab, you should already see GitLab CI begin to do it’s work, but fail on the release_upload and at latest on the deploy_dev task, as you shouldn’t have the Kubernetes integration configured and activated before you even read the post yet ;)
NOTE
If you have now/already imported the repository, jump to Step 2 - Get ServiceAccount Token from Kubernetes-
When creating the repository, keep it empty! Don’t add a README or anything at all to it.
Go ahead and clone my repository with the files locally. To import the repository the remote needs to be changed. For this we run the following commands:
$ git clone https://github.com/galexrt/presentation-gitlab-k8s.git
$ cd presentation-gitlab-k8s
# Change the remote of the repository
$ git remote set-url origin YOUR_GITLAB_PROJECT_URL
# Now to push/"import" the repository run:
$ git push -u origin master
In the end it should have been successful and when navigating to the repository in the GitLab, you should see the files in the repository. If you have problems with importing the repository, please see this Stackoverflow post: https://stackoverflow.com/a/20360068/2172930.
Now we can begin with the GitLab Kubernetes integration.
Step 2 - Get ServiceAccount Token from Kubernetes
NOTE
This step is definetely a bit different for newer clusters as you need to get a
ServiceAccounttoken from an account with enough permissions to create, modify and delete the following objects in Kubernetes: Create, modify and deleteDeployment,Service,Ingress. Talk to your cluster administrator about aServiceAccountthat matches these requirements.
For Kubernetes 1.6 and higher with role-based access control (RBAC) enabled you need to have a ServiceAccount with the correct permissions, to deploy in the namespace of your choice.
For Kubernetes 1.5 and below you just need to a) create a ServiceAccount (see note below) or b) use the default existing one in the namespace of your choice.
NOTE
It is recommended to create a new
ServiceAccountfor each application! For information on how create aServiceAccount, please refer to the Kubernetes documentation here:
- Kubernetes
1.5and below: https://kubernetes.io/docs/admin/service-accounts-admin/- Kubernetes
1.6and higher (with RBAC enabled): https://kubernetes.io/docs/admin/authorization/rbac/
In my case even if it not the best way, I’ll go with the default ServiceAccount created in the namespace where I will run the application.
For that I check what secrets exist, then get the secret and base64 decode it.
$ kubectl get -n presentation-gitlab-k8s secret
NAME                                           TYPE                                  DATA      AGE
default-token-nmx1q                            kubernetes.io/service-account-token   3         20m
$ kubectl get -n presentation-gitlab-k8s secret default-token-nmx1q -o yaml
apiVersion: v1
data:
  ca.crt: [REDACATED]
  namespace: [REDACATED]
  token: [THIS IS YOUR TOKEN BASE64 ENCODED]
kind: Secret
metadata:
  annotations:
    kubernetes.io/service-account.name: default
  [...]
  name: default-token-nmx1q
  namespace: presentation-gitlab-k8s
  [...]
type: kubernetes.io/service-account-token
$ echo YOUR_TOKEN_HERE | base64 -d
YOUR_DECODED_TOKEN
In the end copy YOUR_DECODED_TOKEN somewhere safe.
Step 3 - Get the Kubernetes CA Certificate
At least for my cluster that I setup with the kubernetes/contrib Ansible deployment the Kubernetes CA certificate is located in /etc/kubernetes/certs/ca.crt.
So a simple cat does the thing ;)
$ cat /etc/kubernetes/ca.crt
-----BEGIN CERTIFICATE-----
[REDACATED]
-----END CERTIFICATE-----
If you have gotten a kubectl config from your provider or administrator, you can find the CA certificate location in there at the certificate-authority key.
In most cases the so called kubeconfig will be located at ~/.kube/config.
[...]
apiVersion: v1
clusters:
- cluster:
    # This is where CA certificate will be located at
    certificate-authority: path/to/my/cafile
    server: https://horse.org:4443
  name: horse-cluster
[...]
For more information on kubeconfig, see the Kubernetes documentation for “access” to Kubernetes cluster here: https://kubernetes.io/docs/tasks/access-application-cluster/authenticate-across-clusters-kubeconfig/.
For other cluster “types”/deployments, please refer to your cluster administrator or guide.
Save the CA certificate somewhere safe with the token from Step 2 - Get ServiceAccount Token from Kubernetes.
Step 4 - Activate the Kubernetes Integration in GitLab
You will now need the ServiceAccount token, the CA certificate, Kubernetes API server address and the namespace you want to run the application in.
To setup the integration in GitLab, go to your project of choice and go to Settings->Integrations. Scroll down to Project services.

GitLab - Settings -> Integrations
Now find the Kubernetes point in the list and click on it.

GitLab - Integration list
Next you need to fill out the formular with the token, the CA certificate, the Kubernetes API server address and namespace.
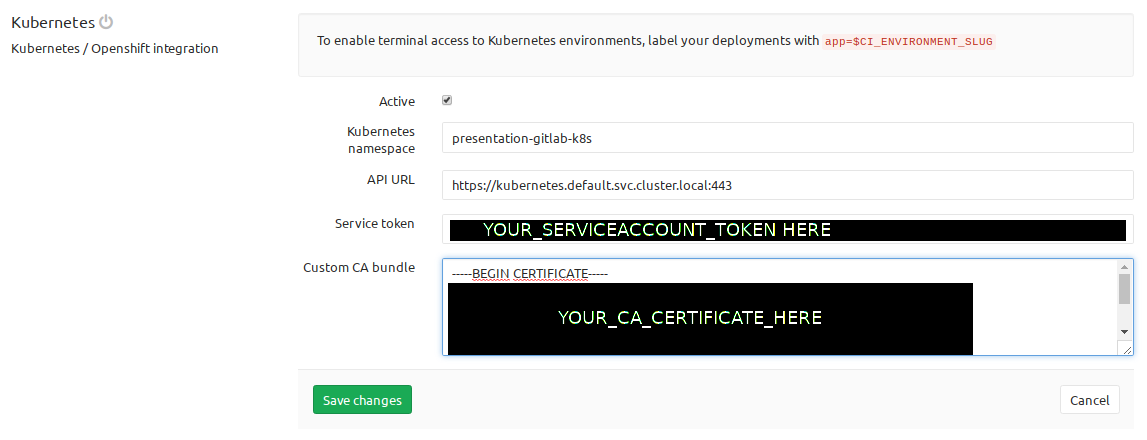
GitLab - Kubernetes Integration Form
Click Save changes and you now have the Kubernetes integration activated.
Step 5 - Add a .gitlab-ci.yml to your project
NOTE
registry.example.comis the address to your GitLab container registry.s3.example.comis just a minio where I upload the artifact to an “external” destination for demonstration. To remove this step just delete therelease_uploadstructure. Replace{gitlab,s3,registry}.example.comwith your corresponding domain name!WARNING You should first commit when you are done with adding the manifests from the sixth step too!
The .gitlab-ci.yml is based on the official GitLab CI Go template.
A job in the .gitlab-ci.yml file looks like this:
# run the golang application tests
test:
    stage: test
    script:
        - go test ./...
The job above would run for the test stage.
To specify the stages to be run, you put a simple list of the names anywhere in the file:
# list of all stages
stages:
    - test
    - build
    - release
    - deploy
You can specify the image to be used to run the commands on a global level or on a per job basis. To extend the given job example, see below how you can specify the image:
# For jobs without a image specified use the below
image: golang:1.8.3
# Or for the test job the image `python:3` will be used:
test:
    stage: test
    image: python:3
    script:
        - go test ./...
NOTE
For other parts of the
.gitlab-ci.yml, please check the comments in the file below or just checkout the GitLab CI documentation for all possible settings/parameters here: https://docs.gitlab.com/ce/ci/yaml/README.html.
In the .gitlab-ci.yml 4 stages are defined test, build, release and deploy:
teststage simply runs go test to test the example Golang application in this case.buildstage compiles the application and tells GitLab CI that the end binaryappis an artifact to be preserved in GitLab and the build containers.releasestage in which theimage_buildjob, builds the Docker image and pushes it into the GitLab Container Registry. In thereleasestage, I also upload the artifactappinto a S3.deploystage for branches always deploys to thedevenvironment, for tags it will be deployed todevand the manually triggered intoliveenvironment.
The whole .gitlab-ci.yml file looks like this:
image: golang:1.8.3
# Fix the location of the go source code, different changes may be required for other languages
before_script:
    - mkdir -p /go/src/gitlab.example.com/${CI_PROJECT_NAMESPACE}
    - ln -sf ${CI_PROJECT_DIR} /go/src/gitlab.example.com/${CI_PROJECT_PATH}
    - cd /go/src/gitlab.example.com/${CI_PROJECT_PATH}/
# list of all stages
stages:
    - test
    - build
    - release
    - deploy
# run the golang application tests
test:
    stage: test
    script:
        - go test ./...
        - /go/bin/govendor test +local
# build/compile the application
compile:
    stage: build
    variables:
      VERSION: "1.0.14"
    script:
        - go build -race -ldflags "-extldflags '-static'" -o app
    artifacts:
        paths:
            - app
# use minio client to upload the built binary to a S3 storage
release_upload:
    stage: release
    image: minio/mc
    script:
      - echo "=> We already have artifact sotrage in GitLab! Are we sure we want this too?"
      - mc config host add examplenet https://s3.example.com ${ACCESS_KEY} ${SECRET_KEY} S3v4
      - mc mb -p examplenet/build-release-${CI_PROJECT_NAME}/
      - mc cp app examplenet/build-release-${CI_PROJECT_NAME}/
# build the Docker image with the artifact
image_build:
    stage: release
    image: docker:latest
    variables:
        DOCKER_HOST: "tcp://localhost:2375"
    services:
        - docker:dind
    script:
        - docker info
        - docker login -u gitlab-ci-token -p ${CI_JOB_TOKEN} registry.example.com
        - docker build -t registry.example.com/${CI_PROJECT_PATH}:latest .
        - docker tag registry.example.com/${CI_PROJECT_PATH}:latest registry.example.com/${CI_PROJECT_PATH}:${CI_COMMIT_REF_NAME}
        - test ! -z "${CI_COMMIT_TAG}" && docker push registry.example.com/${CI_PROJECT_PATH}:latest
        - docker push registry.example.com/${CI_PROJECT_PATH}:${CI_COMMIT_REF_NAME}
# deploy to dev "environment", the Kubernetes manifests to the cluster
deploy_dev:
    image: registry.gitlab.com/gitlab-examples/kubernetes-deploy
    stage: deploy
    environment:
        name: dev
        url: "https://dev-presentation-gitlab-k8s.example.com"
    script:
        - echo "${KUBE_CA_PEM}" > kube_ca.pem
        - kubectl config set-cluster default-cluster --server=${KUBE_URL} --certificate-authority="$(pwd)/kube_ca.pem"
        - kubectl config set-credentials default-admin --token=${KUBE_TOKEN}
        - kubectl config set-context default-system --cluster=default-cluster --user=default-admin --namespace ${KUBE_NAMESPACE}
        - kubectl config use-context default-system
        - sed -i "s/__CI_ENVIRONMENT_SLUG__/${CI_ENVIRONMENT_SLUG}/" deployment.yaml ingress.yaml service.yaml
        - sed -i "s/__VERSION__/${CI_COMMIT_REF_NAME}/" deployment.yaml ingress.yaml service.yaml
        - kubectl cluster-info
        - kubectl get deployments -l app=${CI_ENVIRONMENT_SLUG}
        - kubectl create -f deployment.yaml || (kubectl delete -f deployment.yaml && kubectl apply -f deployment.yaml)
        - kubectl create -f service.yaml || true
        - kubectl apply -f ingress.yaml
# deploy to live "environment", the Kubernetes manifests to the cluster
deploy_live:
    image: registry.gitlab.com/gitlab-examples/kubernetes-deploy
    stage: deploy
    environment:
        name: live
        url: "https://live-presentation-gitlab-k8s.example.com"
    only:
        - tags
    when: manual
    script:
        - echo "${KUBE_CA_PEM}" > kube_ca.pem
        - kubectl config set-cluster default-cluster --server=${KUBE_URL} --certificate-authority="$(pwd)/kube_ca.pem"
        - kubectl config set-credentials default-admin --token=${KUBE_TOKEN}
        - kubectl config set-context default-system --cluster=default-cluster --user=default-admin --namespace ${KUBE_NAMESPACE}
        - kubectl config use-context default-system
        - sed -i "s/__CI_ENVIRONMENT_SLUG__/${CI_ENVIRONMENT_SLUG}/" deployment.yaml ingress.yaml service.yaml
        - sed -i "s/__VERSION__/${CI_COMMIT_REF_NAME}/" deployment.yaml ingress.yaml service.yaml
        - kubectl cluster-info
        - kubectl get deployments -l app=${CI_ENVIRONMENT_SLUG}
        - kubectl apply -f deployment.yaml
        - kubectl create -f service.yaml || true
        - kubectl apply -f ingress.yaml
There are special control keys like when and only that allow for limiting the runs of the CI, to for example with only: ["tags"] to run for created tags only and so on.
More on this topic can be found at the GitLab CI file documentation here: https://docs.gitlab.com/ce/ci/yaml/README.html
I hope you can what it does by looking at the script parts of the jobs and the stages that will be run.
Step 6 - Add Docker login information to Kubernetes
To be able to deploy the built image from the GitLab registry later on, you need to add the Docker login information for the GitLab Registry as a Secret to Kubernetes. You need to have kubectl downloaded and usable on your system for that.
The command for creating the Docker login secret is:
# YOUR_SECRET_NAME for example "registry-example-gitlab-key"
$ kubectl create \
    -n presentation-gitlab-k8s \
    secret docker-registry YOUR_SECRET_NAME_HERE \
    --docker-server=registry.example.com \
    --docker-username=YOUR_GITLAB_USERNAME \
    --docker-password=YOUR_PERSONAL_GITLAB_ACCESS_TOKEN_HERE \
    --docker-email=YOUR_GITLAB_EMAIL_ADDRESS
Write down the name you gave the secret (YOUR_SECRET_NAME_HERE). You will need to put it into the Deployment manifest that is coming up next.
Step 7 - Create Kubernetes manifests
Now you are creating the Kubernetes manifests for your application and add them to your repository.
Create the Deployment manifest (deployment.yaml):
apiVersion: extensions/v1beta1
kind: Deployment
metadata:
  name: __CI_ENVIRONMENT_SLUG__
  labels:
    app: __CI_ENVIRONMENT_SLUG__
    track: stable
spec:
  replicas: 4
  template:
    metadata:
      labels:
        app: __CI_ENVIRONMENT_SLUG__
        track: stable
    spec:
      imagePullSecrets:
        - name: YOUR_SECRET_NAME_HERE
      containers:
      - name: app
        image: registry.example.com/atrost/presentation-gitlab-k8s:__VERSION__
        imagePullPolicy: Always
        ports:
        - containerPort: 8000
        livenessProbe:
          httpGet:
            path: /health
            port: 8000
          initialDelaySeconds: 3
          timeoutSeconds: 2
        readinessProbe:
          httpGet:
            path: /health
            port: 8000
          initialDelaySeconds: 3
          timeoutSeconds: 2
NOTE
Don’t forget to replace
YOUR_SECRET_NAME_HEREwith the actual name of your Docker login secret created in the previous step.
This is a basic Kubernetes Deployment manifest. For more information on Deployment manifests please check the Kubernetes Docs page here: https://kubernetes.io/docs/concepts/workloads/controllers/deployment/
Placeholders like __CI_ENVIRONMENT_SLUG__ and __VERSION__ are used for templating this single manifest for the multiple environments we want to achieve.
For example later the __CI_ENVIRONMENT_SLUG__ get’s replaced by dev or live (environment name) and __VERSION__ with the built image tag.
To be able to connect to the generated Pods of the Deployment, a Service is also required.
A Service manifest looks like this, includes the placeholders already (service.yaml):
apiVersion: v1
kind: Service
metadata:
  name: presentation-gitlab-k8s-__CI_ENVIRONMENT_SLUG__
  namespace: presentation-gitlab-k8s
  labels:
      prometheus-scrape: "true"
spec:
  type: ClusterIP
  ports:
    - name: http-metrics
      port: 8000
      protocol: TCP
  selector:
    app: __CI_ENVIRONMENT_SLUG__
The application runs on port 8000. The port is named http-metrics as in my case of Kubernetes cluster I use the prometheus-operator which creates the “auto-discovery” config for Prometheus for example to monitor all Services with a port named http-metrics.
The Kubernetes Service documentation can be found here: https://kubernetes.io/docs/concepts/services-networking/service/
But now we would be only able to connect to the cluster from the inside and not the outside. That’s what Ingresses are for. As the name implies they provide a way of allowing traffic to kind of flow into the cluster to a certain Service.
The following manifest contains so called “annotations” that would automatically get a Let’sencrypt certificate for it and deploy it into the “loadbalancer”. The file is named (ingress.yaml).
apiVersion: extensions/v1beta1
kind: Ingress
metadata:
  name: presentation-gitlab-k8s-__CI_ENVIRONMENT_SLUG__
  namespace: presentation-gitlab-k8s
  annotations:
    # letsencrypt support enabled (https://github.com/jetstack/kube-lego)
    kubernetes.io/tls-acme: "true"
    # use the Kubernetes ingress "nginx"
    kubernetes.io/ingress.class: "nginx"
spec:
  tls:
  - hosts:
    - __CI_ENVIRONMENT_SLUG__-presentation-gitlab-k8s.example.com
    secretName: tls-com-example-__CI_ENVIRONMENT_SLUG__-presentation-gitlab-k8s
  rules:
  - host: __CI_ENVIRONMENT_SLUG__-presentation-gitlab-k8s.example.com
    http:
      paths:
      - path: /
        backend:
          serviceName: presentation-gitlab-k8s-__CI_ENVIRONMENT_SLUG__
          servicePort: 8000
Ingress documentation can be found here: https://kubernetes.io/docs/concepts/services-networking/ingress/.
To be able to reach the domain names, you need to already have the DNS names created. With the current manifest you would need to create __CI_ENVIRONMENT_SLUG__-presentation-gitlab-k8s.example.com, where __CI_ENVIRONMENT_SLUG__ live and dev. Resulting in dev-presentation-gitlab-k8s.example.com and live-presentation-gitlab-k8s.example.com to be created by yourself.
NOTE The deployment stage could be expanded to use the DNS providers API to create the domain name for you or the external-dns operator from the Kubernetes incubator project could be used.
Now that we have all the manifests in the repository, we can move on to the next step.
Step 8 - Make a change, push and watch the magic happen!
Now that you have the manifests and the .gitlab-ci.yml file in the repository or from the imported one, you can make a change to the code or just create a file by running the following commands:
$ touch test1
$ git add test1
$ git commit -m"Testing the GitLab CI functionality #1"
$ git push
The commands create a new file, commit it and push the change to the repository on GitLab.
Now you should see GitLab creating a “new” pipeline and running the stages, which you specified in the .gitlab-ci.yml, with their jobs.

GitLab - Pipeline List
When you now go to the pipeline, you should see a view like this:

GitLab - New Pipeline Overview
The last stage shows if you did everything correct. If it passes you now have successfully deployed your application to your Kubernetes cluster.
A successful stage “build” deploy_dev looks like this:

GitLab - deploy_dev job passed
If any of the build/steps fail for you, you may have misconfigured your .gitlab-ci.yml or the GitLab CI Kubernetes integration can’t reach the configured Kubernetes cluster. Make sure connectivity from the GitLab CI Runners to the Kubernetes cluster is given!
For Troubleshooting see the below section for more details on some possible issues.
Troubleshooting
Pipeline stuck on pending
If the build pipeline is stuck in pending, it could be that your GitLab CI runner aren’t properly configured with your GitLab CI instance.
Build failure
- If you made any changes to the
.gitlab-ci.yml, use the “CI Lint” functionality available on the GitLab Repo pipeline page in the top right corner to check for any syntax issues. - Did you replace all the example domains
{gitlab,s3,registry}.example.comwith your own correct addresses?
Summary
I hope this helps you, getting started with using GitLab CI in combination with Kubernetes for Continuous Delivery of your application(s). For questions about the post, please leave a comment below, thanks! I’m maybe going to create a post about how I run GitLab and GitLab CI runner on top of Kubernetes in the near future too.
Have Fun!