Table of Contents
This workshop is deprecated!
Please use the new version of the “Docker for Admins” Workshop post, here.
Goal of the Workshop
The Goal is to show how easy it is to use Docker. The simpleness in creating an image for an own project/application. If there’s enough time, we also look at how to orchestrate a Kubernetes cluster and let the first containers run on the cluster.
Heads up - “Blogger” Words
- Grey Boxes with green line on the left: Mostly contain an useful tip, expected command output or something funny.
- TASK: Is a refer to a task in the workshop repo mostly in the
tasks/folder. - WDWD: Stands for “What does what do” aka “Me explaining what the things listed below do” (short forms FTW!), I only explain new things in this section.
Group “Partitions”
At least 2 groups with 2-3 or more people. Every group will work on their own Kubernetes cluster. If there are people that aren’t as “advanced”, they can play around with Docker Swarm (No tutorial provided in this post!).
Special details
The VirtualBox is available under INSERT_DOWNLOAD_LINK_HERE. (Most likely to be given around with an USB stick at the workshop day)
- VM Username:
workshop - VM Password:
workshop
“What’s in the f*cking box?!”
Fedora 23 with Docker and Cockpit enabled. Firewalld removed, Iptables cleared and persistence disabled.
Why is the VM running Fedora?
That’s simple. It is more up to date, than Debian :P and uses a up to date kernel.
README before begining!
If you don’t know any further, add --help to the command, to get a help page that may guide you to your goal or use man INSERT_COMMAND_HERE to show the man(ual) page for the given command.
There are no dumb questions, but please don’t ask them. Okay? – Alexander Trost
Intro: Container and Microservices
Why do people like the Docker-“Principle”?
Because the Docker-“Principle” means “simpleness”. You want WordPress? One command and you’re good to go. Enough said.
Micro-what? Microservices!
Microservices allow you to test local, small scale, and run large (if done right), large scale, on your bare metal, cloud or virtual machines.
What’s the Workshop about
The basics of Docker, how to use it, Networking, Data “Management” and docker-compose.
Orchestration tools like Kubernetes and/or RancherOS.
Prepare for the Docker Madness
Side Notes
- You can install Docker directly on your system or in a VirtualBox. If you use a VirtualBox, please use Fedora 23, as the OS.
- If you are a Windows or Mac OSX user, ask yourself “Why you use it?”, switch to linux, thanks! You can use Boot2Docker (I don’t help or give any support if you use it though!).
- The download and login details to the VM are located here.
System “Requirements”
- Linux Kernel 4.x or higher (“included” in the Virtualbox)
Preparation
TASK:
setup101
Docker Installation
For Docker see the begining of script at here or run the installation command curl -sSL https://get.docker.com/ | sh.
docker-compose Installation
For docker-compose see the docs or run the following command:
curl -L https://github.com/docker/compose/releases/download/1.6.2/docker-compose-`uname -s`-`uname -m` > /usr/local/bin/docker-compose
chmod +x /usr/local/bin/docker-compose
Last but not least
Clone the Workshop repo https://github.com/galexrt/workshop-docker.git, it’ll provide all files used in the Workshop ;)
git clone https://github.com/galexrt/workshop-docker.git
Test your installation
If you installed Docker correctly, you have to add yourself to the docker group. Relog or restart your machine.
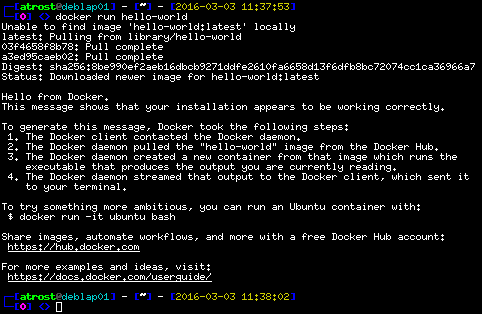
To verify that Docker is working, run the hello-world image as a test ( hello-world):
Expected Output of
docker run hello-world
To see if docker-compose got installed correctly, run docker-compose --version:
Expected Output of
docker-compose --version

Everything seems right and working correctly? Move on to the next part.
Everything working? Good, let’s go!
The first simple Task
TASK:
runit101
Let’s start with something simple, the situation is that you want to run a WordPress Blog and a MySQL (in this case we use MariaDB) database. No problem, Docker got you!
Start the database container (using image: sameersbn/mysql:latest):
docker run \
    --name mysql \
    -d \
    -e 'DB_NAME=wordpress' \
    -e 'DB_USER=wordpress' \
    -e 'DB_PASS=wordpress' \
    sameersbn/mysql:latest
WDWD
docker- Executedockercommand.run- Run a container with the given configuration.--name mysql- Gives the container a name-d- Runs the container detached from the current session (don’t attach stdin and stdout), the contrary is-iwhich attaches the stdin and stdout.-e 'KEY=VALUE'- Defines an environment variable inside the container at “runtime”.sameersbn/mysql:latest- The name of the image used.
Now we need WordPress
The command for starting a WordPress instance is:
docker run \
    --name wordpress \
    -d \
    --link mysql:database \
    -p 8080:80 \
    -e 'WORDPRESS_DB_HOST=mysql:3306' \
    -e 'WORDPRESS_DB_NAME=wordpress' \
    -e 'WORDPRESS_DB_USER=wordpress' \
    -e 'WORDPRESS_DB_PASSWORD=wordpress' \
    -e 'WORDPRESS_AUTH_KEY=SECURE_AUTH_KEY' \
    -e 'WORDPRESS_LOGGED_IN_KEY=SECURE_LOGGED_IN_KEY' \
    -e 'WORDPRESS_AUTH_SALT=SECURE_AUTH_SALT' \
    -e 'WORDPRESS_LOGGED_IN_SALT=SECURE_LOGGED_IN_SALT' \
    wordpress
WDWD
-p HOST_PORT:CONTAINER_PORT/tcp- Creates a tcp (or udp) proxy on theHOST_PORTto theCONTAINER_PORT
Enter the WordPress container using docker exec. With docker exec you can execute a command or a shell inside the container, but be aware that the shell and or command has to be present inside the container to be executed.
But wait how does the WordPress instance talk to the database, when the database and WordPress are running in seperate containers? Every container has a seperate container IP. Docker offers a simple way to allow these containers to speak to each other, by using links.
To create a link between two containers, not much is needed, just adding the link argument --link=CONTAINER_ID:LINK_NAME (CONTAINER_ID can be the id or the name; LINK_NAME is the usable “hostname” and prefix for environment variables.
When you link a container, the environment variables of the linked container will become available in the created container.
The “inherited” environment variables will be prefixed with the LINK_NAME, example link name is database DATABASE_ENV_DB_USER and so on.
But wait how can the containers communicate with each other and how does the created WordPress container know what IP address the database container has? See in the next part.
Summary
We now can start a database and WordPress container. We now know how to define environment variables, publish ports, link containers together.
How can the containers talk? Local and multi host?
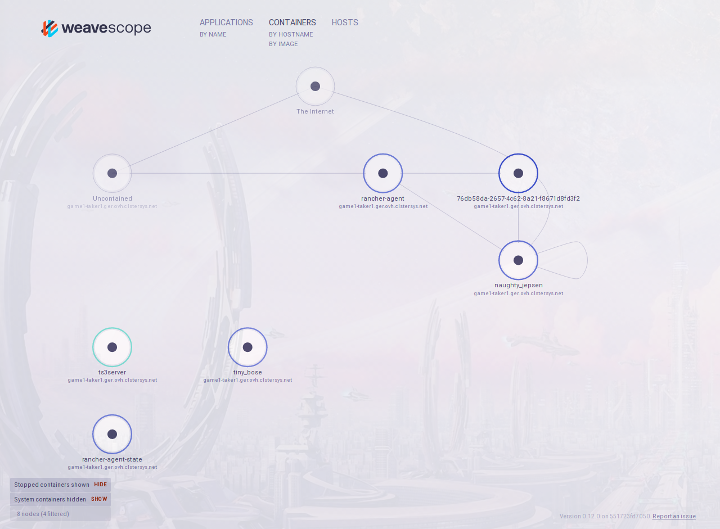
TIP
Use WeaveScope to visualize your Docker network.
TASK
network101, filestart_weave_scope.sh: Starts WeaveScopeExample output
Overview over possible Docker networking “solutions”
How would one connect..
- single host Docker installation
- Default Docker networking (
ICC- Inter-Container-Communication) - OpenVSwitch
- Default Docker networking (
- multi host Docker installation (using overlay networks)
- Docker Machine/Engine “Native” Networking
- Flanneld
- Weave
- Project Calico
Now enough about Docker networking solutions, back to the topic.
How does the traffic flow in and out of containers?
We are now going to find out how the traffic flows when it enters and exits the container(s). So we use the following tools, to check the traffic:
ip link show(DON’T you dare useifconfig!)iptablesoriptables-save
TASK:
network101, file:show_me_dat_network.sh
Let’s see if Docker creates some type of network device for our database and WordPress container using ip link show:
Expected Output of
ip link show
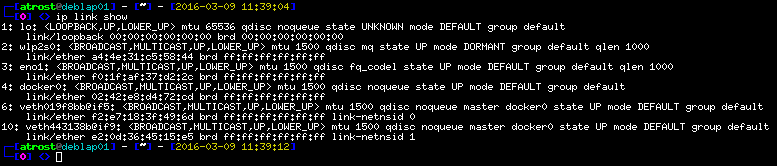
Docker creates a bridge device called docker0 and for every container, running in default network mode, it creates one veth interface per container and every veth interface get’s an IP address from a specified pool. This IP address pool can be specified when starting Docker/the Docker Engine.
Now we know that because of every container having it’s own “dedicated” IP, Docker uses NAT (Network Address Translation). Meaning we need more than just a separate interface per container. That means there has to be some sort of “routing” “process”. Let’s check the iptables.
Are there any iptables rules added by Docker?:
Expected Output of
iptables -Landiptables -t nat -L
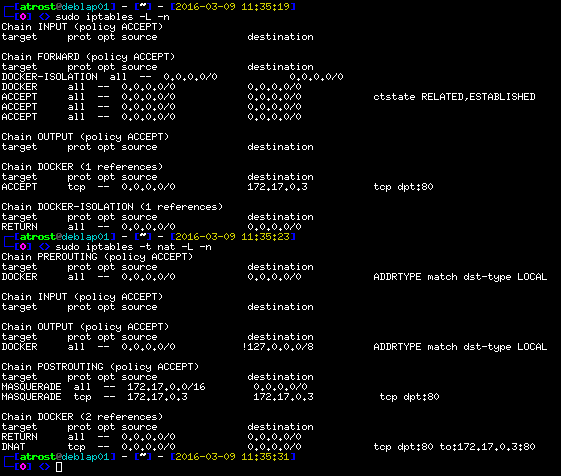
As we can see, Docker creates iptables rules to route the NAT traffic to and from the containers.
Docker has an userspace proxy, the “proxy” is required so the ports that are published/forwarded can’t be used twice or more. Cause iptables can’t “block” a port from being used multiple times, that’s why there is this userspace proxy in place.
So if we start a container with published port 80 and then start another container also with port 80 published, the second container can’t start. The second container would “crash” with the message that the port 80 is already in use. Cause the userspace proxy of the first container, has the port in use (/ “blocks” the port).
TIP
Keep in mind, that default Docker networking works using NAT with iptables. It is important, if you have other iptables rules, that are in place to filter incoming traffic, because Docker traffic goes through the
FORWARD-Chain and not theINPUT-Chain!
Summary
Docker creates a iptables chain in nat and filter table. Docker creates a bridge interface called docker0. Every container has it’s own veth interface.
Pointers, Tuts and Docs
Data and Layer Cakes in Docker
Data in Containers
TASK:
datait101
Data is not persistent in containers. Currently if we stop the database container and delete it, all data is gone. :( To make data in a container persistent, we use volumes. So to make our database data persistent, we add the following argument to the command.
docker run \
    --name mysql \
    -d \
    -e 'DB_NAME=wordpress' \
    -e 'DB_USER=wordpress' \
    -e 'DB_PASS=wordpress' \
    -v /opt/docker/database:/var/lib/mysql:rw \
    sameersbn/mysql:latest
WDWD
-v HOST_PATH:CONTAINER_PATH:rw-HOST_PATHpath to mount from the host into the container at theCONTAINER_PATH.rwmeansread-writeandro(read-only) are possible arguments too (default isrw).
We have to stop the WordPress container first, because it is linked to the database container:
docker stop wordpress database
docker rm wordpress database
Now you can start the database container and the WordPress container again.
What have Layer Cakes to do with Docker Images?
TASK:
dockerfile101
In the Docker universe, a cake would be built from the bottom using a baseimage (or any other image as a base). Every “new” layer on top of it, is an action that had been run when building the image.
Meaning if we create an image from the “baseimage” fedora:23 like the example Dockerfile, a cross-section/profile would look like this:
That is one of the reasons, why Docker images are so small. If you download 10 images that are based on debian:jessie, you would only have to download the created/modified layers, because the baseimage is the same in this case.
Pointers, Tuts and Docs
Take an image! - Create your first Docker image
Let’s set our goal to creating a simple nginx container. We use debian:jessie as the baseimage.
A Dockerfile
As you may have already seen in task dockerfil101, there was a file called Dockerfile.
A Dockerfile contains build instructions for an image. For Dockerfiles there is a “special” syntax, but the syntax is very simple.
Simple Dockerfile Example (Taken from the carazzim0/docker-ebot
Dockerfile):
FROM debian:jessie
ENV EBOT_HOME="/ebot" TIMEZONE=“Europe/Berlin”
ADD entrypoint.sh /sbin/entrypoint.sh
RUN apt-get update &&
apt-get -y upgrade &&
apt-get clean &&
apt-get -y install nodejs npm curl git php5-cli php5-mysql screen git &&
apt-get clean &&
sed -i “s~;date.timezone =~date.timezone = $TIMEZONE~g” /etc/php5/cli/php.ini &&
/bin/ln -s /usr/bin/nodejs /usr/bin/node &&
curl -sS https://getcomposer.org/installer | php – –install-dir=/usr/bin &&
mkdir “$EBOT_HOME” &&
git clone https://github.com/deStrO/eBot-CSGO.git “$EBOT_HOME” &&
cd “$EBOT_HOME” &&
git checkout “master” &&
/usr/bin/php /usr/bin/composer.phar install &&
npm install socket.io formidable archiver
COPY Match.php $EBOT_HOME/src/eBot/Match/Match.php
VOLUME ["$EBOT_HOME/demos", “$EBOT_HOME/logs”]
EXPOSE 12360 12361
ENTRYPOINT ["/sbin/entrypoint.sh"]
> **Advanced Dockerfile Example** (Taken from the [galexrt/docker-zulip](https://github.com/galexrt/docker-zulip) `Dockerfile`):
> ```console
FROM quay.io/sameersbn/ubuntu:latest
MAINTAINER Alexander Trost <galexrt@googlemail.com>

ENV ZULIP_VERSION="master" DATA_DIR="/data"

ADD entrypoint.sh /sbin/entrypoint.sh

RUN apt-get -q update && \
    apt-get -q dist-upgrade -y && \
    apt-get install -y git && \
    mkdir -p "$DATA_DIR" /root/zulip && \
    git clone https://github.com/zulip/zulip.git /root/zulip && \
    cd /root/zulip && \
    git checkout "$ZULIP_VERSION" && \
    rm -rf /root/zulip/.git

ADD custom_zulip_files/ /root/custom_zulip

RUN cp -rf /root/custom_zulip/* /root/zulip && \
    VOYAGER_CLASS="dockervoyager" DEPLOYMENT_TYPE="dockervoyager" ADDITIONAL_PACKAGES="python-dev python-six python-pbs" \
    /root/zulip/scripts/setup/install && \
    wget -q https://www.zulip.com/dist/releases/zulip-server-latest.tar.gz -O /tmp/zulip-server.tar.gz && \
    tar xfz /tmp/zulip-server.tar.gz -C "/home/zulip/prod-static" --strip-components=3 --wildcards */prod-static/serve && \
    rm -rf /tmp/zulip-server.tar.gz && \
    ln -nsf /home/zulip/deployments/current/prod-static/serve /home/zulip/prod-static && \
    apt-get -qq autoremove --purge -y && \
    apt-get -qq clean && \
    rm -rf /root/zulip/puppet/ /var/lib/apt/lists/* /tmp/* /var/tmp/*

ADD setup_files/ /opt/files
ADD includes/supervisor/conf.d/zulip_postsetup.conf /etc/supervisor/conf.d/zulip_postsetup.conf
ADD includes/createZulipAdmin.sh /createZulipAdmin.sh

VOLUME ["$DATA_DIR"]
EXPOSE 80 443

ENTRYPOINT ["/sbin/entrypoint.sh"]
CMD ["app:run"]
Don’t worry we’re just making a very simple and basic example. ;)
Dockerfile explained
TASK:
dockerfile202TIP
If you have trouble writing a
Dockerfile, check the Dockerfile Docs.
You will create an image with nginx installed (You can later expand it, with more functionality, like with PHP-FPM).
To guide you in creating a nginx image, I show you an example http webserver written in golang as an example, before we create the “final” nginx image.
Golang Dockerfile Example: (Example taken from Shiju Varghese Medium Blog)
golang image where workspace (GOPATH) configured at /go.
FROM golang:latest
Copy the local package files to the container’s workspace.
ADD . /go/src/github.com/shijuvar/golang-docker
Build the golang-docker command inside the container.
RUN go install github.com/shijuvar/golang-docker
Run the golang-docker command when the container starts.
ENTRYPOINT ["/go/bin/golang-docker"]
http server listens on port 8080.
EXPOSE 8080
> **WDWD**
> * `FROM ...` - Sets the baseimage.
> * `COPY ... ...` - Copy files from the build root.
> * `ADD ... ...` - Same as `COPY`, but target can be "online" and if it is an archive, it will be extracted.
> * `RUN ...` - Run commands (Shell used `/bin/sh`).
> * `ENTRYPOINT ["..."]` - The command to execute when the container is started.
> * `CMD ["..."]` - Arguments for the `ENTRYPOINT`.
> * `EXPOSE 8080 ...` - Expose a port when linked (_If not specified port not reachable when linked!_).

There's even the possibility, to execute specific commands when the image is used as a base image, the instruction is called `ONBUILD ...`.

To build your image we use the `docker build` command. Building the example image run the following command:

```console
docker build -t golang-docker -f Dockerfile .
WDWD
build- Used to build Docker images.-t TAG_NAME- Specify the tag / name of the image, you are creating (Optional. Important when manually building and pushing a Docker image).-f DOCKERFILE- Set the location of theDockerfile(Optional).PATH- The root of the image build (Important whenADDorCOPYis used in theDockerfile).
As you can see, it isn’t hard to build your first Docker images. If you want to see more advanced examples, you can find more examples in my GitHub repositories here.
Creating the nginx image
Now that we know some Dockerfile basics, we can start building our own nginx image from the baseimage debian:jessie.
Let’s make this like a test in the school, replace all __BLANK__ with the correct answer (Solutions are here):
FROM __BLANK__

RUN __BLANK__

ENTRYPOINT ["__BLANK__"]
Got all blanks filled out? Good. Let’s build the image:
docker build -t workshop-nginx .
Expected Output of
docker build -t workshop-nginx .
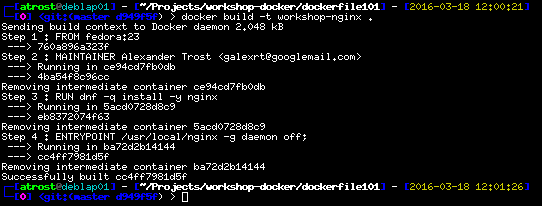
The build should go successfully, when you filled in the blanks correctly. Let’s run the image to see if it is working, the container name will be nginx-workshop:
docker run \
    --name nginx-workshop \
    -d \
    -p 80:80 \
    workshop-nginx
If you did something wrong, remove the container using (where CONTAINER_NAME is a container ID or name):
docker rm CONTAINER_NAME
To check if the container is running with your image, run docker ps -a.
WDWD
ps- Like thepscommand, but for the containers.-a- Show all containers, whether their current state, without it showing only running containers.
You should see that the container you started, has exited.
There’s a simple reason, why the container exited/stopped. When running a command as the entrypoint, it has to stay running, not fork to background. When the process forks to background, Docker will think the process has stopped and the container status will be set to exited with the last return code.
That’s why we need to tell nginx, not to run as a daemon, not fork to background, with the following additional arguments "-g", "daemon off;" (these arguments must be added to the ENTRYPOINT line of the Dockerfile).
So we could make a change to the nginx.conf, overwrite nginx.conf with a custom one or just change the ENTRYPOINT line to make it look like this:
ENTRYPOINT ["nginx", "-g", "daemon off;"]
Let’s rebuild the image (same command) and run it again. Open http://127.0.0.1:8080 in your browser and voilà it should show the nginx default page.
To go further with your created image, let’s “mount” a volume inside the container with our own index.html.
Use the index.html from task dockerfile202 or create one yourself.
Now we add a volume to the container. Add -v "$(pwd)":"/usr/share/nginx/html" to the docker run command, but don’t forget add the argument before the image name.
Your command should look like this:
docker run \
    --name workshop-nginx \
    -d \
    -p 8080:80 \
    -v "$(pwd)":"/usr/share/nginx/html" \
    workshop-nginx
This starts a container named workshop-nginx running the image workshop-nginx with a volume mounted at /usr/share/nginx/html.
If we now open http://127.0.0.1:8080 in the browser, we will see our index.html. Well done!
Summary
We have created our own working nginx image.
We are able to mount a folder into the container and see it’s content per nginx web server.
Pointers, Tuts and Docs
- Dockerfile Docs
- Digitialocean Docker explained: Dockerfiles to automate building of images
- Dockerfile Best Practices by Michael Crosby
docker-compose.yml aka “Simpleness for multi container applications”
Making multi container applications simpler to start
TASK:
compose101
To remove the process of typing all those commands to start the containers, docker-compose has been created.
docker-compose makes it easy peasy lemon squeezy to run one to many containers using one command.
The syntax of a docker-compose.yml is YAML (YAML Ain’t Markup Language). A good syntax checker, I use, is available here.
In our example with WordPress we will create a docker-compose.yml for our database, WordPress and as an extra we’ll add phpMyAdmin to it.
Create the docker-compose.yml file. I made this part like a test again, so you can see where you have knowledge holes, replace all __BLANK__ with the correct answer (Solutions are here):
# Taken from https://www.digitalocean.com/community/tutorials/how-to-install-wordpress-and-phpmyadmin-with-docker-compose-on-ubuntu-14-04
database:
  image: sameersbn/mysql:latest
  environment:
    DB_NAME: wordpress
    DB_USER: wordpress
    DB_PASS: wordpress
    DB_REMOTE_ROOT_NAME: root
    DB_REMOTE_ROOT_PASS: workshop
  volumes:
    - "/opt/docker/database:/var/lib/mysql:rw"
wordpress:
  image: wordpress
  links:
    - __BLANK__:mysql
  ports:
    - 8080:80
  environment:
    WORDPRESS_DB_HOST: __BLANK__:3306
    WORDPRESS_DB_NAME: __BLANK__
    WORDPRESS_DB_USER: __BLANK__
    WORDPRESS_DB_PASSWORD: __BLANK__
    WORDPRESS_AUTH_KEY: SECURE_AUTH_KEY
    WORDPRESS_LOGGED_IN_KEY: SECURE_LOGGED_IN_KEY
    WORDPRESS_AUTH_SALT: SECURE_AUTH_SALT
    WORDPRESS_LOGGED_IN_SALT: SECURE_LOGGED_IN_SALT
phpmyadmin:
  image: corbinu/docker-phpmyadmin
  links:
    - __BLANK__:mysql
  ports:
    - 8181:80
  environment:
    MYSQL_USERNAME: root
    MYSQL_ROOT_PASSWORD: wordpress
WDWD
database:- Name of the container.image:- Defines the used image for the container.links: []- A list of container links.ports: []- A list of published ports.environment: []- “Hash” list of environment variables (Format:NAME: VALUE).
I have also added the environment variables DB_REMOTE_ROOT_NAME and DB_REMOTE_ROOT_PASS, so that phpMyAdmin can access the database.
Starting our multi container applications with one command
To “run”/start our docker-compose.yml, we run:
docker-compose up -f DOCKER_COMPOSE_YML
WDWD
-f DOCKER_COMPOSE_YML- Optional. Default isdocker-compose.yml.up- Starts the containers defined in the given docker-compose file.stop- Stops the containers defined in the given docker-compose file.rm- Deletes the containers defined in the given docker-compose file.
TIP
Keep the
-f DOCKERFILEargument in mind, when creating multipledocker-compose.yml’s.
Let’s do more with docker-compose!
TASK:
compose202The task contains otherdocker-compose.ymls for you to play around with. Look at thedocker-compose.ymls and start them. Just play around withdocker-composea bit. And don’t forget the-f DOCKER_COMPOSE_YMLargument. ;)
Summary
We can now write basic docker-compose.ymls. We can now start a multi container application with one single command.
Pointers, Tuts and Docs
Below this line, everythings a bit vague and still needs some writing to be done. Please be aware of that! This line will slowly move down, until I’m finished. ;)
Read this section carefully! This sections explain the basic principles of Kubernetes.
Kubessar - Glossar
Like a glossar, but for Kubernetes.
- Pod - A set of one or more containers.
- ReplicationController - Replication for Pods.
- Services - Exposing Pod ports as a service (“loadbalanced”) to other pods.
- Namespaces - Everything runs in a namespace.
- ResourceQuotas - Quotas for “everything” in a namespace.
- kubeclt Files - Run/“Deployment” files for the kubectl command.
- “Object” - A Pod, ReplicationController, Service or Namespace. A “part” of the available ressources to use with the Kubernetes API.
I highly recommend you to look through my Kubernetes presentation to get to know Kubernetes a bit before starting to work with it. Keep in mind, the presentation is written in german.
Conductor of the orchestra - Kubernetes
Kubernetes Logo
Side Notes
- Certificates are “hard” to generate, I’ll be using the kubernetes ansible cert creation script.
Installing Ansible
If you use the provided Virtual Box, this step is not needed!
The package
python-netaddralso needs to be installed on the client. Don’t forget to install it!!
Please refer to the official Ansible Installation Docs on how to install Ansible on your machine.
For ArchLinux: http://docs.ansible.com/ansible/intro_installation.html#latest-releases-via-pacman-arch-linux For Debian: http://docs.ansible.com/ansible/intro_installation.html#latest-releases-via-apt-ubuntu For CentOS: http://docs.ansible.com/ansible/intro_installation.html#latest-release-via-yum
Create the inventory for the cluster
TASK:
kubernetes101
Enter the cloned repository and look out for a directory called ansible/.
Create a file called inventory, this file will contain the list of servers.
Per server one line in the format below (username and password are valid for the provided vm, change to suit your environment):
[masters]
# In most cases the first "server"
SERVER_IP_ADDRESS:SSH_PORT ansible_user=docker ansible_ssh_pass=docker ansible_become_pass=docker

[etcd]
#Add all the node servers here
SERVER_IP_ADDRESS:SSH_PORT ansible_user=docker ansible_ssh_pass=docker ansible_become_pass=docker
[...]
SERVER_IP_ADDRESS:SSH_PORT ansible_user=docker ansible_ssh_pass=docker ansible_become_pass=docker

[nodes]
# This can include the master server and the etcd servers too
SERVER_IP_ADDRESS:SSH_PORT ansible_user=workshop ansible_ssh_pass=workshop ansible_become_pass=workshop
[...]
SERVER_IP_ADDRESS:SSH_PORT ansible_user=workshop ansible_ssh_pass=workshop ansible_become_pass=workshop
WDWD
[GROUP_NAME]- Specifies a server/inventory group.SERVER_IP_ADDRESS:SSH_PORT-SSH_PORTis optional. A hostname or ip address the server is reachable.ansible_user- Specifies the SSH username to login with.ansible_ssh_pass- SSH user password.ansible_become_pass- The sudo (default) password.
If you have created your inventory properly, run ./setup.sh --syntax-check to check for any syntax errors.
No syntax errors? Let’s bring the cluster up!
Bringing up your cluster with Ansible
All the servers need to have python installed!
Before you continue to do anything, go to the task kubernetes101 directory and execute the prepare.sh script. The script will download and setup all files required for the deployment of the cluster.
If the script exits with an error, please get in touch with me (It should normally not exit with an error).
Then navigate into the kubernetes/contrib/ansible directory, run ./setup.sh -vvvv (the -vvvv are for verbose), this will setup all machines to your needings.
If a step fails (It shouldn’t fail), try to fix it through MAGIC, most problems are solved by just running the command again.
Summary
We now have a working Kubernetes cluster (DON’T use this setup in production! There is more work required to make it secure for productions use.). We are now ready to deploy a WordPress with Mysql on it :)
Pointers, Tuts and Docs
- Kubernetes
- My favorite one
- Kubernetes Basics
- Storage “Management”
- Service Loadbalancing (Kubernetes Style)
- Uses a Key-Value Storage
- Docker Swarm
- Requires Docker Daemon to run on a network socket
- Authentication using Certificates
- Uses a Key-Value Storage
- Shipyard
- Simple setup
- Rancher
- Simple (non-https and non-ha) setup
First Deployment with Kubernetes
TASK:
kubernetes202
kubectl Files
kubectl files, as I call them, are written in YAML (YAML Ain’t Markup Language) like docker-compose.yml files, but have some “big” differences.
Let’s take a look at an example of a WordPress, Database and phpMyAdmin Pod and services.
These files are also located in the task directory and are here shown for people that haven’t cloned the workshop repository.
WDWD comments are included in the code boxes.
WordPress
Pod
# Kubernetes API version
apiVersion: v1
# Type of "request"
kind: Pod
# Metadata of the "object"
metadata:
  # Name of the "object"
  name: wordpress
  # Labels of the "object"
  labels:
    # A lable named "name" with value "wordpress"
    name: wordpress
# spec ~= Specifications of the "object"
spec:
  # List of Container definitions
  containers:
    # What Docker image to use
    - image: wordpress
      # The "name"/"suffix" of the container name
      name: wordpress
      # List of environment variables
      env:
        - name: WORDPRESS_DB_HOST
          value: mysql.default:3306
        - name: WORDPRESS_DB_NAME
          value: wordpress
        - name: WORDPRESS_DB_USER
          value: wordpress
        - name: WORDPRESS_DB_PASSWORD
          value: wordpress
        - name: WORDPRESS_AUTH_KEY
          value: SECURE_AUTH_KEY
        - name: WORDPRESS_LOGGED_IN_KEY
          value: SECURE_LOGGED_IN_KEY
        - name: WORDPRESS_AUTH_SALT
          value: SECURE_AUTH_SALT
        - name: WORDPRESS_LOGGED_IN_SALT
          value: SECURE_LOGGED_IN_SALT
      # List of ports to "publish"
      ports:
        # ContainerPort exposes only to the inside of your network, not to the outside
        # To reach the container we create a cluster wide service
        - containerPort: 80
          # gives the port a name
          name: wordpress
Service
apiVersion: v1
# Service object
kind: Service
metadata:
  # labels for the service
  labels:
    name: wordpress
  # name of the service
  name: wordpress
spec:
  ports:
    # the port that this service should serve on
    - port: 80
  # label keys and values that must match in order to receive traffic for this service
  selector:
    # select pods with the name "wordpress"
    name: wordpress
Mysql Database Server
Pod
# Kubernetes API version
apiVersion: v1
# Type of "request" in this case a Pod
kind: Pod
# Metadata of the "object"
metadata:
  # Name of the "object"
  name: mysql
  # Labels of the "object"
  labels:
    # A lable named "name" with value "mysql"
    name: mysql
# spec ~= Specificationsof the "object"
spec:
  # List of Container definitions
  containers:
    # The "name"/"suffix" of the container name
    - name: mysql
      # What Docker image to use
      image: sameersbn/mysql:latest
      env:
        - name: DB_NAME
          value: wordpress
        - name: DB_USER
          value: wordpress
        - name: DB_PASS
          value: wordpress
      # List of container ports reachable from within the cluster
      ports:
        - containerPort: 3306
          name: mysql
Service
apiVersion: v1
# Service object
kind: Service
metadata:
  labels:
    name: mysql
  name: mysql
spec:
  ports:
    # the port that this service should serve on
    - port: 3306
  # label keys and values that must match in order to receive traffic for this service
  selector:
    # select pods with the name "mysql"
    name: mysql
phpMyAdmin
Pod
# Kubernetes API version
apiVersion: v1
# Type of "request"
kind: Pod
# Metadata of the "object"
metadata:
  # Name of the "object"
  name: phpmyadmin
  # Labels of the "object"
  labels:
    # A lable named "name" with value "phpmyadmin"
    name: phpmyadmin
# spec ~= Specificationsof the "object"
spec:
  # List of Container definitions
  containers:
    # The "name"/"suffix" of the container name
    - name: phpmyadmin
      # What Docker image to use
      image: phpmyadmin/phpmyadmin
      env:
        - name: PMA_HOST
          value: mysql.default
      # List of container ports reachable from within the cluster
      ports:
        - containerPort: 80
          name: phpmyadmin
Service
apiVersion: v1
kind: Service
metadata:
  # labels for the service
  labels:
    name: phpmyadmin
  # name of the service
  name: phpmyadmin
spec:
  ports:
    # the port that this service should serve on
    - port: 81
      # set the target of the port, in this case 81 -> 80
      targetPort: 80
  # label keys and values that must match in order to receive traffic for this service
  selector:
    # select pods with the name "phpmyadmin"
    name: phpmyadmin
kubectl - Our tool to rule them all!
The kubectl command is used to create new “objects”, view Pods, view Replication Controller and much more.
An example to view Pods in all namespaces:
kubectl get --all-namespaces pods
WDWD
kubectl- The kubectl command.get- Get “objects” from kubernetes API.--all-namespaces- Show objects from all namespaces.pods- Show only pods (Can be a comma seperated list of types, short forms are available).
Get all information about a Pod:
kubectl describe --namespace=NAMESPACE TYPE NAME
WDWD
describe- Call the describe routines.--namespace=NAMESPACE- Set namespace to search in (optional when set through kubeconfig file).TYPE- The type of objects to show. For examplepod,rc(for replication controller).NAME- Name of the object to show. For our WordPress Pod, would bewordpress.
To create our WordPress, MySQL, phpMyAdmin Pod and Services, we run:
kubectl create -f FILE_NAME
WDWD
create- Creates an object.-f FILE_NAME- Can be one file, a directory or stdin.
In our case FILE_NAME would be the path to the kubernetes202 task, kubernetes202/.
The files are read and the objects are created in alphabetical order (FIFO).
Summary
We have now knowledge about creating kubectl files. Our wordpress instance with the database is now running on the Kubernetes cluster, but currently not in HA mode (high Availability)
High Availability and “Balancing with Loads” - Kubernetes
Kubernetes balances loads by default
Kubernetes uses iptables to “balance” the traffic between services that are running across the cluster. Not perfect, but a good software side approach using iptables.
Kubernetes Ingress aka “Reverse Proxing between multiple webservers”
Please note Kubernetes Ingress doesn’t support L7 ssl termination yet! See here, list point Global Parameters.
Pointers, Tuts and Docs
- “Native” Docker
- jwilder/nginx-proxy - Automatic Docker Nginx Proxy
- Multi Host
The End
If you have any questions about the workshop content, feel free to ask them in the comments or ask me directly at the workshop.
Solutions
For the nginx Dockerfile
FROM debian:jessie

RUN apt-get update && apt-get install -y nginx

ENTRYPOINT ["nginx"]
For WordPress docker-compose.yml
# Taken from https://www.digitalocean.com/community/tutorials/how-to-install-wordpress-and-phpmyadmin-with-docker-compose-on-ubuntu-14-04
database:
  image: sameersbn/mysql:latest
  environment:
    DB_NAME: wordpress
    DB_USER: wordpress
    DB_PASS: wordpress
  volumes:
    - "/opt/docker/database:/var/lib/mysql:rw"
wordpress:
  image: wordpress
  links:
    - database:mysql
  ports:
    - 8080:80
  environment:
    WORDPRESS_DB_HOST: mysql:3306
    WORDPRESS_DB_NAME: wordpress
    WORDPRESS_DB_USER: wordpress
    WORDPRESS_DB_PASSWORD: wordpress
    WORDPRESS_AUTH_KEY: SECURE_AUTH_KEY
    WORDPRESS_LOGGED_IN_KEY: SECURE_LOGGED_IN_KEY
    WORDPRESS_AUTH_SALT: SECURE_AUTH_SALT
    WORDPRESS_LOGGED_IN_SALT: SECURE_LOGGED_IN_SALT
phpmyadmin:
  image: corbinu/docker-phpmyadmin
  links:
    - database:mysql
  ports:
    - 8181:80
  environment:
    MYSQL_USERNAME: root
    MYSQL_ROOT_PASSWORD: wordpress