Table of Contents
Goal of the Workshop
The workshop is going to show how simple it is to use Docker and why it is worth a thought to implement it into your development workflow.
The second topic is how to compose containers with docker-compose.
The last part is about the container orchestration tool Kubernetes by Google. As part of this you are going to create a Kubernetes cluster and you take a look at the internal services of Kubernetes and deploy applications on top of it.
Heads up - “Blogger” Words
- Grey Boxes with green line on the left: Mostly contain an useful tip, expected command output or something funny.
- TASK: Is a refer to a task in the workshop repository.
- WDWD: Stands for “What does what do” aka “Me explaining what the things listed below do” (short forms FTW!). I only explain new things in these sections.
Group Partition Schema
Two groups ore more should be good. Per group at least two or more people. Every group works on their own Kubernetes cluster. If there are people that aren’t as “advanced”, they can play around with Docker Swarm (No tutorial provided in this post!).
Special details
A prepared VirtualBox Image will be given around on an USB stick, during the preparation of the workshop.
The VM Username is workshop and so is the password.
“What’s in the f*cking box?!”
Fedora 23 with Docker and Cockpit enabled. Cockpit is enabled, so I can simply help and also monitor the VMs, if a problem occurs. Firewalld removed, Iptables cleared and persistence disabled.
Why is the VM running Fedora?
That’s simple, instead of, e.g., Debian, Ubuntu or CentOS? Fedora is more up to date. Not like Debian :P Yes, up to date doesn’t makes it more stable, but I never had a problem yet and having the latest version of packages is often just awesome, because of improvements or new features.
README
If you don’t know any further, add --help to the command, to get a help page that should guide you to your goal or use man INSERT_COMMAND_HERE to show the man(ual) page for the given command. If you can’t solve your problem feel free to ask me.
There are no dumb questions, but please don’t ask them. Okay? – Alexander Trost
Intro: Container and Microservices
Why do people like the Docker-“Principle”?
The Docker-“Principle” is simpleness. Making it as simple as possible to for example starting a WordPress instance with database server with only two commands (or one command using docker-compose).
Simpleness that almost everybody, with a little knowledge about using a shell or cmd, could do it. That’s what makes Docker great and bad again, because there are a lot of people that have little to no knowledge about “basic” troubleshooting. I had open issues, because of people A) not RTFM, B) No knowledge about how to troubleshoot problems on their own first.
Overall Docker is an awesome tool, that is more and more growing with each release and with all the awesome open source applications for Docker like Kubernetes, Flocker, Weave and many more.
Micro-what? Microservices!
Microservices are small gears, like a MySQL database, NoSQL database, Redis, etc., for a big application like Redmine, GitLab, etc. They allow you to test local in a small scale and then scale with your load (if done right).
Container?!
Currently Docker containers can (and will) only allow you to run any distribution that runs on Linux. NO WINDOWS or other bullshit! Every container runs in it’s own namespace. For this we need to understand how namespaces work. A namespace is a separated “branch”, where processes, mounts, etc. can exist without disturbing other processes, mounts, etc. in other namespaces.
An advantage of namespaces is, that you can limit the cpu, memory, network, etc. for them. For example, a process that goes rogue, can be limited to specific resource limits.
This diagram should make it clear, how namespaces can create “unlimited” separated and isolated container environments.
Docker and most other containers utilities not only use namespaces to separate containers from each other. There are several other techniques, that further improve security.
A container uses the existing Linux kernel, there are less resources used, because a container just uses the existing kernel processes and doesn’t need to spawn them like when using a virtual machine.
Why is it a good idea to use separate namespaces for networked applications? Because if someone breaches for example your webserver, he is just in the container and not on the host server. If you’ll then detect the breach, you just stop the container and would restart it with an updated image version that contains the latest webserver software.
TL;DR A container is NOT a VM. A container is a “separate” Linux system, that runs in an isolated namespaced environment of the running kernel on the running kernel.
Prepare for the Docker Madness
TASK
setup101
Side Notes
- You can install Docker directly on your system or in a VirtualBox. If you use a VirtualBox, please consider using Fedora 23 or anyother linux distro with at least kernel 4.x.
- If you are a Windows or Mac OSX user, ask yourself “What have I done wrong, to use such shitty plattform?”, switch to linux m8, thanks! You can use Boot2Docker (I don’t help or give any support if you use it though!).
- The download and login details to the VM are located here.
System “Requirements”
Nope, they’re not!
- A working Linux distro
- Linux Kernel 4.x or higher (“included” in the Virtualbox)
You can run Docker under any kernel 3.16+, but I recommend you to use the latest kernel for the implemented improvements in some of the file system and network systems Docker uses.
Docker Engine Installation
If you use the workshop VM, you can skip this section.
To install the Docker Engine run the command:
curl -sSL https://get.docker.com/ | sh
For a more details about the installation of the Docker Engine, see the Linux installation docs or the Windows installation docs.
When talking about Docker, we almost always talk about the Docker Engine. Because the Docker Engine is, as the name implies, the engine for the containers.
After you have installed it without any errors popping up, you have to start the Docker Engine. When your distribution is using systemd:
systemctl enable docker.service
systemctl start docker.service
On distribution without systemd:
/etc/init.d/docker start
This starts Docker and when using systemd enables the autostart for Docker Engine.
docker-compose Installation
If you use the workshop VM, you can skip this section.
With curl we download the docker-compose binary, then we move docker-compose to your /usr/local/bin that is in your PATH and set the execute permission.
wget -O /usr/local/bin/docker-compose "https://github.com/docker/compose/releases/download/1.8.0/docker-compose-`uname -s`-`uname -m`"
sudo chmod +x /usr/local/bin/docker-compose
For more detailed docker-compose installation docs, see here.
After you have followed the commands above, you can test if you have installed docker-compose successfully by running docker-compose --version.
The recording below shows the expected output for the docker-compose installation and the installation test.
Expected Output
Clone the workshop repo
If you use the workshop VM, you can skip these steps.
Clone the Workshop repo from GitHub https://github.com/galexrt/workshop-docker.git. It’ll provide all files and tasks used in the Workshop.
git clone https://github.com/galexrt/workshop-docker.git
Expected Output
Running your first Docker containers
This will guide you through the commands needed to start your WordPress instance with MySQL database server.
Hello World!
When you have Docker installed correctly, you now have to add your user to the docker group (on most distributions the group is called docker).
To add your user to the docker group, you can run the following command:
gpasswd -a $USER docker
Please relog or restart your machine after you have added yourself to the group.
Now to test your Docker installation, we start like when learning a new programming language, with the simplest example. A “Hello World” container. To run the “Hello World” container, you simply run the following command:
docker run hello-world
Example Output
When everything went correct, I can now welcome you to the big World of the containers!
Basic commands you need to know
docker ps- Displays all currently running containers. To display all containers, add the-aoption or use the filter option-f [](can be specified multiple times).docker stop CONTAINER- Sends aSIGTERMsignal to the containers main process. WhereCONTAINERis a container ID or name.docker rm CONTAINER- Deletes a stopped/exited container. WhereCONTAINERis a container ID or name.
One of the most important commands we need is docker run. So we now take a look at it and run:
docker run --help
Expected Output
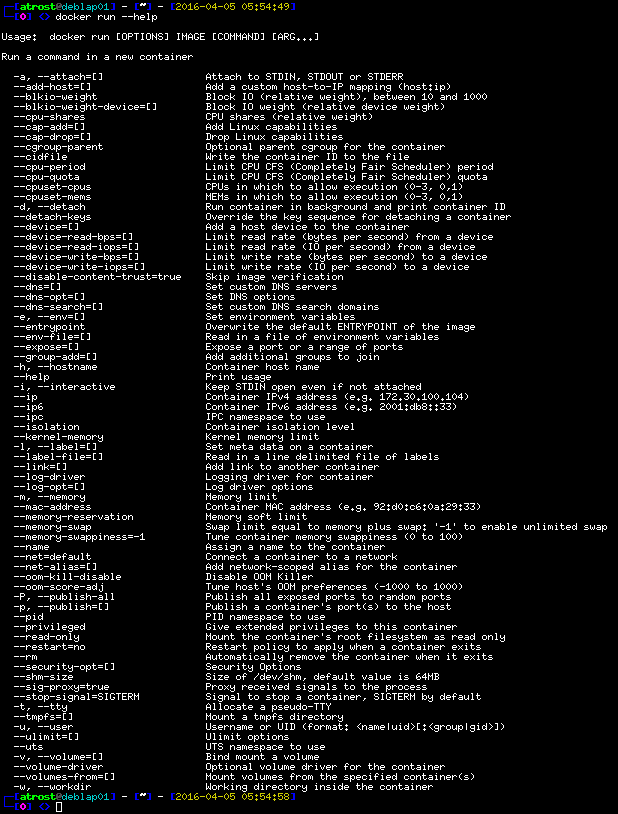
As we can see docker run has a lot of options, to choose from.
In this workshop we are only covering some of basic options, you should know to begin with.
WDWD
[OPTIONS]- Run flags/options.IMAGE- The name of a Docker image.[COMMAND] [ARG ...]- Depending on the images, used as arguments or as the command by the entrypoint.
I’m going in depth about image names, command args and entrypoint later on (here).
Starting the MySQL database server
I’m going to use the MySQL Docker image from sameersbn in the workshop. Because this image is more convenient to setup, than the official available MySQL and MariaDB Docker image.
So we specify the IMAGE argument in our command now.
docker run \
    sameersbn/mysql:latest
Let’s give it a name (BTW Can we keep it?)
How about Dogmeat? :D
Our MySQL database server container should have a name, so we don’t need to use the randomized name or unique ID.
Every container gets an unique ID and randomized name. We can override the name with the --name NAME option.
Let’s name it “database”.
Our command now looks like this:
docker run \
    --name mysql \
    sameersbn/mysql:latest
Giving a container a “simple” name, is important to simplify later processes, like connecting from the WordPress instance to the MySQL database server.
Does the container keep on running or do I need something like screen or what?!
The --detach and --interactive options.
If you now run the command to start the container, upon start you see some log output coming, but should notice that when closing the terminal, the database container immediately gets stopped/exits (To see if the container exited, use docker ps -a).
When you run a container, by default your current stdin and stdout will be attached to the container, making it interactive (If you want an interactive container, you should still add --interactive option). To disable the attachment of stdin and stdout add the --detach (or short -d) option to the command. Using the --detach (or -d) option, runs the container detached.
docker run \
    -d \
    --name mysql \
    sameersbn/mysql:latest
Running a container detached is most common for containers with server or headless application, like Nginx, MySQL, etc.
Don’t forget to delete the exited/stopped MySQL database container with the remove command, docker rm database (where database is the name or ID of the container) else if starting you’ll get an error saying that a container already exists with the same name.
In case you already forgot, here’s how to delete the container
docker rm NAME
How would one configure the MySQL database server instance?
One big questions will be for you, “How can I configure the MySQL database server?” in the container. You can.. A) use config files or B) use environment variables (portable and the best way).
The most portable way is to use environment variables. Most containers that are configured through environment variables, have a script, the entrypoint, that sets config variables and a lot more, before the main application/program is started.
In the case of sameersbn/mysql:latest the following environment variables are used for basic configuration:
DB_USER- Database User to create. User will be given access to the database(s) fromDB_NAME.DB_PASS- Password for the given database user.DB_NAME- Database to create and gain access to the username given inDB_USER.
To specify an environment variable, the --env (or -e) option is used.
docker run \
[...]
    -e 'DB_USER=wordpress' \
    -e 'DB_PASS=wordpress' \
    -e 'DB_NAME=wordpress' \
[...]
*sarcasm on* 100% secure passwords used here *sarcasm off*
Use secure passwords when running in production!
openssl rand -base64 20, can be used to generate a “secure” password.
How do I save the database outside the container?
You want to save your data outside of the container, for a simple reason: If you stop and delete the container, your data is gone. For this Docker has volumes.
A Volume is like a mount from the host system inside the container.
The volume option is --volume (or -v). The syntax of a volume option is for example:
docker run \
[...]
    -v HOST_PATH:CONTAINER_PATH:MODE
[...]
WDWD
HOST_PATH- Path to mount from the host system inside the container.CONTAINER_PATH- “Mount” destination path in the container.:MODE- Is optional. Can berw(read-write) orro(read-only). Defaults torw.NOTE
- If the host path doesn’t exist it’ll get created.
- The host path can be a file too.
- Docker doesn’t distinguish between file or folder. If the path doesn’t exist, a directory always get’s created.
Running the MySQL database server container
Now we have all components, we need for running the MySQL container.
When we have put everything we learned now together, we should get something that looks like this:
docker run \
    -d \
    --name mysql \
    -e 'DB_USER=wordpress' \
    -e 'DB_PASS=wordpress' \
    -e 'DB_NAME=wordpress' \
    -v /opt/docker/wordpress/mysql:/var/lib/mysql \
    sameersbn/mysql:latest
WDWD
-d- To run the container detached.--name wordpress- Gives the container the name “wordpress”.-e ...=...- Specifies environment variables, that are used for configuration.-v /opt/docker/wordpress/mysql:/var/lib/mysql- Mount/opt/docker/wordpress/mysqldirectory at/var/lib/mysqlinto the container.sameersbn/mysql:latest- Specifies what image to use.
If you run the run command with the --detach (or -d), it’ll just return the unique (long) ID of the container.
With docker logs CONTAINER (where CONTAINER is a container ID or name), you’ll get the logs of the first process in the container.
Starting the WordPress instance
So you now already know some “basics”, about starting containers. I’m not going in depth with every little thing anymore.
How can the WordPress container and the MySQL container communicate with each other?
In Docker by default all containers can talk to each other, if they know the IP address, that is called short ICC or Inter Container Communication (docker daemon [...] --icc=[true/false]).
To allow the WordPress container to contact the MySQL container, we would need to get the IP address of the MySQL container. You can use the docker inspect CONTAINER_OR_IMAGE (where CONTAINER_OR_IMAGE is the unique ID or name of a container), the command returns JSON formatted output with “all” informations about the given container(s) or image(s).
But to do this everytime the MySQL container get’s restarted, is too much work. That’s where Docker implements a mechanism called links.
As you might guess, with links, you can “link”/connect containers together. Keep in mind that with the above mentioned Docker daemon option --icc=true all containers can talk to each other, when knowing the IP address of another container.
The link option syntax is like this:
docker run \
[OPTIONS]
    --link=CONTAINER_NAME:LINK_NAME \
[IMAGE]
WDWD
CONTAINER_NAME- The container to link.LINK_NAME- The name of the “/etc/hosts” entry (aka “fake” DNS record).
If you link the MySQL container to the WordPress container, the WordPress container will get a special entry in it’s /etc/hosts about the MySQL container and “inherit” all of the MySQL containers environment variables prefixed with the link name.
For example the link option is --link=mysql:database.
So if we take a look at the /etc/hosts and environment variables inside the WordPress container, with the container link to the MySQL container, it should get much clearer how the “linking works”.
To show you the created /etc/hosts entry and the environment variables created inside the container.
I’m running the following command, to just demonstrate it:
docker run \
    -d \
    --name=wordpress \
    --entrypoint=/bin/bash \
    wordpress
cat /etc/hosts
env
exit # To exit the container
docker rm wordpress
WDWD
--entrypoint=/bin/bash- This overwrites the command executed, when the container is started.Expected Output
(The output here may looks a bit different, due to small changes to the commands executed in the demo)
The environment variables are created inside the new container only, not in the link source! The container that is used as the link destination is left untouched.
beginning with DATABASE_, allow to get the environment variables and published ports from the linked container very simple.
NOTE
- There can be multiple links with the same name.
- You can’t attach two same named links to the destination container (the container you are creating).
How can I reach the WordPress instance from the outside?
To make a port available to the “public”, that’s why it’s called publishing ports, you use the --publish (or -p) option in this format:
docker run \
[OPTIONS]
    -p HOST_ADDRESS:HOST_PORT:CONTAINER_PORT/PROTOCOL
[IMAGE] [ARGUMENTS]
docker run \
[OPTIONS] \
    -p 80:80/tcp \
[IMAGE] [ARGUMENTS]
WDWD
HOST_ADDRESS:- Optional. By default0.0.0.0. Address to expose the port on the host system.HOST_PORT- Host port to expose the container port on.CONTAINER_PORT- Container port to expose./PROTOCOL- Optional. By defaulttcp. The port protocol, currently can betcporudp.
And that’s how you forward/publish ports from the container to the outside.
Running the WordPress instance container
To configure our WordPress container instance, the Docker image comes with extra environment variables.
The WordPress image name is wordpress (Docker Hub Page)
The possible environment variables for the configuration are the following ones:
-e WORDPRESS_DB_HOST=...Defaults to the DNS name or IP address and port of the linked MySQL container, link namemysql.-e WORDPRESS_DB_USER=...Defaults to “root”.-e WORDPRESS_DB_PASSWORD=...Defaults to the value of theMYSQL_ROOT_PASSWORDenvironment variable from the linked MySQL container, link namemysql.-e WORDPRESS_DB_NAME=...- Defaults to “wordpress”.-e WORDPRESS_TABLE_PREFIX=...- Defaults to “”. Only set this when you need to override the default table prefix inwp-config.php.-e WORDPRESS_AUTH_KEY=...,-e WORDPRESS_SECURE_AUTH_KEY=...,-e WORDPRESS_LOGGED_IN_KEY=...,-e WORDPRESS_NONCE_KEY=...,-e WORDPRESS_AUTH_SALT=...,-e WORDPRESS_SECURE_AUTH_SALT=...,-e WORDPRESS_LOGGED_IN_SALT- Set these to a secure random value; in production use different random values per variable.
In the case of the WORDPRESS_DB_HOST, the value would be the name of the link name in the docker run command below. In the case of the below command, the WORDPRESS_DB_HOST would be database.
The command to run the WordPress container is like this:
docker run \
    -d \
    --name wordpress \
    -e 'WORDPRESS_DB_HOST=database' \
    -e 'WORDPRESS_DB_USER=wordpress' \
    -e 'WORDPRESS_DB_PASSWORD=wordpress' \
    -e 'WORDPRESS_AUTH_KEY=wordpress' \
    -e 'WORDPRESS_SECURE_AUTH_KEY=wordpress' \
    -e 'WORDPRESS_LOGGED_IN_KEY=wordpress' \
    -e 'WORDPRESS_NONCE_KEY=wordpress' \
    -e 'WORDPRESS_AUTH_SALT=wordpress' \
    -e 'WORDPRESS_SECURE_AUTH_SALT=wordpress' \
    -e 'WORDPRESS_LOGGED_IN_SALT=wordpress' \
    --link mysql:database \
    -p 80:80 \
    wordpress
WDWD
-d- To run the container detached.--name wordpress- Gives the container the name “wordpress”.-e ...=...- Specifies environment variables, that are used for configuration.--link mysql:database- Creates a “link” namedmysql, from thedatabasecontainer.wordpress- Specifies what image to use.
Now execute the command and you should be able to see the WordPress installation screen at http://127.0.0.1:80/.
NOTE
All data inside the container, will be lost on removal of the container! In our case, we already use volumes, so don’t worry.
For cleanup you now stop and delete the container.
To stop the WordPress instance, run docker stop CONTAINER (where CONTAINER in this case is wordpress). After stopping the container, you can remove it with docker rm CONTAINER.
The container has to be stopped, before it can be removed.
Now that we looked into some of most important beginner topics of Docker, we are going to take a look deeper into these topics.
How do you execute a command/shell inside the container?
To execute a command inside the container, after it has been started, for example in the MySQL container for maintenance access.
With our example, MySQL container let’s display a list of the existing databases. The command to display the databases from shell is:
mysql -u root -p -e "SHOW DATABASES;"
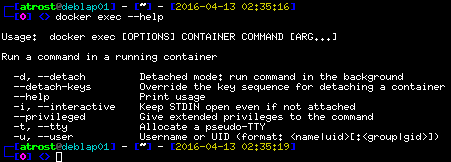
For this case, the command docker exec is used.
The syntax of docker exec is a bit equal to the of docker run. Running docker exec --help as always to show you the help/syntax menu.
Expected Output
To run a command interactively for example opening an interactive MySQL shell session, the command would be:
docker exec \
    -it \
    CONTAINER \
    mysql -u root -p
WDWD
-i- Attach the stdin aka interactive.-t- Optional. Allocates a pseudo-TTY (pseudo TeleTYpewriter) to the shell/command run.CONTAINER- Container ID or name of the container the command should be executed in.mysql -u root -p- The command and arguments to execute.
You would use the --detach (or -d) option to run a non-interactive command in the background with no logs or return (Good for cron jobs ;)).
NOTE
- To be able to run a command in the container, the command/binary/file/whatever has to exist in the container!
Data, Data everywhere
Volumes aka Mounts
Volumes add persistence to your data. When a container is stopped and removed, the data in the container is lost.
With a volume you would mount the part of the data out of the container. For example with our MySQL container, we would mount the container path /var/lib/mysql/ (contains the MySQL databases) somewhere safe.
So if the MySQL server inside the container should ever crash and the container then be terminated, you can just fire up with the docker start command or delete the container and execute the docker run command again. The MySQL container then starts using the data where it exited.
I already showed the option, but here is it again (Long form --volume=):
docker run \
[OPTIONS]
    -v HOST_PATH:CONTAINER_PATH:MODE
[IMAGE] [ARGUMENTS]
WDWD
HOST_PATH- Path to mount from the host system inside the container.CONTAINER_PATH- “Mount” destination path in the container.:MODE- Is optional. Can berw(read-write) orro(read-only). Defaults torw.TL;DR Data inside container to outside of container.
NOTE
- When the host path doesn’t exist, it’ll get created. BUT the permissions will be a bit “freaky”.
- When the path get’s created on the host, the directory will be (by default) owned by
root:root, mod permsdrwxr-xr-x.- You can now create volumes using the Docker command, but I’m not going deeper into this. You can read more about this here.
Data containers aka --volumes-from
NOTE
- I do NOT recommend this method as I often enough “accidentally” clear all exited/dead containers, so my disk space doesn’t run out.
- I also have cron jobs running on my servers, that clean exited containers. Meaning data containers would just get cleared out everytime.
You can store data inside another container, that’s called data volume containers.
When creating an image, you can specify those volumes. You create a container that has a volume “built-into” (Specified while the image was built), meaning that assuming it is our MySQL server image the in-built volume would be located at /var/lib/mysql
The data volume container runs “nothing”, it is just there for purpose of getting used by another container. For this you change the entrypoint with the following run option --entrypoint=COMMAND (where command could be just /bin/true) so the container stops and doesn’t run the program it should.
Now that we would have a data container, we can use the volumes from this container using the --volumes-from=CONTAINER (where CONTAINER is a container name or ID) option.
Let’s assume we have a data container, created from the example here, with the volume /data and we have a second container, running the same image, that would save the data to /data.
In this case using the --volumes-from option would write the data inside the first container, the data container.
As I wrote I personally don’t recommend and I’m not even using this method, as I find it bad.
Networking
NATing using iptables
I’m not going to explain NAT here.
NAT also Network Address Translation, allows multiple devices to sit behind one IP address.
Over seven bridges you must go (docker0 bridge and veth interfaces)
Docker creates a bridge that is used as a bridge to your network interfaces (eth0, en0, etc.). The bridge Docker creates is called docker0 by default.
By default the docker0 bridge will be assigned the 172.17.0.1/16 IP range as a network. This IP address range will be used, to assign every container a separate IP.
Sometimes the bridge address range needs to be adjusted, in most cases when you are running Docker in a corporate network or the network range is just already in use/allocated.
You would need to add the --bip=192.168.1.0/24 (where 192.168.1.0/24 is an unused IP range) to on Debian based systems to the /etc/default/docker or on RHEL based systems to the /etc/sysconfig/docker or /etc/sysconfig/docker-network.
When a container is created, a veth interface will be created too (depending on the network mode). The veth interface will have an unique name. veth stands for virtual ethernet device. The veth device will “connect” to the bridge, to acquire network connectivity. The veth interface will not show the ip address when using tools like ip addr show or ifconfig.
Example Output
This recording shows, the docker0 interface and the veth interface of the database container. In the end we use
docker inspect CONTAINERto get the IPAddress of the container.
Docker has the feature to even create an overlay network, between multiple machines. But I’m not going deeper into this. For people interested in this feature, see the Docker docs here (Docs Docker network create).
Network “modes” (“default”, host or other)
I’ve wrote, that I’m not going deeper into Docker’s own (overlay) network feature, but with this topic, I’ll have to go into it just a bit.
When running a container the default network “mode” is named default (--net=default). The default network “mode” creates a separate network stack for every container.
There is also the network “mode” host available by default. The host network “mode” gives the host network stack aka “full access to the network of the host system” inside the container.
The network “mode” can be also the name of an (overlay) network created using the Docker “client” (engine).
Example Output
In the recording, you can see that when using the default network mode you’ll get a “newly” created network stack and when using the
hostnetwork mode, the container gets the hosts network stack.
Publishing ports
When using the default network mode, Docker creates iptables rules so published/forwarded ports are reachable from the outside.
In the example, we see the iptables rules for a container with published port 80/http.
Example Output
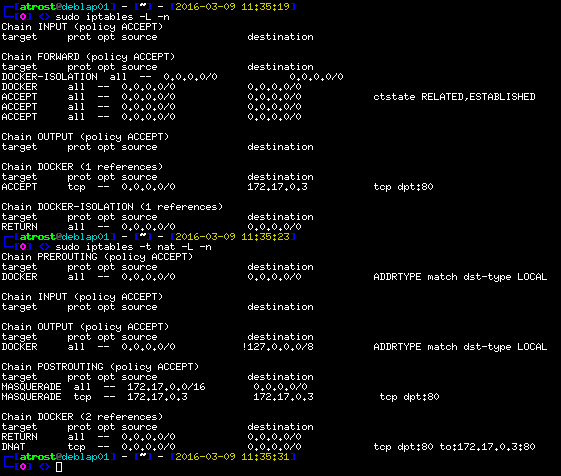
As we can see Docker uses a separate DOCKER chain in the FORWARD chain, to map incoming traffic on port 80 to the container IP.
After the destination IP has been changed, Docker uses DNAT (Destination Network Address Translation), to “map” the traffic to the container’s end address.
TASK
network101
You can use the script show_me_dat_network.sh from task network101, to view your network interfaces and current iptables rules.
Looking into your network
TASK
network101
Do you want to visualize your container network situation? Yes? Then the perfect tool for this is Weave Scope.
In the network101 task is a file called start_weave_scope.sh. The script downloads the Weave Scope wrapper script, that starts the containers needed for Weave Scope to function.
The commands that are used to download the Weave Scope wrapper script are:
sudo wget -O /usr/local/bin/scope https://git.io/scope
sudo chmod a+x /usr/local/bin/scope
sudo scope launch
After the image of the container has been pulled and started, you can then navigate to http://localhost:4040 to see the Weave Scope UI.
Expected Output
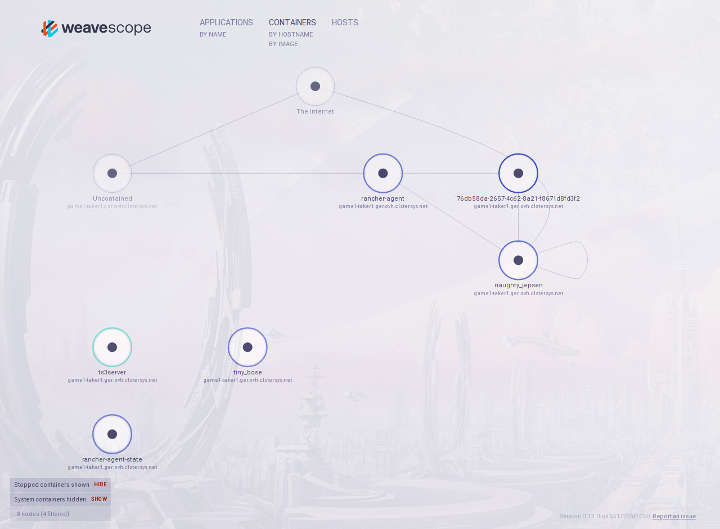
Through the Weave Scope UI you gain an immersive insight into your network of the containers.
Limiting container resources
As I already mentioned in the Container!? part, namespaces are able to limit the resources available to processes, etc.
CPU Limit
Limiting the precious computing resource of a container.
$ docker run --help
[...]
  --cpu-period                    Limit CPU CFS (Completely Fair Scheduler) period
  --cpu-quota                     Limit CPU CFS (Completely Fair Scheduler) quota
  --cpuset-cpus                   CPUs in which to allow execution (0-3, 0,1)
[...]
You can limit the time period and the quota of the CFS (Completely Fair Scheduler).
Limiting a container to specific cores is also possible (--cpuset-cpus).
Memory and Swap Limit
$ docker run --help
[...]
  --cpuset-mems                   MEMs in which to allow execution (0-3, 0,1)
[...]
  --kernel-memory                 Kernel memory limit
[...]
  --memory-reservation            Memory soft limit
  --memory-swap                   Swap limit equal to memory plus swap: '-1' to enable unlimited swap
  --memory-swappiness=-1          Tune container memory swappiness (0 to 100)
[...]
  --oom-kill-disable              Disable OOM Killer
  --oom-score-adj                 Tune host's OOM preferences (-1000 to 1000)
[...]
As you can see, there is a good amount of option to play around with the memory a container can use and how it can use the memory.
A good feature if you have limited memory available is to play with the memory swappiness.
The OOM (Linux Out of Memory Management) options are good, if you have memory intensive applications, but only limited memory available. So important application container don’t get killed, when the system should run out of memory.
Selfies? I mean Images
An image is the core of a container. Without an image, there would be no container. Creating images is simple to do, depending on what you try to “containerize”. In this part we set a simple goal. Our goal is to create a container that runs nginx in it.
Image Names explained
Images that “come” from the Docker Image Hub, don’t need a repository specified.
The image we used for the MySQL container is:
sameersbn/mysql:latest
WDWD
sameersbn- The username of the creator.mysql- The image name.latest- The “version” tag. The tag can be anything, but emojis.
An example for an image that is pulled from a different image server, than the official Docker Hub, is my image for Zulip by Dropbox that is hosted on quay.io.
quay.io/galexrt/zulip:1.3.10
SERVER/USERNAME/IMAGE_NAME:TAG
WDWD
quay.io,SERVER- Defaults todocker.io. The image repository server to pull the image from.galexrt,USERNAME- Username of the image creator/uploader.zulip,IMAGE_NAME- Name of the image.1.3.10,TAG- Like git tags. When not specified, the default islatest.
In the case of official created images, like the WordPress image we used no server and username is required (by default). Official images are “marked” through the “missing” username in the image name and the Docker Image Hub url having an underscore instead of an username (https://hub.docker.com/r/_/wordpress/).
What have Layer Cakes to do with Docker Images?
TASK:
dockerfile101
In the Docker universe, a Docker image is built from the bottom to the top like a cake, the bottom is a baseimage (or any other image as a base). Every “new” layer on top of it, is an action that had been run when building the image.
Meaning if we create an image from the “baseimage” fedora:23 like the example Dockerfile, a cross-section/profile would look like this:
That is one of the reasons, why Docker images are so small. If you download 10 images that are based on debian:jessie, you would only have to download the created/modified layers, because the baseimage is the same for these 10 images.
To build/create an image, you create a Dockerfile and that’s what we are going to talk about next.
Dockerfile examples
As you may have already seen in the task directory dockerfil101, there was a file called Dockerfile.
A Dockerfile contains build instructions for an image. For Dockerfiles there is a “special” syntax, but the syntax is very simple.
I’m going to show you a simple and a more advanced example of Dockerfiles.
Simple Dockerfile Example
Taken from the carazzim0/docker-ebot GitHub project, file Dockerfile.
FROM debian:jessie

ENV EBOT_HOME="/ebot" TIMEZONE="Europe/Berlin"

ADD entrypoint.sh /sbin/entrypoint.sh

RUN apt-get update && \
    apt-get -y upgrade && \
    apt-get clean && \
    apt-get -y install nodejs npm curl git php5-cli php5-mysql screen git && \
    apt-get clean && \
    sed -i "s~;date.timezone =~date.timezone = $TIMEZONE~g" /etc/php5/cli/php.ini && \
    /bin/ln -s /usr/bin/nodejs /usr/bin/node && \
    curl -sS https://getcomposer.org/installer | php -- --install-dir=/usr/bin && \
    mkdir "$EBOT_HOME" && \
    git clone https://github.com/deStrO/eBot-CSGO.git "$EBOT_HOME" && \
    cd "$EBOT_HOME" && \
    git checkout "master" && \
    /usr/bin/php /usr/bin/composer.phar install && \
    npm install socket.io formidable archiver

COPY Match.php $EBOT_HOME/src/eBot/Match/Match.php

VOLUME ["$EBOT_HOME/demos", "$EBOT_HOME/logs"]

EXPOSE 12360 12361

ENTRYPOINT ["/sbin/entrypoint.sh"]
Advanced Dockerfile Example
Taken from the galexrt/docker-zulip GitHub project, file Dockerfile.
FROM quay.io/sameersbn/ubuntu:latest
MAINTAINER Alexander Trost <galexrt@googlemail.com>

ENV ZULIP_VERSION="master" DATA_DIR="/data"

ADD entrypoint.sh /sbin/entrypoint.sh

RUN apt-get -q update && \
    apt-get -q dist-upgrade -y && \
    apt-get install -y git && \
    mkdir -p "$DATA_DIR" /root/zulip && \
    git clone https://github.com/zulip/zulip.git /root/zulip && \
    cd /root/zulip && \
    git checkout "$ZULIP_VERSION" && \
    rm -rf /root/zulip/.git

ADD custom_zulip_files/ /root/custom_zulip

RUN cp -rf /root/custom_zulip/* /root/zulip && \
    VOYAGER_CLASS="dockervoyager" DEPLOYMENT_TYPE="dockervoyager" ADDITIONAL_PACKAGES="python-dev python-six python-pbs" \
    /root/zulip/scripts/setup/install && \
    wget -q https://www.zulip.com/dist/releases/zulip-server-latest.tar.gz -O /tmp/zulip-server.tar.gz && \
    tar xfz /tmp/zulip-server.tar.gz -C "/home/zulip/prod-static" --strip-components=3 --wildcards */prod-static/serve && \
    rm -rf /tmp/zulip-server.tar.gz && \
    ln -nsf /home/zulip/deployments/current/prod-static/serve /home/zulip/prod-static && \
    apt-get -qq autoremove --purge -y && \
    apt-get -qq clean && \
    rm -rf /root/zulip/puppet/ /var/lib/apt/lists/* /tmp/* /var/tmp/*

ADD setup_files/ /opt/files
ADD includes/supervisor/conf.d/zulip_postsetup.conf /etc/supervisor/conf.d/zulip_postsetup.conf
ADD includes/createZulipAdmin.sh /createZulipAdmin.sh

VOLUME ["$DATA_DIR"]
EXPOSE 80 443

ENTRYPOINT ["/sbin/entrypoint.sh"]
CMD ["app:run"]
Don’t worry we’re going to make a very simple and basic image. ;)
Understanding Dockerfiles
TASK:
dockerfile202TIP
If you have trouble writing a
Dockerfile, check the Dockerfile Docs.
You will create an image with nginx installed (You can later expand it, with more functionality, like with PHP-FPM).
To guide you in creating a nginx image, I show you an example of a http webserver application written in golang, before you are going to create your own nginx image.
Golang Dockerfile Example: (Example taken from Shiju Varghese Medium Blog)
golang image where workspace (GOPATH) configured at /go.
FROM golang:latest
Copy the local package files to the container’s workspace.
ADD . /go/src/github.com/shijuvar/golang-docker
Build the golang-docker command inside the container.
RUN go install github.com/shijuvar/golang-docker
Run the golang-docker command when the container starts.
ENTRYPOINT ["/go/bin/golang-docker"]
http server listens on port 8080.
EXPOSE 8080
> **WDWD**
>
> * `FROM ...` - Sets the baseimage.
> * `COPY ... ...` - Copy files from the build root.
> * `ADD ... ...` - Same as `COPY`, but target can be "online" and if it is an archive, it will be extracted.
> * `RUN ...` - Run commands (Shell used `/bin/sh`).
> * `ENTRYPOINT ["..."]` - The command to execute when the container is started.
> * `CMD ["..."]` - Arguments for the `ENTRYPOINT`.
> * `EXPOSE 8080 ...` - Expose a port when linked (_If not specified port not reachable when linked!_). To specify protocol just add a `/tcp` or `/udp`.

There's even the possibility, to execute specific commands when the image is used as a base image, the base instruction is called `ONBUILD ...`, but explaining this is beyond the scope of this workshop. Thanks for understanding!

To build an image we use the `docker build` command. Building this golang example image, we run the following command:
```console
docker build -t golang-docker -f Dockerfile .
WDWD
build- Used to build Docker images.-t IMAGE_NAME- Specify the name (with an optional tag) of the image, you are creating (Optional. NOTE This options is important when manually building and pushing a Docker image to a repository).IMAGE_NAMEis a string name for the image with an optional tag specified. The tag is added by adding double dots like this:TAG_NAME.-f DOCKERFILE- Set the location of theDockerfile(Optional)..- The image build root of the image build (Important whenADDorCOPYis used in theDockerfile). All files will be at least added to the build environment for easy access, but not added to the image itself.
As you can see, it isn’t hard to build your first Docker images. If you want to see more advanced examples, you can find more examples in my GitHub repositories here.
Commands you need to know when working with Docker images
Deleting a Docker image
To delete a Docker image, you use the docker rmi subcommand. The syntax is the same as for the docker rm subcommand.
docker rmi IMAGE [IMAGE...]
WDWD
rmi- The subcommand for deleting one or more image(s).IMAGE [IMAGE...]- One or more image names or IDs to delete.
Build a Docker image from Dockerfile
Use this command to build images.
docker build -t IMAGE_NAME -f DOCKERFILE BUILD_PATH
WDWD
build- The build subcommand.-t IMAGE_NAME- More details toIMAGE_NAMEare going to be explained in a later section, here or see above WDWD part.DOCKERFILE- Path to a Dockerfile. Defaults to the current work directory withDockerfileattached as a file name.BUILD_PATH- The build root path. Files in the directory will be added to the Docker build environment, but not to the image itself. The files are only added when the specified Dockerfile has instructions to do so. You can’t go deeper than theBUILD_PATH!
Let’s build your first Docker image
Now that we know some Dockerfile basics, we can start building our own nginx image from the baseimage debian:jessie.
Let’s make this like a test in the school, replace all __BLANK__ with the correct answer (Solutions are here):
FROM __BLANK__

RUN __BLANK__

ENTRYPOINT ["__BLANK__"]
Got all blanks filled out? Good. Let’s build the image:
docker build -t workshop-nginx .
Expected Output of
docker build -t workshop-nginx .
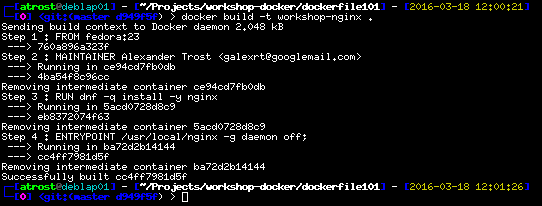
The build should go successfully, when you filled in the blanks correctly. Let’s run the image to see if it is working, the container name will be workshop-nginx:
docker run \
    --name workshop-nginx \
    -d \
    -p 80:80 \
    workshop-nginx
If you did something wrong, remove the container using (where CONTAINER_NAME is a container ID or name):
docker rm CONTAINER_NAME
To check if the container is running with your image, run docker ps -a.
WDWD
ps- Like thepscommand, but for the containers.-a- Show all containers, whether their current state, without it showing only running containers.
You should see that the container you started, has exited.
There’s a simple reason, why the container exited/stopped. When running a command as the entrypoint, it has to stay running, not fork to background. When the process forks to background, Docker will think the process has stopped and the container status will be set to exited with the last return code.
That’s why we need to tell nginx, not to run as a daemon, not fork to background, with the following additional arguments "-g", "daemon off;" (these arguments must be added to the ENTRYPOINT line of the Dockerfile).
So we could make a change to the nginx.conf, overwrite nginx.conf with a custom one or just change the ENTRYPOINT line to make it look like this:
ENTRYPOINT ["nginx", "-g", "daemon off;"]
Let’s rebuild the image (same command) and run it again. Open http://127.0.0.1:8080 in your browser and voilà it should show the nginx default page.
To go further with your created image, let’s “mount” a volume inside the container with our own index.html.
Use the index.html from task dockerfile202 or create one yourself.
Now we add a volume to the container. Add -v "$(pwd)":"/usr/share/nginx/html" to the docker run command, but don’t forget add the argument before the image name.
Your command should look like this:
docker run \
    --name workshop-nginx \
    -d \
    -p 8080:80 \
    -v "$(pwd)":"/usr/share/nginx/html" \
    workshop-nginx
This starts a container named workshop-nginx running the image workshop-nginx with a volume mounted at /usr/share/nginx/html.
If we now open http://127.0.0.1:8080 in the browser, we will see our index.html. Well done!
How can this help in the development workflow?
If you are for example creating a new CMS written in PHP you could, create a Docker image for it. On every push to the git repository of the project, the image could be built and automatic checks could be run, to ensure every feature is working fine.
For example Travis-CI has switched big parts of their build infrastructure to Docker containers. Quoting Travis-CI some headings from their blog post:
Builds start in seconds Faster builds More available resources in a build container Better network capacity, availability and throughput Easier to scale
As we can see, containers are better than VMs (depending on the application area).
The lower resource usage is good for the development workflow, making it faster and cheaper.
Composing containers made simple with docker-compose
Making multi container applications simpler to start
To remove the process of typing all those commands to start the containers, docker-compose has been created.
docker-compose makes it easy peasy lemon squeezy to run one to many containers using one command.
The syntax of a docker-compose.yml is YAML (YAML Ain’t Markup Language). A good syntax checker, I use, is available here.
In our example with WordPress we will create a docker-compose.yml for our MySQL database server, WordPress instance and as an extra we’ll add phpMyAdmin to it.
Create the docker-compose.yml file. I made this part like a test again, so you can see where you have knowledge holes, replace all __BLANK__ with the correct answer (Solutions are here):
(This docker-compose.yml has been taken from https://www.digitalocean.com/community/tutorials/how-to-install-wordpress-and-phpmyadmin-with-docker-compose-on-ubuntu-14-04)
database:
  image: sameersbn/mysql:latest
  environment:
    DB_NAME: wordpress
    DB_USER: wordpress
    DB_PASS: wordpress
    DB_REMOTE_ROOT_NAME: root
    DB_REMOTE_ROOT_PASS: workshop
  volumes:
    - "/opt/docker/database:/var/lib/mysql:rw"
# wordpress image configuration see https://hub.docker.com/_/wordpress/
wordpress:
  image: wordpress
  links:
    - __BLANK__:mysql
  ports:
    - 8080:80
  environment:
    WORDPRESS_DB_HOST: __BLANK__:3306
    WORDPRESS_DB_NAME: __BLANK__
    WORDPRESS_DB_USER: __BLANK__
    WORDPRESS_DB_PASSWORD: __BLANK__
    WORDPRESS_AUTH_KEY: SECURE_AUTH_KEY
    WORDPRESS_LOGGED_IN_KEY: SECURE_LOGGED_IN_KEY
    WORDPRESS_AUTH_SALT: SECURE_AUTH_SALT
    WORDPRESS_LOGGED_IN_SALT: SECURE_LOGGED_IN_SALT
# phpmyadmin image configuration see https://hub.docker.com/r/phpmyadmin/phpmyadmin/
phpmyadmin:
  image: phpmyadmin/phpmyadmin
  links:
    - mysql:database
  ports:
    - 8181:80
  environment:
    PMA_HOST: mysql
    PMA_USER: root
    PMA_PASSWORD: workshop
WDWD
database:- Name of the container.image:- Defines the used image for the container.links: []- A list of container links.ports: []- A list of published ports.environment: []- “Hash” list of environment variables (Format:NAME: VALUE).
I have also added the environment variables DB_REMOTE_ROOT_NAME and DB_REMOTE_ROOT_PASS, so that Admin can access the MySQL server.
Starting our multi container applications with one command
TASK:
compose101
To “run”/start the content of our docker-compose.yml, we run:
docker-compose -f DOCKER_COMPOSE_YML up
WDWD
docker-compose- Thedocker-composecommand.-f DOCKER_COMPOSE_YML- Optional. Defaults todocker-compose.yml.DOCKER_COMPOSE_YMLis a path to a validdocker-composefile.up- Starts the containers defined in the given docker-compose file. Expected Output
After running the command, you should see log output starting to fill your terminal. To stop the started containers press CTRL+C.
For running the containers detached in the background, you use the same option as for Docker, the --detach (or -d) option.
Basic docker-compose commands
There are some docker-compose commands you should know when working with the docker-compose command.
Stopping all containers run by the current docker-compose file
Instead of the up, you just put stop there. Stops the containers from the current docker-compose file.
docker-compose stop -t TIMEOUT
WDWD
stop- Stop subcommand.-t TIMEOUT- Optional. Timeout to wait for the containers, before the containers get killed.
Deleting all containers run by the current docker-compose file
Replacing the up with rm, deletes all containers that are started by the current docker-compose file, but now are stopped or exited.
docker-compose -f DOCKER_COMPOSE_YML rm -f
WDWD
rm- “Subcommand” for removing/deleting all container started by the current selecteddocker-composefile.-f- Optional. Forces the removal of the containers.
Restarting all container started by the current docker-compose file
Restarts all containers that are started or have exited by the current docker-compose file.
This just stops and starts the containers again and not stops, deletes and runs the containers again.
docker-compose -f DOCKER_COMPOSE_YML restart
WDWD
restart- “Subcommand” for removing/deleting all container started by the current selecteddocker-composefile.
Let’s play more with docker-compose!
TASK:
compose202The task contains otherdocker-compose.ymls for you to play around with. Look at thedocker-compose.ymls and start them. Just play around withdocker-composea bit.TIP
Keep the
-f DOCKERFILEoption in mind, when dealing with multipledocker-compose.yml’s in one folder.
Summary of these sections
We can now write basic docker-compose.ymls. We can now start a multi container application with one single command.
Orchestration Tools
The right tool for the right workload. Keep that in mind or you’ll have problems soon.
A wild Docker Swarm appeared. Kubernetes used rolling-update. It was very effective.
The choice of the orchestration tool, depends on many factors:
- Workloads you’ll handle (how many containers will be run?)
- How many servers?
My favorite choice is Kubernetes, easy to use, developed by Google (one of the largest and longest container users) and now with the latest updates, can scale up to 1000+ nodes. I like Kubernetes more, because it offers a rolling-update feature. Allowing you to update your application Pod by Pod.
That’s not the only reason, but one of the biggest why.
Other Orchestration Tools
Kubessar - Glossar but for Kubernetes
Like a glossar, but for Kubernetes stuff.
I highly recommend you to look through my Kubernetes presentation to get to know Kubernetes a bit better, before starting to work with it. Please note, that the presentation is written in german.
Namespace
Separation of resources. Allowing for quotas per namespace.
When not specifying a namespace, the default namespace will be used.
Pod (po)
A set of one or more containers.
Replication Controller (rc)
A ReplicationController ensures that there are always the specific number of replica of a given Pod.
Service (svc)
Exposed ports of one or multiple pods. The access to the port(s) is “loadbalanced” using iptables. A service also creates a A and SRV DNS record, when using the kubedns Pod.
Other “Objects”
- kubeclt Files - “Deployment” files for “objects” of Kubernetes. Can be “deployed”/run/executed using the
kubectlcommand. - ResourceQuotas - Resource quotas for a namespace.
Kubernetes
Kubernetes Logo
Kubernetes Features
The iptables rules will blow your mind
If you have already worked with the basics of iptables, this will blow your mind, a lot more is possible with iptables than you thought.
You have some Network Volumes?
No problem, Kubernetes allows you to specify volumes that are network volumes and mount them by a simple name. You could even use the volume claim system. Where a Pod just says, I need X GB storage and Kubernetes does the rest for you.
(As long as the specific mount binaries are installed on every server, this will work with no problems)
And there are even more features!
- Loadbalanceing for L4 and L7
- L7 https termination
- Autoscaling of Replication Controller
- And more features already there and to come
kubectl - Our tool to deploy them all
The Basics of kubectl
The kubectl command is used to create new “objects”, view Pods, ReplicationController and all other available objects in Kubernetes.
List objects
To view all Pods in all namespaces.
kubectl get --all-namespaces pods
WDWD
kubectl- The kubectl command.get- Get “objects” from kubernetes API.--all-namespaces- Show objects from all namespaces.pods- Show only pods (Can be a comma seperated list of types, short forms are available).
Gather information about one or more object(s)
Get informations about one or more object(s).
kubectl describe --namespace=NAMESPACE TYPE/NAME (TYPE/NAME ...)
WDWD
describe- Call the describe routines.--namespace=NAMESPACE- Set namespace to search in (optional when set through kubeconfig file).TYPE- The type of objects to show. For examplepod,rc(for replication controller).NAME- Name of the object to show. For our WordPress Pod, would bewordpress.
Create one or more object(s)
To deploy/execute a “kubectl” file, we use the create subcommand.
kubectl create -f FILE_NAME
WDWD
create- Creates an object.-f FILE_NAME- Can be one file, a directory or-for stdin. When a directory is specified, files are read in alphabetical order.
Delete one or more object(s)
To stop/delete one or more object(s), there’s the delete subcommand.
kubectl delete -f FILE_NAME
WDWD
delete- Deletes specified object(s).-f FILE_NAME- Can be one file, a directory or-for stdin. When a directory is specified, files are read in alphabetical order.
Or
kubectl delete TYPE/NAME (TYPE/NAME ...)
WDWD
delete- Deletes specified object(s).TYPE- The type of objects to show. For examplepod,rc(for replication controller).NAME- Name of the object to show. For our WordPress Pod, would bewordpress.
Execute command inside a Pod’s container
Using the exec subcommand, with almost the same syntax as docker exec.
kubectl exec POD_NAME OPTIONS (-c CONTAINER_NAME) COMMAND
WDWD
exec- Deletes specified object(s).NAME- Name of the object to show. For our WordPress Pod, would bewordpress.OPTIONS- For example-ifor interactive, see the help menu for more information.-c CONTAINER_NAME- Optional. If the specified pod has more than one container, then it is required.COMMAND- The command to run inside the container.
View the logs of a Pod’s container
The logs subcommand, has almost the same syntax as docker logs.
kubectl logs OPTIONS POD_NAME (-c CONTAINER_NAME) COMMAND
WDWD
exec- Deletes specified object(s).OPTIONS- For example-ffor follow the output, see the help menu for more information.NAME- Name of the object to show. For our WordPress Pod, would bewordpress.-c CONTAINER_NAME- Optional. If the specified pod has more than one container, then it is required.
Advanced kubectl usage
Update the Pods of a Replication Controller during runtime
The rolling-update subcommand allows to stop one pod after another and replace it with a new instace of the pod.
kubectl rolling-update REPLICATION -f FILE_NAME
WDWD
rolling-update- Rolling update subcommand.REPLICATION- The ReplicationController to update with the givenFILE_NAME.-f FILE_NAME- Name of the updated ReplicationController file. Can be one file, a directory or-for stdin. When a directory is specified, files are read in alphabetical order.
Scaling running Replication Controller
The scale subcommand gives you control over the size of running ReplicationController.
kubectl scale
WDWD
scale- Scale subcommand.--replicas=X- Set the given ReplicationController to X replicas.-f FILE_NAMEorreplicationcontrollers FOO- Name of the ReplicationController to scale. Can be just the name or one file, a directory or-for stdin. When a directory is specified, files are read in alphabetical order.
Deploy your own Kubernetes cluster
Follow these simple steps and get a Kubernetes cluster up and running fast.
Install Ansible
If you use the provided Virtual Box, this step is not needed!
The package
python-netaddralso needs to be installed on the client. Don’t forget to install it!!
Please refer to the official Ansible Installation Docs on how to install Ansible on your machine.
- For ArchLinux: Ansible Docs
- For Debian: Ansible Docs
- For CentOS: Ansible Docs
Create the cluster inventory file for the deployment
TASK:
kubernetes202
Enter the task directory and look for a directory called ansible/.
Create a file called inventory, in this folder. This file will contain the list/inventory of the servers.
You create one line per server in the format below (username and password are valid for the provided vm, change to suit your environment):
[masters]
# In most cases the first "server"
SERVER_IP_ADDRESS:SSH_PORT ansible_user=docker ansible_ssh_pass=docker ansible_become_pass=docker

[etcd]
#Add all the node servers here
SERVER_IP_ADDRESS:SSH_PORT ansible_user=docker ansible_ssh_pass=docker ansible_become_pass=docker
[...]
SERVER_IP_ADDRESS:SSH_PORT ansible_user=docker ansible_ssh_pass=docker ansible_become_pass=docker

[nodes]
# This can include the master server and the etcd servers too
SERVER_IP_ADDRESS:SSH_PORT ansible_user=workshop ansible_ssh_pass=workshop ansible_become_pass=workshop
[...]
SERVER_IP_ADDRESS:SSH_PORT ansible_user=workshop ansible_ssh_pass=workshop ansible_become_pass=workshop
WDWD
[GROUP_NAME]- Specifies a server/inventory group.SERVER_IP_ADDRESS:SSH_PORT-SSH_PORTis optional. A hostname or ip address the server is reachable.ansible_user- Specifies the SSH username to login with.ansible_ssh_pass- SSH user password.ansible_become_pass- The sudo (default) password.
If you have created your inventory properly, run ./setup.sh --syntax-check to check for any syntax errors.
No syntax errors? Let’s deploy the cluster!
Deploying the Kubernetes cluster
TASK:
kubernetes202The servers must have thepythonandpython-netaddrpackage installed!
Before you continue, enter the task kubernetes202 directory. Execute the bash prepare.sh script. The script will download and setup all files required for the deployment of the cluster.
If the script exits with an error, please get in touch with me (It should normally not exit with an error).
Go into the kubernetes/contrib/ansible directory and execute the ./setup.sh with the following argument -vvvv (-vvvv is for verbose output), this will setup Kubernetes on the machines in the inventory.
When you have done everything correct, it should go through without any errors.
After the deployment, please wait up to 10 minutes before continuing.
This waiting time is for giving the Kubernetes cluster some time to download all required images and start all kube-system containers.
If you want to be 100% safe, wait up to 15 minutes. Thanks!
After you have waited some time, please power cycle server after server.
Summary of the Kubernetes deployment
We now have a working Kubernetes cluster (DON’T use this setup in production though! There is more work required to make it secure for production use.).
We are now ready to deploy objects/containers on to our Kubernetes cluster. :)
Test the Kubernetes cluster health
TASK:
kubernetes101
In the task kubernetes101 directory is a file called busybox.yaml. We will now deploy this file onto our cluster.
The file looks like this:
apiVersion: v1
kind: Pod
metadata:
  name: busybox
  namespace: default
spec:
  containers:
  - image: busybox
    command:
      - sleep
      - "3600"
    imagePullPolicy: IfNotPresent
    name: busybox
  restartPolicy: Always
The syntax of a “kubectl” file, is similar to the syntax of docker-compose files. It should get clear when you look at some other examples.
Connect to the Kubernetes master server. Create the busybox container by running the busybox.yaml file, wait some seconds and then run the following command:
kubectl exec busybox -- nslookup kubernetes
The output should look like this:
Example Output
If the output shows an error, something went wrong, please contact me.
No errors? Good move on to the next section.
Take a look at the pre-installed kube-system containers
Open a ssh tunnel, to the Kubernetes master:
ssh -L 8080:127.0.0.1:8080 -fN SERVER_IP_ADDRESS_HERE
Open your browser and navigate to http://127.0.0.1:8080/. Welcome to the Kubernetes API!
NOTE You can close the ssh tunnel, by simply killing the ssh tunnel process. You can find it using
ps ax
Kubernetes own Dashboard
Navigate to http://127.0.0.1:8080/ui and look around in the dashboard.
Example Output
In the above picture, I have already some ReplicationController running on the cluster.
The above picture shows the overview page of the
kube-dns-v11replication controller in thekube-systemnamespace.
Just navigate around in the dashboard and see for yourself what you can do.
Monitoring the nodes and containers (with Heapster and Grafana)
Navigate to http://127.0.0.1:8080/api/v1/proxy/namespaces/kube-system/services/monitoring-grafana/.
Overview over the first workshop node usage.
Overview over Pod
monitoring-influxdb-grafanain namespacekube-system.
Basic monitoring of the cluster nodes, out of the box. You can see data for your cluster nodes, down to every single Pod.
Grafana may not work from the begining, but you can easily fix this by changing the data source to type direct and the url to:
http://127.0.0.1:8080/api/v1/proxy/namespaces/kube-system/services/monitoring-influxdb:api/
All Container logs in one place with an ELK stack
Navigate to http://127.0.0.1:8080/api/v1/proxy/namespaces/kube-system/services/kibana-logging/.
After you have created the default index in the formular, you should see the Kibana interface.
The “homepage” of the Kibana running on top of your Kubernetes cluster. NOTE It could happen, that the Kibana is a bit slow, that is just because you are not running on real server hardware or fast VM hosts.
You can try searching for specific logs or create visualizations.
Deployments with Kubernetes
The kubectl utility allows us to create objects, in this section I’m going to cover how you can create “deployment” files for Kubernetes objects.
BusyBox Pod Example
TASK:
kubernetes303
You have already seen this example, but here again with explanations:
apiVersion: v1
kind: Pod
metadata:
  name: busybox
  namespace: default
spec:
  containers:
  - image: busybox
    command:
      - sleep
      - "3600"
    imagePullPolicy: IfNotPresent
    name: busybox
  restartPolicy: Always
WDWD
apiVersion: v1- Sets the API version to use.kind: Pod- Sets the type/kind of the “obejct”.metadata: []- A list of metadata information, like what name or namespace to use.spec: []- A list of “specifications”. In this case containing a list of containers.- Container part see below.
restartPolicy: Always- Restart policy. In this case the pod always restarts, until deleted.
- image: busybox
  command:
    - sleep
    - "3600"
  imagePullPolicy: IfNotPresent
  name: busybox
WDWD
- image: busybox- Use the busybox image. The-(minus) begins the list entry.command: []- The command to run in the container (not the entrypoint).imagePullPolicy: IfNotPresent- The image pull policy.name: busybox- The name of the container of the pod.
Most things are seem similar but different to docker-compose.ymls, but if you know the basic syntax differences you should be good to go.
WordPress and MySQL Pod Example
See the file wordpress-mysql/wordpress-mysql-all-in-one.yaml.
This code block only contains the pods, not the services.
apiVersion: v1
# Service object
kind: Service
metadata:
  labels:
    name: mysql
  name: mysql
spec:
  ports:
    # the port that this service should serve on
    - port: 3306
  # label keys and values that must match in order to receive traffic for this service
  selector:
    # select pods with the name "mysql"
    name: mysql
---
# Kubernetes API version
apiVersion: v1
# Type of "request" in this case a Pod
kind: Pod
# Metadata of the "object"
metadata:
  # Name of the "object"
  name: mysql
  # Labels of the "object"
  labels:
    # A lable named "name" with value "mysql"
    name: mysql
# spec ~= Specificationsof the "object"
spec:
  # List of Container definitions
  containers:
    # The "name"/"suffix" of the container name
    - name: mysql
      # What Docker image to use
      image: sameersbn/mysql:latest
      env:
        - name: DB_NAME
          value: wordpress
        - name: DB_USER
          value: wordpress
        - name: DB_PASS
          value: wordpress
      # List of container ports reachable from within the cluster
      ports:
        - containerPort: 3306
          name: mysql
---
apiVersion: v1
# Service object
kind: Service
metadata:
  # labels for the service
  labels:
    name: wordpress
  # name of the service
  name: wordpress
spec:
  ports:
    # the port that this service should serve on
    - port: 80
  # label keys and values that must match in order to receive traffic for this service
  selector:
    # select pods with the name "wordpress"
    name: wordpress
---
# Kubernetes API version
apiVersion: v1
# Type of "request"
kind: Pod
# Metadata of the "object"
metadata:
  # Name of the "object"
  name: wordpress
  # Labels of the "object"
  labels:
    # A lable named "name" with value "wordpress"
    name: wordpress
# spec ~= Specifications of the "object"
spec:
  # List of Container definitions
  containers:
    # What Docker image to use
    - image: wordpress
      # The "name"/"suffix" of the container name
      name: wordpress
      # List of environment variables
      env:
        - name: WORDPRESS_DB_HOST
          value: mysql.default:3306
        - name: WORDPRESS_DB_NAME
          value: wordpress
        - name: WORDPRESS_DB_USER
          value: wordpress
        - name: WORDPRESS_DB_PASSWORD
          value: wordpress
        - name: WORDPRESS_AUTH_KEY
          value: SECURE_AUTH_KEY
        - name: WORDPRESS_LOGGED_IN_KEY
          value: SECURE_LOGGED_IN_KEY
        - name: WORDPRESS_AUTH_SALT
          value: SECURE_AUTH_SALT
        - name: WORDPRESS_LOGGED_IN_SALT
          value: SECURE_LOGGED_IN_SALT
      # List of ports to "publish"
      ports:
        # ContainerPort exposes only to the inside of your network, not to the outside
        # To reach the container we create a cluster wide service
        - containerPort: 80
          # gives the port a name
          name: wordpress
You can see that the syntax is similar to the syntax of docker-compose. It has it’s differences, for example the environment variables, but all in all it is similar.
The big difference to docker-compose is that there is more around the container “defintions”. In docker-compose we “only” have containers, no services, replication controller and other objects.
Your turn, let’s deploy the Guestbook application
Run the Guestbook
TASK:
kubernetes303
Enter the guestbook/ directory and kubectl create/“run” the guestbook-all-in-one.yaml file.
For the forgetful, this is how you create/“run” the file:
kubectl create -f guestbook-all-in-one.yaml
Expected Output
This will start all services and replication controller that are required by the guestbook application.
Test the Guestbook
To reach the guestbook, navigate to http://127.0.0.1:8080/api/v1/proxy/namespaces/default/services/frontend.
The guestbook app just started, so there are no entries yet.
Now with some entries added.
Now add some entries on your own, then move on to the next section.
Shutdown one node
Please shutdown one node only, if you have less than five nodes. Thanks! And don’t shutdown the master server, without a replicated master setup not much will work then.
Et voilà, the application is still up, running and reachable. Kubernetes is going to create new instances of the lost containers from the node.
Best would be to just reboot and not shutdown the server/VM. Kubernetes has no problem restarting the containers on other servers, but when running with low resources it is the best to keep the “downtime” low.
Write your own “deployment files”
As you have already seen some Kubernetes “deployment” files in this Deployments with Kubernetes section. We are now going deeper into this topic. To be exact we are now writing our own Kubernetes “deployment” files.
WordPress + MySQL - WIP
Details about a deploying WordPress with MySQL to Kubernetes can be found here: https://github.com/kubernetes/kubernetes/tree/release-1.4/examples/mysql-wordpress-pd
NOTE
The link above uses PDs (PersistentDisks) (too. Replace the part with the PDs (PersistentDisks) with hostdirs.
Have fun with your Kubernetes cluster!
Now you can continue to play around with your Kubernetes cluster. Deploy other applications, if you need help please contact me.
If you want to stop the Kubernetes cluster, please stop all nodes at the same time! Not stopping them at the same time, causes the services required to run the cluster to desync and causes fatal errors.
The End
If you are reading this, you have made it to the end. Well done, sir or madame! Have a cookie on my cap.
Solutions for “Tests”
nginx Dockerfile
FROM debian:jessie

RUN apt-get update && apt-get install -y nginx

ENTRYPOINT ["nginx"]
WordPress and MySQL docker-compose.yml
# Taken from https://www.digitalocean.com/community/tutorials/how-to-install-wordpress-and-phpmyadmin-with-docker-compose-on-ubuntu-14-04
database:
  image: sameersbn/mysql:latest
  environment:
    DB_NAME: wordpress
    DB_USER: wordpress
    DB_PASS: wordpress
  volumes:
    - "/opt/docker/database:/var/lib/mysql:rw"
wordpress:
  image: wordpress
  links:
    - mysql:database
  ports:
    - 8080:80
  environment:
    WORDPRESS_DB_HOST: mysql:3306
    WORDPRESS_DB_NAME: wordpress
    WORDPRESS_DB_USER: wordpress
    WORDPRESS_DB_PASSWORD: wordpress
    WORDPRESS_AUTH_KEY: SECURE_AUTH_KEY
    WORDPRESS_LOGGED_IN_KEY: SECURE_LOGGED_IN_KEY
    WORDPRESS_AUTH_SALT: SECURE_AUTH_SALT
    WORDPRESS_LOGGED_IN_SALT: SECURE_LOGGED_IN_SALT
phpmyadmin:
  image: phpmyadmin/phpmyadmin
  links:
    - mysql:database
  ports:
    - 8181:80
  environment:
    PMA_HOST: mysql
    PMA_USER: root
    PMA_PASSWORD: workshop